I did it! DIY glue ons after farrier trims

Update: y’all were right that the shod feet needed help. I pulled the shoes last round and hoo buddy we have some work to do. He’s ouchy a bit on the bare feet, but his feet are MASSIVE (lots of flare all the way around) and won’t fit into any of my boots. I’m going to try to rasp some and tidy him up a bit. I’ll bring my biggest size of boots out and see if we can get him comfy while I figure out what to do.

It’s wild to me how the back feet, which have been bare this whole time, look like they were done by a completely different person. I know the farrier probably didn’t trim much since we were pulling shoes, but the fronts have lots of wall that’s separating from the rest of the foot and could be trimmed off without changing the weight bearing surface much at all.

2 Likes

Would love to see updated pics if you have the chance! Happy to be a resource in whatever way I can.

Probably a few different things at play with the wild difference in fronts vs hinds–farrier likely does a much different trim to apply a shoe, and the way he fit those shoes is just…oof. Then with having the shoes on, there’s no natural wear to help exfoliate some of the extra crap. With a farrier that routinely doesn’t take enough foot (never thought I’d type those words lol), fits shoes super full to the toe, and a horse that grows a lot of foot…well that’s a recipe for some wonky stuff hiding under shoes and pads.

Good luck with your boy!! He’s so lucky to have you.

1 Like

Will do! He had a weird swelling/muscle knot in his neck that had me distracted, as I’d meant to get pics but got side tracked. Will try again tomorrow.

I’m learning a lot - my biggest struggle will be determining the difference between live and dead sole, in case my farrier isn’t taking enough out. The younger horse has super flat feet so despite having tall heels, there’s nowhere to lower them to. This older guy has lots of concavity (jury is out on whether that’s good or bad) so I think it should be easy to roll his toes and lightly rasp his heels back without setting him down on his sole.

Anyways, side tracked. I really think glue on shoes may be in his future, but we shall see!

Don’t focus so much on the sole. Having some extra sole is not that bad a lot of the time. (Where I live it is very hard, and so farriers tend to be pretty conservative taking sole off). If the sole is ready to shed, you can take it off with a hoof pick. What you don’t want is to forget to trim the bars properly, which sometimes happens when the sole trim is conservative. And the heels get taken down by taking them back to the widest point of the frog. It is still trimming those walls down. Doesn’t have much to do with sole. There isn’t really any sole there to speak of. There’s the pointy shape to the heels and then from there forward next to the frog you have the bars. Too much retained sole in the form of a toe callus might keep you from trimming the toes enough if you don’t take some of that sole with it. Not so much with the heels really. Although what you might be seeing are heels that are so run forward away from the widest part of the foot with a prolapsed rear foot that it looks like the heels are on the same plane as the sole. But you still trim them back not down. There are plenty of good and bad trimming videos out there you can watch to educate yourself on. For some reason, Facebook has been showing me a lot of bad ones lately (I was Google searching for farrier supplies recently), but the comments are worth it :joy:.

1 Like

I’ll have to get pics of Mr Flat Foot - I think the illusion is created by his entire lack of frog tissue. There’s deep collateral grooves, but I’d be carving out sole to go any lower/farther back with his heels. I think.

The older guy is simpler - it’s very clear where there’s extra wall/bar/heel material!

1 Like

It would help if you took X-rays.

On the docket to coincide with spring shots. Farrier didn’t think they were necessary but I want them

2 Likes

These are some really good resources to wrap your head around IMO, the whole site is a wealth of knowledge (you may already have read them!): https://www.hoofrehab.com/HeelHeight.html and https://www.hoofrehab.com/HorsesSole.html

I try to be very, very conservative about trimming soles and to a lesser extent heels. I’m not a huge fan of the adage to take heels down to the widest part of the frog–that ends up gutting the heels in a lot of horses, especially those with compromised caudal feet to begin with. I fought post-trim soreness and chronic run-forward heels a lot when I was following advice to trim them back to the widest point (it crippled the horse I posted above–I had to be very aggressive with the toe and infuriatingly conservative with the heels to get to where those pictures are). You do start to get a feel for what will work with your horse(s) as you go. IME it’s rare, particularly in Thoroughbreds with not-the-best feet, to end up with so much sole that paring out “dead” sole is necessary. It will let go when it’s ready. I agree that sometimes while trimming super run-forward toes, however, you might need to rasp a bit into the sole plane because the sole has been stretched forward by the long toe. I’ll try to find some pictures of where I’ve had to do this.

I agree that rads if you can afford them are always a good tool to have!

3 Likes

Agree, not sure when that became the gold standard. The ELPO protocol teaches to trim to X height about the true seat of corn, meaning you do need to scrape out enough exfoliating sole there to find the live sole back there. 1, maybe 2 credit cards’ height works for the vast majority if horses. The heels then end up wherever they end up relative to the wide part of the frog

Finding the live sole at 10 and 2 gives you landmarks for overall wall height as well, and alter it based on the horse’s needs

I have one who is happiest when ALL dead sole is taken out, and bars taken way down. And I have one who I always leave some dead sole other than the above points.

3 Likes

Here’s the older one’s fronts fresh from the farrier. The one I just pulled shoes off - pardon the wet feet and single view, the flies and chickens were out in FULL FORCE today. He’s not standing completely on his heel bulbs, but it’s close.

I need a new rasp. And a stand. I plan to only rasp and use a hoof knife sparingly, but my back cannot stand under the horse for long! I can see why people use angle grinders when they get really good - I feel like my rasp never takes much off because I’m also having to protect my back and hold the foot up!

1 Like

I hear you about trimming being hard on your back! I’ve been guilty of getting on one knee or using a stool for the ones I know are generally good eggs. Not the safest choice, which I own, but it saves my back.

A hoof jack/stand would be a very good tool–personally, my ankles are shot so I can’t hold feet between my legs. I need them to cooperate with a hoof jack to some extent, and I can use the hand not holding a rasp to gently brace the foot. You’ll find the easiest way that works with your conformation in time.

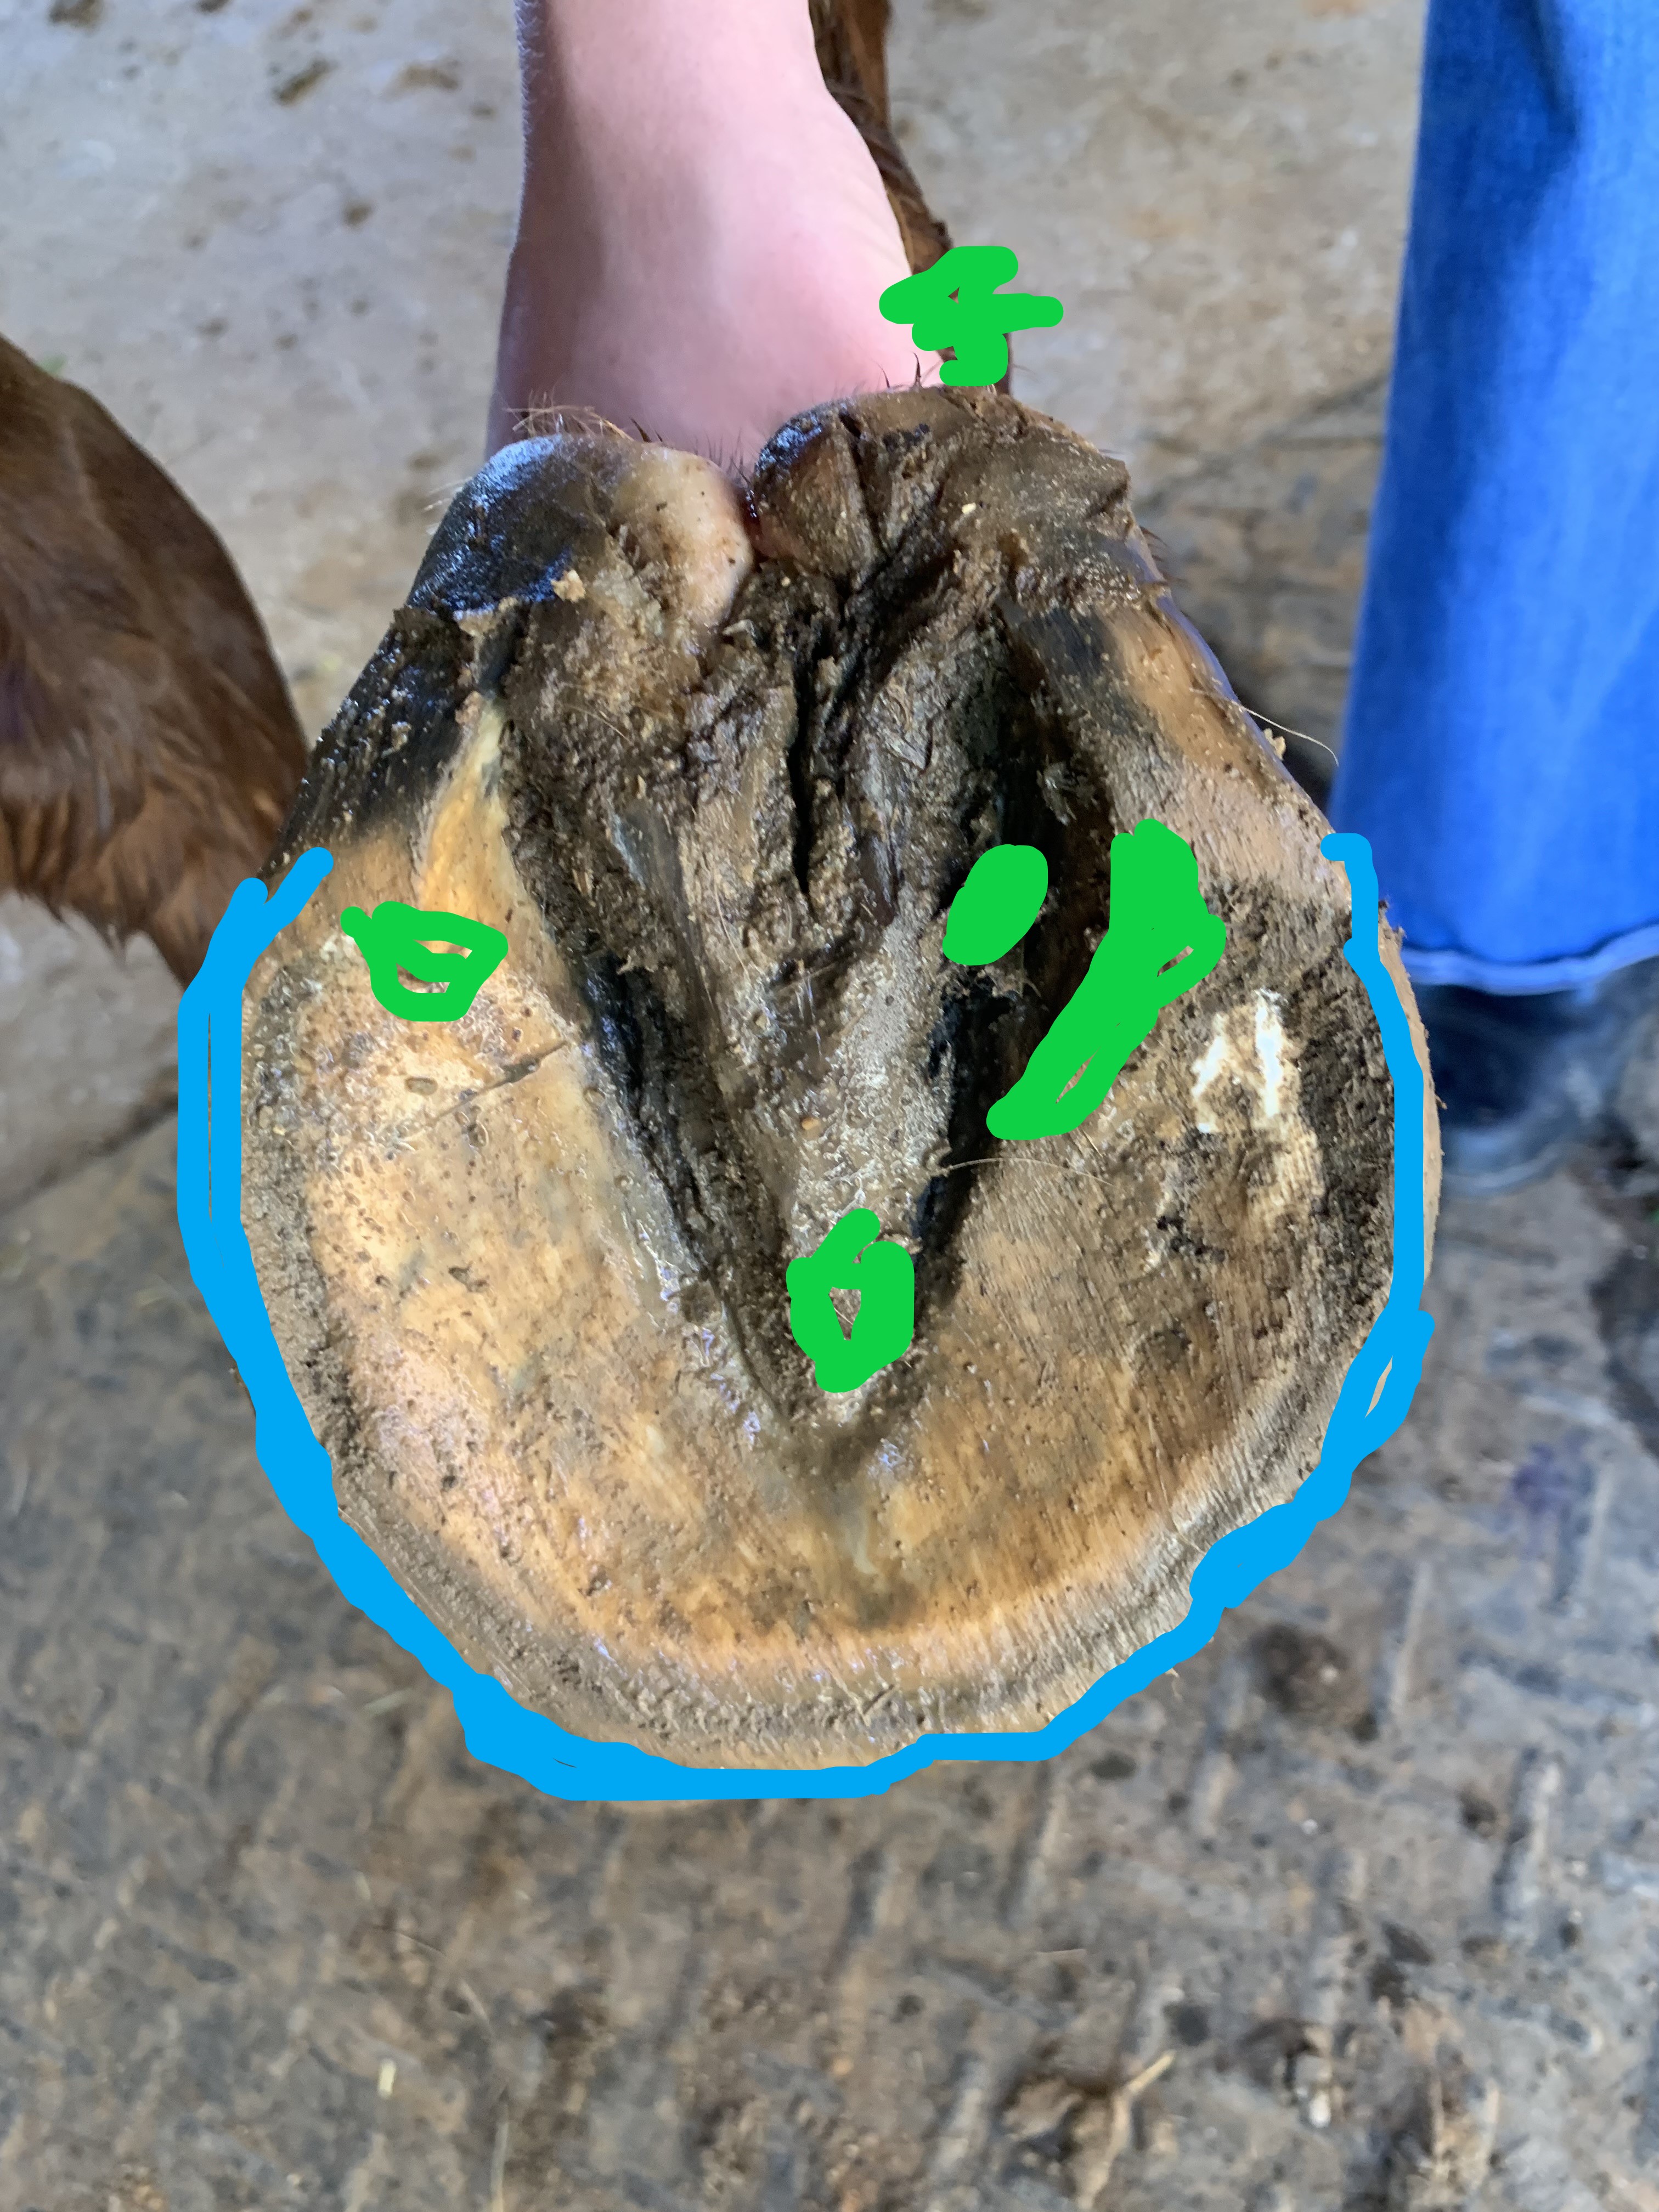
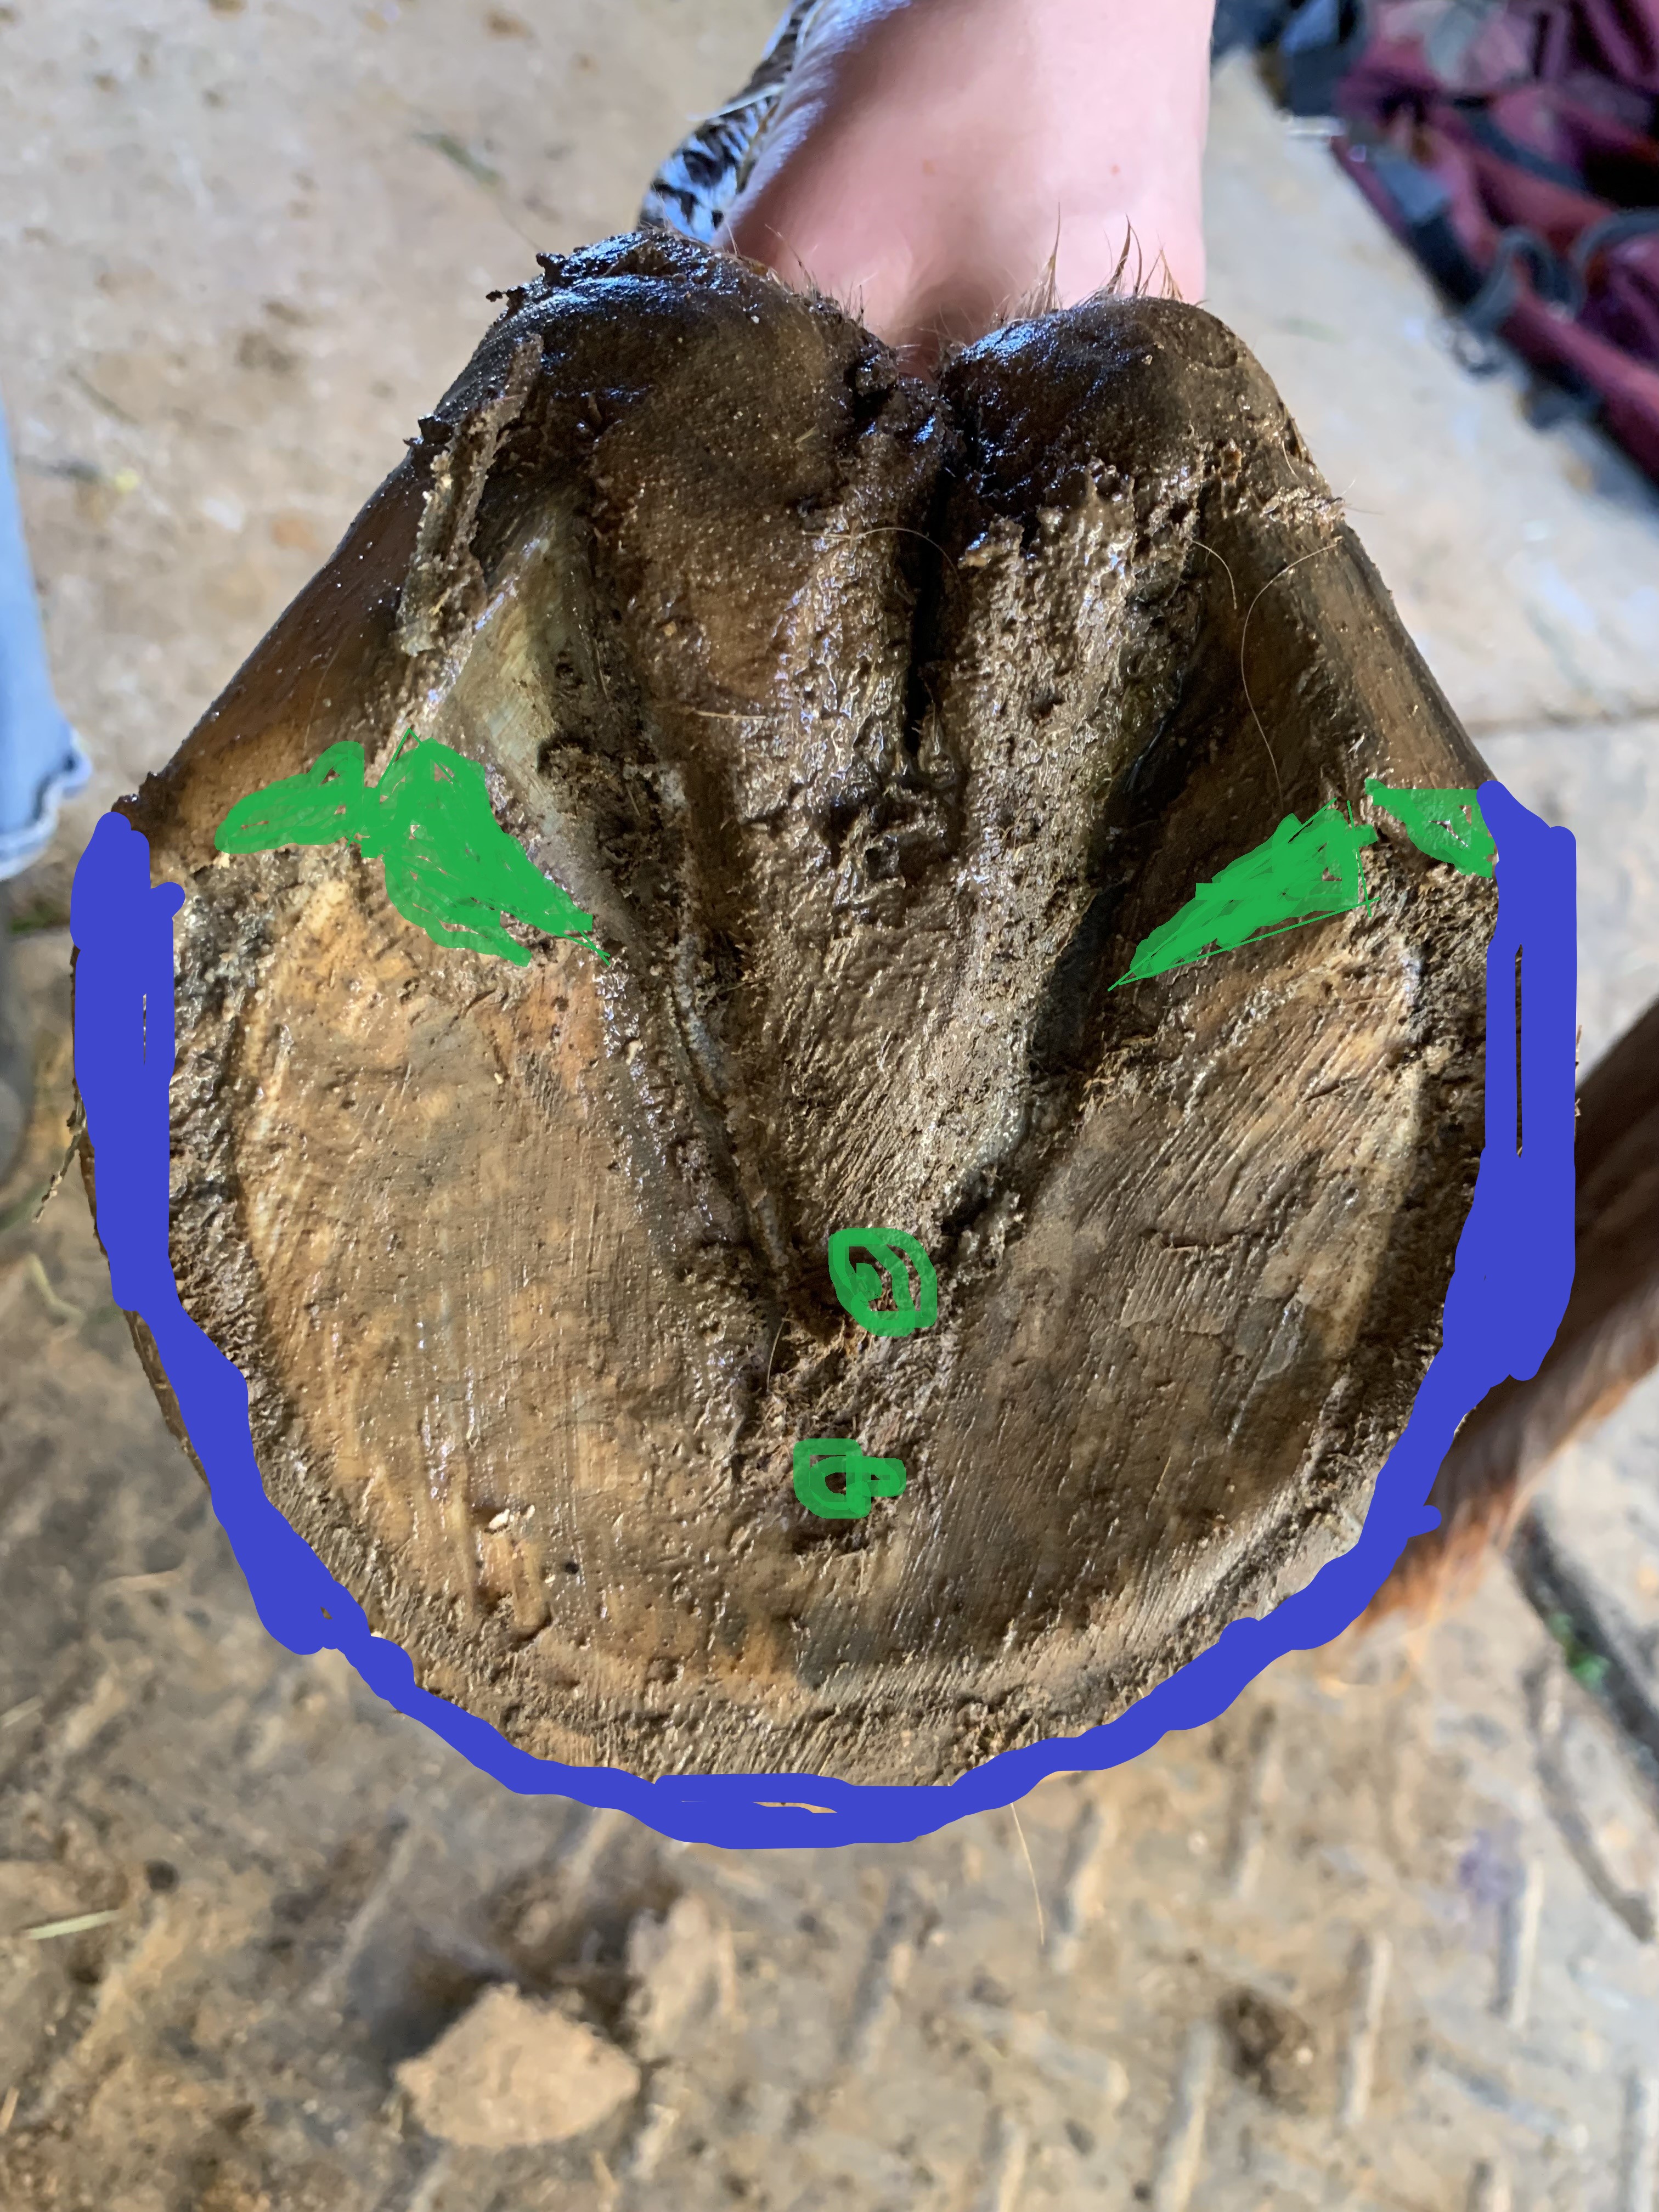
What brand of rasp do you have available to you? I started out with a Heller Red Tang, but have switched to Save Edge (they might be out of business now, I’m not sure) and now ultimately a Bellota Top Sharp. I do also have an angle grinder that is a lifesaver on some of the big lugs I trim! I also really like my little bonsai nippers for trimming frogs, bars, and heels. I’d use them here to clean up the bars a bit and lightly trim some of the heel back. I’ll see if I can doodle on the pictures to show where I’d use them.

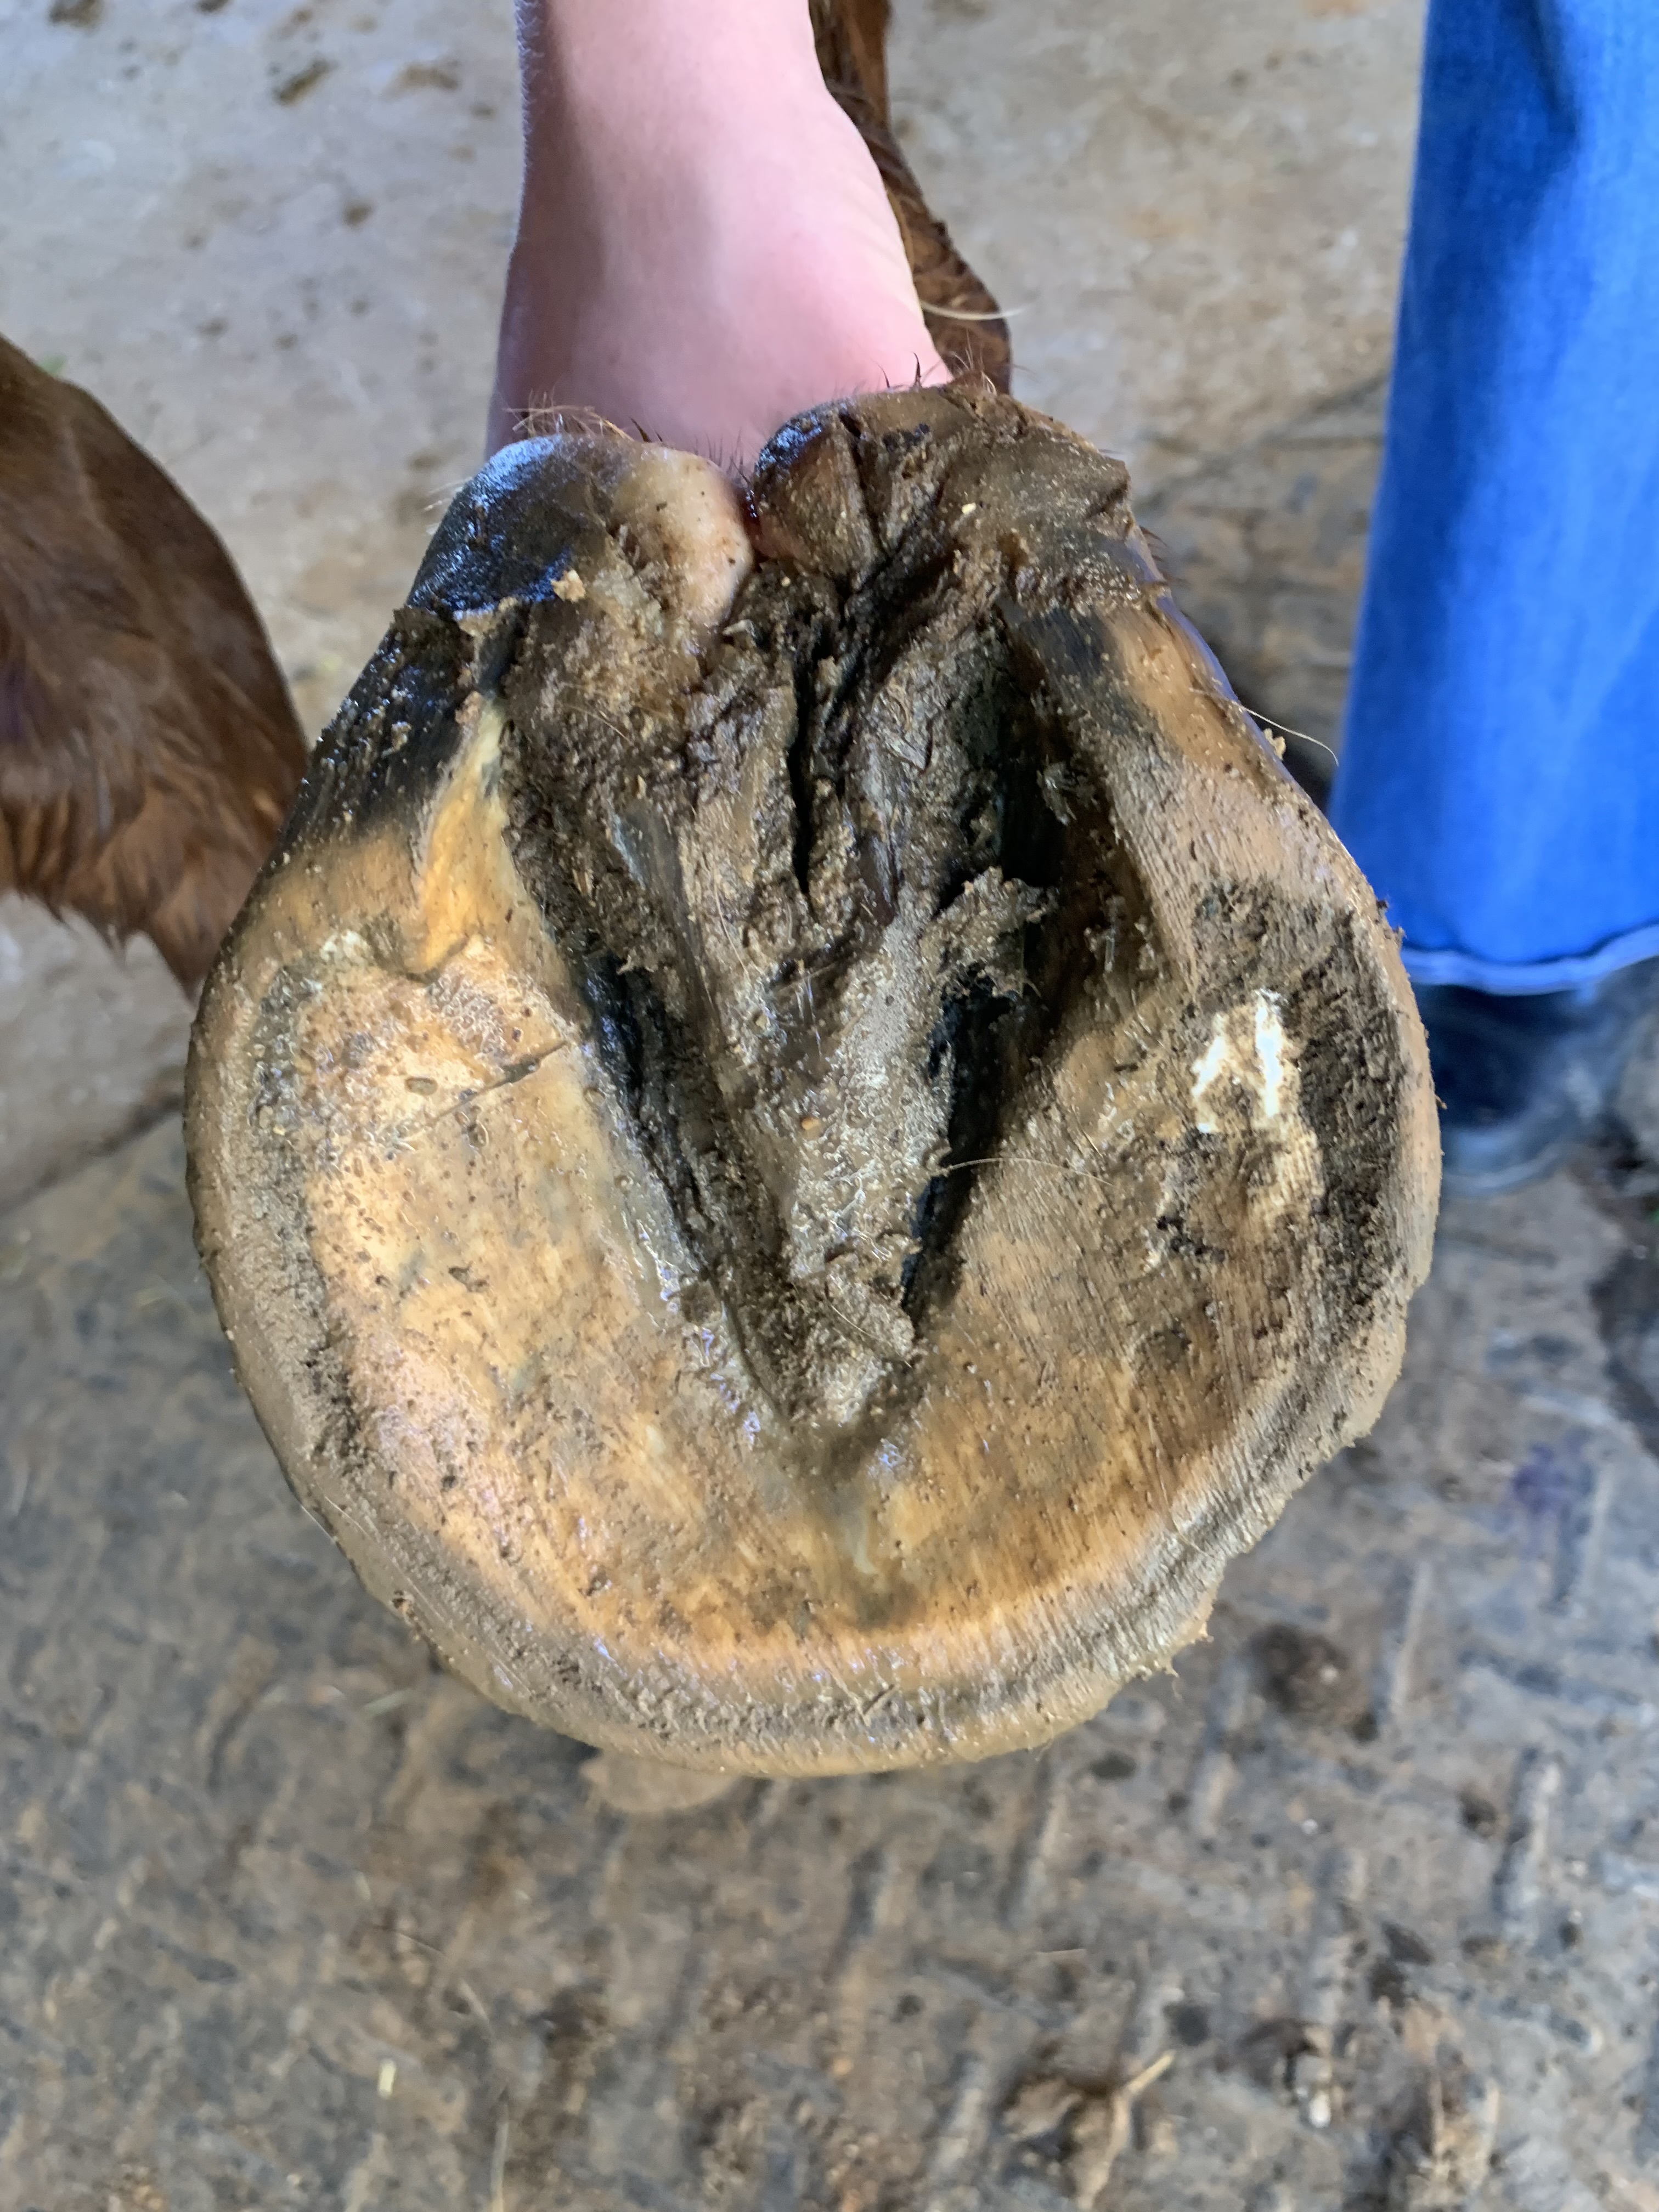
Good/bad news, in the photos the wall separation doesn’t look as bad as I expected :sweat_smile: If you can get your hands on a hoofjack, or can comfortably draw the foot forward against your thigh, I would probably try trimming some of this from the top. Especially while he transitions, you don’t necessarily want to take height, but you do want to bevel the walls. I’ve found sometimes this is easier to accomplish from the top because you can put a bit more force into it.

Do you have something to help tackle the thrushy looking frog in the left picture?

Ugh thrush is eating both of my boys alive right now. I had some Pete’s Goo made up (desitin and athletes foot cream) but need to find a better way to administer it. And maybe order some copper sulfate. I also have some thrush buster but it has never consistently worked for me.

As far as rasps, anything at TSC or online is available to me. Rumor is we have a farrier supply store a city over… somewhere. But that would be moving heaven and earth to find time to hunt it down.

Why are hoofjacks so expensive?! My older guy will let me do pretty much whatever, but the drawing his foot forward onto my leg is guaranteed to set off my back to where I can’t ride or work. (I should probably figure out what is going on with my SI but who has time for that :laughing:). The younger one I don’t trust as he’s all over the place and still prone to slamming a foot down/arguing a bit about who owns the foot at any given moment. Aka - hoof stand.

Buy this stuff: https://shopedss.com/field-paste-750g-equine-sole-frog-dressing/

It’s like Artimud but stickier and gooier. I use it when it’s muddy AF and boggy and I’ve seen it last a week in the most important parts of the foot in truly atrocious conditions. Clean foot, spray with 50/50 ACV and water or other thrush spray (the sole cleanse is good, but apple cider vinegar and water are cheap and easily accessible), dry as best as you can, then slather the field paste over everything with extra care to get it into collateral grooves and central sulcus and anywhere suspicious. Repeat every 3ish days. I wouldn’t use thrushbuster or copper sulfate at this point, it can further dry and irritate sensitive tissue. It kills the bugs, but it doesn’t help promote healing and regrowth of sensitive new tissue. I like Pete’s Goo but it’s a PITA for me and I like that this stuff sticks.

They have a bunch of rasps, too: https://shopedss.com/categories/Tools/Rasps-Files/

Ugh, I hear you re: the hoofjacks. I was so fortunate that my trimming mentor gifted me her extra one, but it only has the cradle attachment. One of these days I’ll buy a post attachment but just haven’t gotten around to it. The good news is they will last forever, and you can probably resell it down the line if you need to. It’s ~$200 well spent IMO, but I know it’s not chump change. I think Well-Shod sells them and they $10 flat rate shipping so you won’t get hit with an oversize charge: https://www.well-shod.com/HOOFJACK-STANDARD-RED

1 Like

IDK, but they are worth it. I’ve probably had mine for almost 15 years and the only thing I’ve replaced is the nylon sling for the cradle. I figure good tools pay for themselves by allowing me to take care of feet myself.

Thanks to all the contributors to this thread. I’ve been trimming my own for a long time, and am about to attempt glue-ons for the first time this week, so it’s been helpful!

3 Likes

Hoof jacks are so worth it. And I just saw a neat hack for keeping the rubber top thingie in good shape—replace it with a black Kong.

I second the suggestion to take those flares down from the top. Hoof forward on the stand, rasp at a 45 degree angle to get those flares down. You can be more aggressive with this than you think at the quarters (at least I learned that with a barefoot horse prone to flaring with guidance from my farrier). The 45 degree angle will take the flare down without just making the wall super thin (and then prone to breakage because the flare will still be there).

The heels are pretty crushed / folded over looking in addition to the whole foot being stretched forward.

2 Likes

Please forgive my Kindergarten MS paint skills…

Green is where I’d use bonsai nippers or delicate hoof knife work to bring back the bars, clear what appear to be flappy bits on the frog, and most importantly try to reveal the actual heel buttress. In the foot with the healthier-looking frog especially it looks like the heel tubules have run forward over the seat of corn. I would trim back any “hooked” material until you have a flat surface that doesn’t have anywhere you can stick a hoof pick into.

Blue is roughly where I’d bevel the wall to, particularly if I were to be applying a glue-on; when in doubt, be more conservative at first.

Cody James Diamondback rasp 100% for this. I’ve had heller and bellota as well and the Cody James stays SHARP (beware) and can take off more hoof quicker. I use the older Bellota when I feel the CJ is going to be too much. I think my CJ is a medium aggressive type.

I have bonsai nippers and hate them. Can’t seem to get my hands to get the tool to do what I want so I’ve used them less than a handful of times.

I found my hoof stand on FB marketplace for $150 which was still a decent investment but it was also brand new at a thrift shop who had no idea what it was. Keep a look out locally for one and you may pick up a good deal!

I have the Yoder aluminum hoof stand ($82 at Well Shod). I am too cheap to buy a HoofJack even though I have 4 horses to trim. :laughing: But I don’t really see a need/use for the cradle, the way I do things.

I’m a little confused though, initially you were talking about continuing to have the farrier trim and just put the shoes on yourself after a little prep. But now the discussion has kind of leaned over to more in depth trimming yourself, to some degree or other. I’d encourage you to pick one or the other, and to get your farrier’s input on doing maintenance between trims and putting these shoes on, otherwise you and the farrier will likely end up unknowingly battling each other (especially if you’re taking off heel where he thinks it should be left). And he’s likely going to notice the non-exfoliated sole and the glue remnants when he comes to trim.

Last year I played around with the versa octos on two of my horses. I had an iffy time on the horse with flared, underrun feet - better luck on the one that has better-shaped feet. Sizing can be tricky. Eventually I got fed up trying to keep them on the horse with flares and switched to nailing them on (which worked quite well). I’d say whatever shoe/glue you go with, be prepared for a somewhat steep learning curve and to throw a lot of money in the trash :rofl:

I definitely agree that something needs to be done differently with the trim on those front feet.

2 Likes

That’s still the plan!

This is just… fixing what the farrier leaves. That’s all.

ETA I’m just learning. Looking to see what the farrier does and does not want to do, plus how the horse responds. I’m not planning on going 100% DIY yet, and the glue ons are still TBD. This horse in particular has some other stuff going on, so we shall see what I do with him.

I took a scrap piece of 4x4, and toe-screwed it into a small piece of 2x10. Makeshift hoof stand.

Not perfect, but better than trying to do it with their foot across your knee.

2 Likes