
We bought an old farm with huge (16’) heavy gates that fall open when you unlatch them. This is a major problem when you’re trying to get two horses through the gate without letting the whole herd out! Short of trial and error with rehanging the gate, how do I correct this problem to have a properly balanced gate? Where can I buy a drill bit that is long enough to go all the way through a gate post?
Can you add a gate wheel to the bottom?
2 Likes
ugh I hate hate hate unbalanced gates! Huge pet peeve – my rule for gates and gate latches is that I need to be able to open, pass through, and latch all of my gates even with half a bale of hay in my arms.
To make new gate hanger holes in a post, use a flat wood boring bit, not a drill bit. Work in increments, pulling the bit outwards every few seconds to clear away the wood scrapings from the hole. An electric-powered drill is your friend for this job, but a good fresh 18v battery can get the job done too.
To restore balance in a wide gate:
First thing is to make sure the gate is well supported at the latch side of the gate, otherwise you’ll just keep getting out of balance. Use a toe block, gate wheel or a Sure-Latch to keep it from pulling the gatepost out of plumb. I LOVE the Sure-Latch gate closures and highly recommend. http://surelatch.com/gate-latches/7-lockable-two-way-latch-and-pin.html They do require a precise distance between gate and the latch post though—you can’t have a too-big or too-narrow gap. They’re really awesome, though.
Balancing gates takes some patience because you have many sources of error-- the post may be out of plumb in multiple directions, the gate hangers may not be aligned on the post, the ground may not be level, etc etc. And you have multiple “levers” to pull to get the gate plumb/level even when nothing else is: you can alter the height of the gate clamps; alter the rotation of the gate clamps; shorten or lengthen the two gate hangers (by pulling them more or less through the gate post). Honestly, you just have to kinda visualize what combination of those levers to pull to restore good balance.
If your gate is way out of level because the post is falling inward, then you’ll have to take the gate completely off the hangers to adjust them. Give the top one a couple turns to pull the hanger through the post more, and give the bottom one a few turns opposite direction, to withdraw that one from the post. Then re-hang (and you’ll almost surely have to still balance the swing, see below).
Most common point of failure, IME, is one or both gate clamps have gotten loose and rotated out of position. (and then usually the gate has also slipped downward through the clamps.
Tools: Two car jacks, a deep socket wrench that fits your gate clamp nuts, and a rubber mallet. A big pipe wrench in case you need to rotate the gate hangers. And a patient helper to hold the top of the gate steady (I’ve mastered a one-person technique, but it’s better to have a helper)
I put a car jack on each side of the gate, raise them until they’re taking the weight of the gate, and then slightly loosen the gate clamps. You don’t want them floppy loose-- just enough so you can move them by tapping with your mallet.
If you need to raise the whole gate, use the car jacks on both sides to get the gate to the right height. Retighten, drop your jacks, see how it swings. Assuming it’s not perfect yet, put your jacks back on, loosen the clamps again and fine-tune the swing. I use the rubber mallet to tap-tap-tap the gate near the clamps—it lets me make more precise, small adjustments without having to completely loosen the clamps. And it’s better to make small adjustments at a time: tap-tap-tap, check the swing, and go back and adjust a little more-- on a 16ft gate, a tiny change in clamp position will have a big impact. It’s an iterative process, just be patient. When you’ve got a nicely swinging gate (most satisfying thing EVAH), really tighten those clamp nuts hard and every couple of months, make a point of walking around with your socket wrench and re-tighten each nut.
1 Like
An after thought … You could set the gate so it closes by its own weight too. Set the bottom hinge away from the top hinge opposite the closed position. Then instead of opening, the gate will swing closed.
Everything I’ve posted assumes the gate post is stable. If the gate post is wobbly or moving as it settles. All advice is off.
1 Like
Agree-- you can compensate for a slightly leaning-but-solid gate post, but not a loose or rotten one.
also known as a spade bit; agreed with this bit for this job
I was going to suggest this as well.
For a heavy 16ft gate, you may also want to add a third hinge in the middle of the gate/post. The extra length tends to make a 16fter sag, and a third hinge gives more support to keep the gate balanced once it’s leveled. You may also want to use bolt-through hangers, with nuts & washers, instead of the simple short screw-in ones that come with most gates.
2 Likes
As other have said, the post has to be “wobble” free" The post should be a 6X6 and I would go 4 feet deep with it. At least a 12 diameter hole filled with cement. Check for plumb (plumb is the term for the vertical line) on both sides.
Big heavy well made gates have the hinge pin welded to it. Measure the spread need. After the cement has set up mark the top hole take a 6’ level put it top at the mark the bottom hole at the distance needed. I make a straight line across the entire width of the post. And then mark the line where your “level” says it is plumb from the top mark. If you don’t have a long enough level, you can use a short one, mark where it ends and slide it down. Or make a “plumb bob” with a piece of string and a weight on the end. Hammer a nail in your top mark and let it hang, when it comes to a rest, make your second mark.
Don’t use those “wood screw” hinge pins. They are a PITA to screw in and even more so to adjust.
Use hinge pins that have a long bolt on them that goes through the entire post with nuts and washers on the inside of the post and on the outside. As pictured below. Once the gate is hung you can easily adjust the gate so it hangs level by loosening the nuts which will allow the hinge pins to move in and out. Pulling the gate angle in with the top hinge pin and pushing the bottom out with the bottom hinge pin.
Once the gate is hung on pins that are plumb to each other and the gate is level is generally will stay in the position you open it to. If you want it to swing back in after opening, if memory serves adjust the bottom pin out a bit. Maybe its the top pin, I get this mixed up. You get the idea, just “play” around adjusting the pins with a wrench.
If the post you have is solid no wobble just redo the hinge pins to make sure they are plumb to each other. Use the existing top pin and plumb the bottom pin to it. Some people make the mistake of marking the bottom hole in the center of a post that is not plumb. This is usually why the gate swings open
Below is the ideal set up.
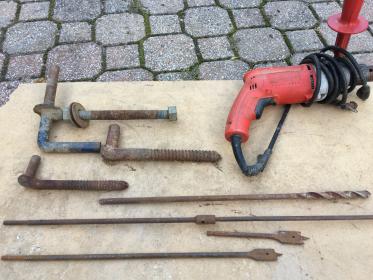
The top pin pictured is the gold standard for big heavy gates. As EventerAJ pointed out. Threaded for easy adjustment. the second “bar” is to keep the pin from twisting off the horizontal over time. Requires a smaller second hole drilled. Once the top hole is drilled pound it in check the pin horizontal then pound it a bit further to make a mark when there the second hole will be drilled. Remove, drill the hole and reinstall.
Threaded pins can be had with out the “stabilizer bar/pin” The bolt on the big ones is 3/4 inch.
The other 2 pins are IMO the crappy “wood screw” pins. They have their place for light weight gates. PITA to adjust because you have to take the gate off. Avoid using them unless you budget is tight, like real tight.
Because you are drilling through what should be a large post using a small drill can and is problematic. The one pictured is a beefer 1/2 inch drill with much better torque. But it also has a screw on handle. Makes for easier work, leverage getting the bit through the wood. But more importantly the drill will not possibly “spin” out of your hands if the bit “binds”. If using a spade bit this can and does happen pretty easily. You can get the job done with a smaller drill without the hand. Just make sure to hold it with both hands securely.
The ideal bit is the top one. Drilling the hole “level” is pretty important. Not easy to do esp by a novice. This bit cost a few $$ but one started level it will generally go through level. The other bits are spade bits as mentioned above. These are cheaper to buy. The short ones are long enough. You buy a bit extender like pictured. Or buy a long one as pictured. Just about any hardware store carries these. Home depot, Lowes keep them in stock. Spade bits can be much hard to keep level, horizontal and bind easily.
Most people don’t have the above to work with. Most of my friends don’t. They just call me, “can I borrow”, lol.
[ATTACH=JSON]{“alt”:“Click image for larger version Name: IMG_3212.JPG Views: 1 Size: 23.2 KB ID: 10195744”,“data-align”:“none”,“data-attachmentid”:“10195744”,“data-size”:“full”}[/ATTACH]
[ATTACH=JSON]{“alt”:“Click image for larger version Name: IMG_0184.JPG Views: 2 Size: 24.5 KB ID: 10195745”,“data-align”:“none”,“data-attachmentid”:“10195745”,“data-size”:“full”}[/ATTACH]
Great ideas!
All of the above. In the meantime, a couple wooden matches or nails in the hinge or a strategically placed rock to allow the gate to open only so far.
1 Like
In the farmer tradition … one uses what, one has on hand.
To prevent turning under weight of gate. Made from a Horseshoe[ATTACH=JSON]{“data-align”:“none”,“data-size”:“medium”,“data-attachmentid”:10197699}[/ATTACH]
A gate wheel is what we did on our 16 foot driveway gate. Makes everything easier!