I made some jumps!

Half brag (because I’m glad it’s over), half instructional.

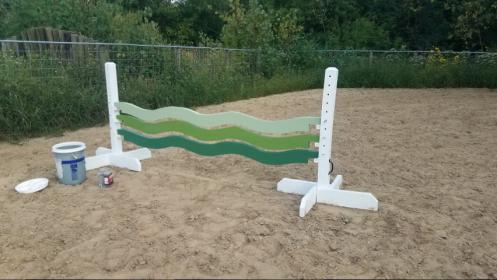
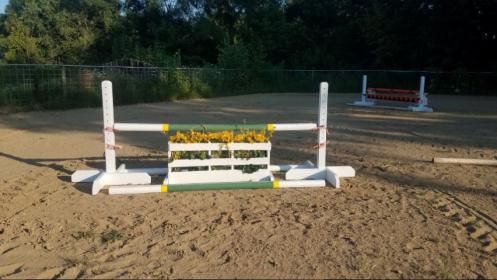
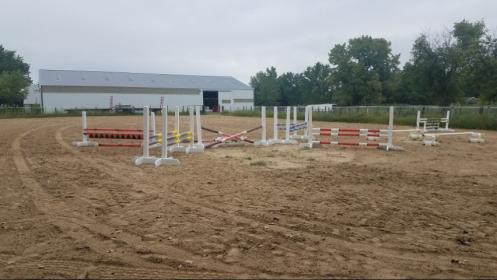
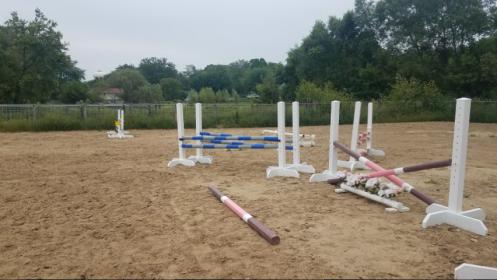
Previous arrangement was that I had to take down jumps every time I set them up. No jumping has ever been allowed in the indoor, outdoor was ok. This is a big PITA, so after some negotiating with the BO we agreed that I could leave jumps up, if and only if they were painted pretty.

Game on.

It should be said this is a small barn where nearly no one rides, so this is primarily for me. There were 8 standards existing at the barn, and minimal jump cups (of the ultra cheap variety). These were not built by me, but were inherited from previous boarders who did not take them with them. I typically would use jump blocks (which I do own) to set quick and dirty courses, because I didn’t have the time or the energy to drag standards around to ride one horse.

First up: Standards.

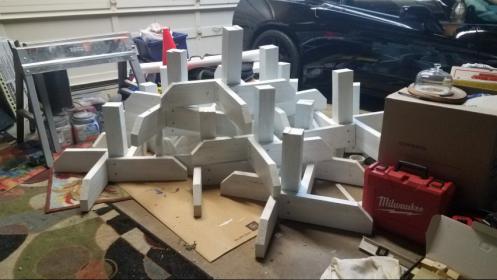
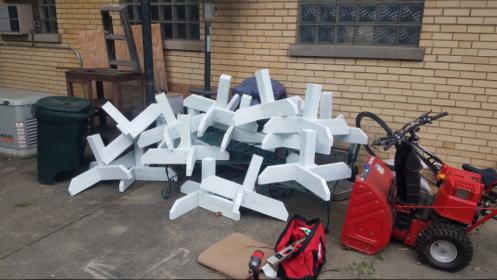
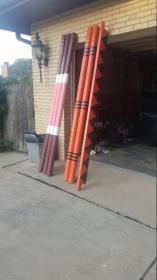
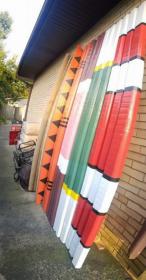
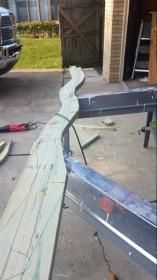
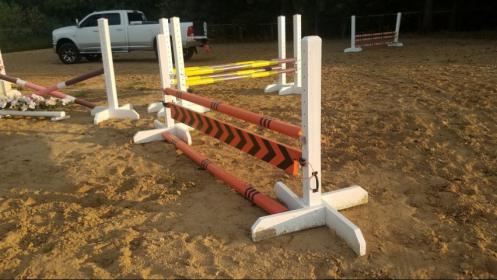
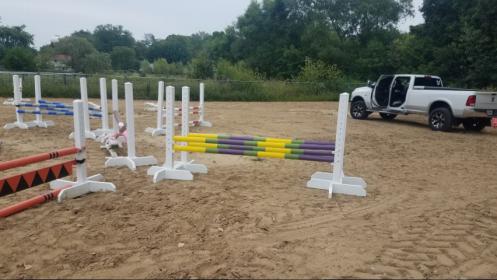
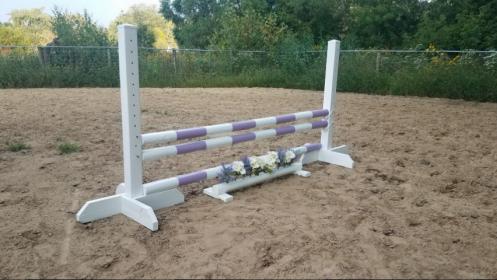
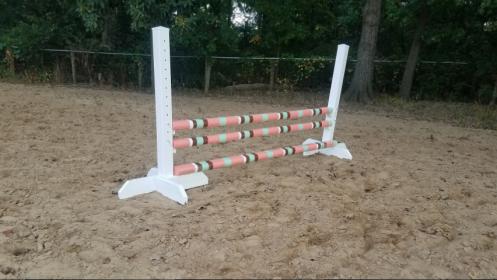
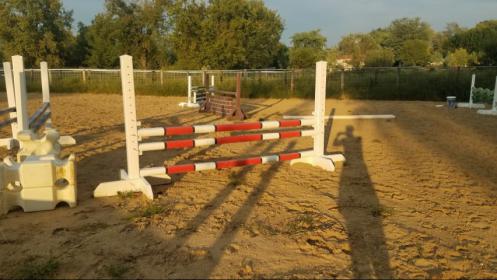
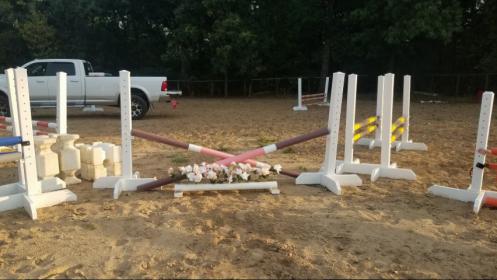
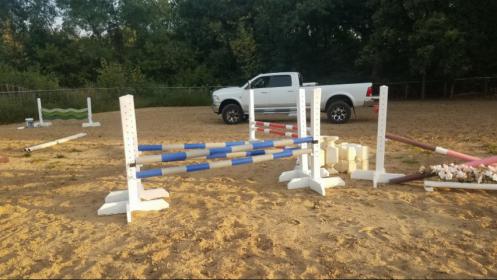
After repainting the existing standards, I began formulating a design for my own. I decided to build the bases out of wood, with only 18" of 4x4 sticking out the top. I would then cut a pvc 4x4 x 100" sleeve in half, drill it, cap it, and then slide it over the 18" protruding wood 4x4 of the base. I decided to make 18 (!) of them.

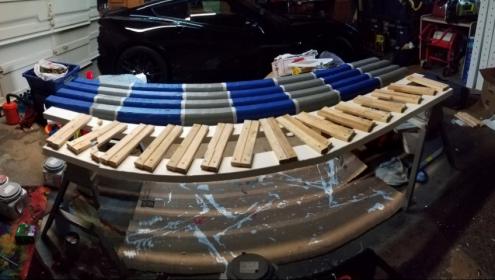
Worth a mention - whoever here in a past thread said these are easier to paint disassembled, you are a sick individual and I hate you. :lol:

Tools/equipment: circular saw, miter saw, impact drill, zinsser primer, dutch boy trim paint.

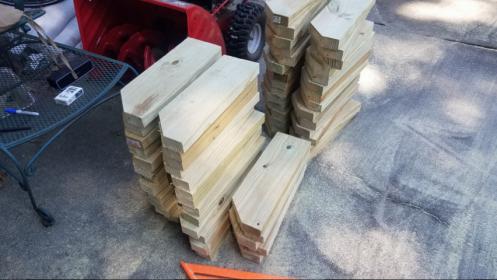
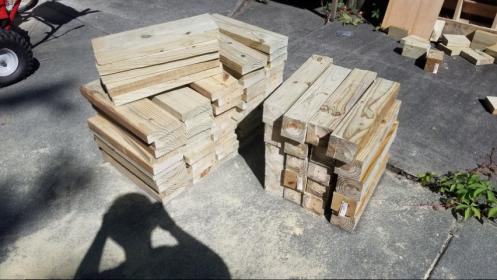
Materials: treated 2x6s, treated 4x4s, pvc 4x4 x 100", pvc post caps, 3" spax screws.

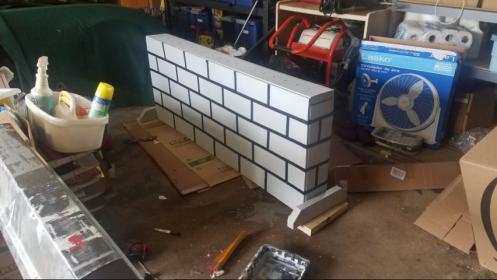
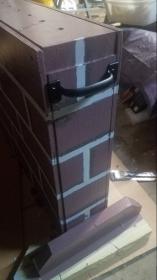
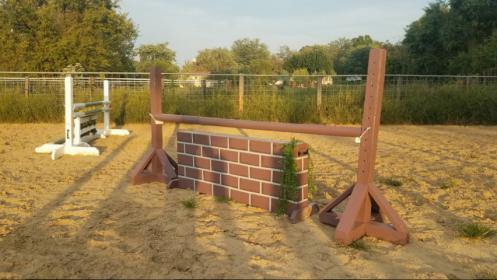
[ATTACH=JSON]{“data-align”:“none”,“data-size”:“full”,“data-attachmentid”:10476076}[/ATTACH][ATTACH=JSON]{“data-align”:“none”,“data-size”:“full”,“data-attachmentid”:10476075}[/ATTACH][ATTACH=JSON]{“data-align”:“none”,“data-size”:“full”,“data-attachmentid”:10476077}[/ATTACH][ATTACH=JSON]{“data-align”:“none”,“data-size”:“full”,“data-attachmentid”:10476073}[/ATTACH][ATTACH=JSON]{“data-align”:“none”,“data-size”:“full”,“data-attachmentid”:10476074}[/ATTACH]

20190809_135408 (Small).jpg

20190814_043941 (Small).jpg

20190812_120145 (Small).jpg

20190809_110807 (Small).jpg

20190809_101614 (Small).jpg

Next: Drilling the posts.

I used a hacksaw with a metal blade to cut the pvc 4x4s in half by hand. Someone skilled could have done it with a reciprocating saw, but I tend to murder stuff with those (don’t let the saw take control!!), so since that was my most expensive piece, I did it by hand.

I made a jig to drill the posts out of the truest piece of pine I could find, keeping in mind the 4x4s will be inside the posts to a certain height. Drilling was done in three steps, with the 1/2" hole ripping your wrists off and stalling a brushless drill, or if using the impact it makes you worried it will crack the PVC.

I don’t have a picture of just a post drilled, but they will make their appearance later with the poles.

1 Like

Next: Painting poles.

All poles are 8’ landscape timbers. I have found that Menards sells the best ones, and Home Depot the worst. I did lot select them, as in, I will go through a whole pallet of them to find the good ones.

The paint I used was Dutch Boy Cabinet and Trim paint - this is because it’s the only one at Menards that came in high gloss. This stuff took AGES to cure, and still feels slightly sticky. Honestly, I would not recommend it for anyone going down this path. I bought white, black, blue, red, and yellow. From there, I mixed all subsequent colors.

Painting poles isn’t rocket science, but it does involve a ton of patience - paint, wait, tape, paint, wait etc etc. Because landscape timbers aren’t smooth, there is a little bleeding along tape lines. I found that “dabbing” the paint along the tape lines instead of brushing it helped minimize any issues.

Creativity is key. Have fun! Paint all the crazy colors!
[ATTACH=JSON]{“alt”:“Click image for larger version Name: 20190728_190449 (Small).jpg Views: 1 Size: 10.3 KB ID: 10476106”,“data-align”:“none”,“data-attachmentid”:“10476106”,“data-size”:“full”}[/ATTACH]
[ATTACH=JSON]{“alt”:“Click image for larger version Name: 20190728_185855 (Small).jpg Views: 1 Size: 7.3 KB ID: 10476105”,“data-align”:“none”,“data-attachmentid”:“10476105”,“data-size”:“full”}[/ATTACH]

20190728_185855 (Small).jpg

20190728_190449 (Small).jpg

3 Likes

Next: Normal planks and wavy planks

Normal:

Take a 2x8" treated piece of lumber, cut notches in it, paint it some fun way. Done!

Wavy:

These admittedly were tough. First, draw on the template. I left 2.5" down the center to have continuous grain, and then drew my waves on a piece of cardboard and traced it onto the 2x8. Don’t forget to include a notch at the end to hang it from the cups. After the first one was cut, I used it as the template. I tried a jigsaw (too slow), reciprocating saw (wild child, all over the place), and returned to the jigsaw, but with a more aggressive blade on it. Still, this took forever, there was tons of blade deflection, and it required a lot of sanding. Finally, I put a 3" screw near the end notches to try and bind it tighter and prevent cracking.
[ATTACH=JSON]{“alt”:“Click image for larger version Name: 20190911_181205 (Small).jpg Views: 2 Size: 28.9 KB ID: 10476119”,“data-align”:“none”,“data-attachmentid”:“10476119”,“data-size”:“full”}[/ATTACH]
[ATTACH=JSON]{“alt”:“Click image for larger version Name: 20190911_181158 (Small).jpg Views: 1 Size: 30.2 KB ID: 10476117”,“data-align”:“none”,“data-attachmentid”:“10476117”,“data-size”:“full”}[/ATTACH]
[ATTACH=JSON]{“alt”:“Click image for larger version Name: 20190903_171052 (Small).jpg Views: 1 Size: 9.6 KB ID: 10476116”,“data-align”:“none”,“data-attachmentid”:“10476116”,“data-size”:“full”}[/ATTACH]
[ATTACH=JSON]{“alt”:“Click image for larger version Name: 20190911_181053 (Small).jpg Views: 1 Size: 25.6 KB ID: 10476118”,“data-align”:“none”,“data-attachmentid”:“10476118”,“data-size”:“full”}[/ATTACH]

20190903_171052 (Small).jpg

20190911_181158 (Small).jpg

20190911_181053 (Small).jpg

20190911_181205 (Small).jpg

2 Likes

Next: Gate

I had a really warped 2x4 and some scrap 1x2 board sitting around, and decided to do something with it.

You will need two 2x4s, with one cut ~12" shorter than the other. I’d imagine you can use anything you want for the pickets, but I used my scrap wood. Lay it out, paint it, screw it together, etc. While it would make it look cleaner to have another 4x4 to sandwich the picket boards, it would also make it really heavy, and I couldn’t exactly match my warped one. Instead, I painted the other side to mimic another 4x4 - I painted white tips on the pickets so it wasn’t apparent from afar they protruded onto the 4x4. Done!

[ATTACH=JSON]{“data-align”:“none”,“data-size”:“full”,“data-attachmentid”:10476132}[/ATTACH][ATTACH=JSON]{“data-align”:“none”,“data-size”:“full”,“data-attachmentid”:10476133}[/ATTACH][ATTACH=JSON]{“data-align”:“none”,“data-size”:“full”,“data-attachmentid”:10476134}[/ATTACH]

20190824_065427 (Small).jpg

20190827_164658 (Small).jpg

20190901_173213 (Small).jpg

2 Likes

Next: Pallet flower… thing.

Yeah, I fell into the pallet trap.

I took a pallet, used the recip saw to cut it down, rearranged the boards so that a hoof couldn’t get caught, painted it, and put support legs on it. I also added a screw per board, to supplement the pallet nails.

Stuff with flowers, done.
[ATTACH=JSON]{“alt”:“Click image for larger version Name: 20190806_181225 (Small).jpg Views: 1 Size: 27.1 KB ID: 10476136”,“data-align”:“none”,“data-attachmentid”:“10476136”,“data-size”:“full”}[/ATTACH]
[ATTACH=JSON]{“alt”:“Click image for larger version Name: 20190911_181105 (Small).jpg Views: 1 Size: 30.6 KB ID: 10476137”,“data-align”:“none”,“data-attachmentid”:“10476137”,“data-size”:“full”}[/ATTACH]

20190806_181225 (Small).jpg

20190911_181105 (Small).jpg

4 Likes

HOLY COW! Those look amazing- you are my hero. No WAY I could a) complete that without giving up halfway through in anger and committing bodily injury; b) complete that without cutting off one or both of my hands thereby committing bodily injury. Great job!

7 Likes

Next: Brick wall

I had a scrap piece of plywood, and some left over 2x6s. Cut the plywood in half, used the 2x6s on 3 of the 4 sides (bottom is left open), drilled some holes on top in case I ever want to add flowers, put supporting legs on, taped, and painted. Handles were added when I realized this thing is a bear to move.

[ATTACH=JSON]{“data-align”:“none”,“data-size”:“full”,“data-attachmentid”:10476145}[/ATTACH][ATTACH=JSON]{“data-align”:“none”,“data-size”:“full”,“data-attachmentid”:10476144}[/ATTACH]
[ATTACH=JSON]{“data-align”:“none”,“data-size”:“full”,“data-attachmentid”:10476147}[/ATTACH][ATTACH=JSON]{“data-align”:“none”,“data-size”:“full”,“data-attachmentid”:10476146}[/ATTACH]

20190901_212752 (Small).jpg

20190901_133947 (Small).jpg

20190901_214858 (Small).jpg

20190911_181911 (Small).jpg

4 Likes

Final thoughts, with some general pictures…

The last piece will be feather-fillers, that my sister designed, but I cut. She has to paint them yet - I’m fresh out of painting motivation, haha. They’re waiting for her in the garage.

For jump cups, I stole an idea from here of drilling two 2x2 cubes and putting a rope through it, using a bolt for the pin. They work like a charm. I’ll start buying jump cups slowly, but for now these work great.

Flower “bars” were made with a landscape timber cut in half, drilled, and 2x4 supporting legs put on it.

Overall, it was fun but I’m so glad that it’s over. Total project time - ~1.5 months, working on it ~2 hours/day.

Lastly - I finished just in time for one of my horse’s masses to need to be removed, leaving me without a horse to jump for a month or more. ugh…
[ATTACH=JSON]{“alt”:“Click image for larger version Name: 20190901_173209 (Small).jpg Views: 1 Size: 26.4 KB ID: 10476154”,“data-align”:“none”,“data-attachmentid”:“10476154”,“data-size”:“full”}[/ATTACH]
[ATTACH=JSON]{“alt”:“Click image for larger version Name: 20190911_181222 (Small).jpg Views: 1 Size: 28.8 KB ID: 10476155”,“data-align”:“none”,“data-attachmentid”:“10476155”,“data-size”:“full”}[/ATTACH]
[ATTACH=JSON]{“alt”:“Click image for larger version Name: 20190911_181231 (Small).jpg Views: 1 Size: 24.9 KB ID: 10476156”,“data-align”:“none”,“data-attachmentid”:“10476156”,“data-size”:“full”}[/ATTACH]
[ATTACH=JSON]{“alt”:“Click image for larger version Name: 20190911_181239 (Small).jpg Views: 1 Size: 27.3 KB ID: 10476157”,“data-align”:“none”,“data-attachmentid”:“10476157”,“data-size”:“full”}[/ATTACH]
[ATTACH=JSON]{“alt”:“Click image for larger version Name: 20190901_173153 (Small).jpg Views: 2 Size: 23.1 KB ID: 10476158”,“data-align”:“none”,“data-attachmentid”:“10476158”,“data-size”:“full”}[/ATTACH]

20190901_173209 (Small).jpg

20190901_173153 (Small).jpg

20190911_181239 (Small).jpg

20190911_181231 (Small).jpg

20190911_181222 (Small).jpg

2 Likes

[ATTACH=JSON]{“data-align”:“none”,“data-size”:“full”,“data-attachmentid”:10476164}[/ATTACH]
[ATTACH=JSON]{“data-align”:“none”,“data-size”:“full”,“data-attachmentid”:10476165}[/ATTACH]

20190901_173220 (Small).jpg

20190911_181137 (Small).jpg

20190911_181142 (Small).jpg

2 Likes

And that’s it! If anyone has any questions or wants more pictures of something, feel free to ask. Can’t wait to jump them!

Edit:

I’m a wrench turner, not a wood worker. STRONGLY prefer working on engines than this horse hockey. That said, if I can do it, anyone can!!

2 Likes

The wavy planks had me pretty stinking close to homicidal, I have to admit.

Holy moly these are great! I also have a pallet brush box ;). I LOVE those wavy planks!

They end up being cheap, but infuriating. :lol:

Wow! These look great.

How much did the jump poles cost? Ball park figures! Are they round? or 6 sided?

Those are 8’ treated landscape timbers. They are flat on two sides, and rounded the rest of the way - if that makes sense.

Cost was $4 each, roughly. Hardware stores have regular sales, though, so I waited until a sale time and bought a bunch then.

Shape of timbers/poles:

[ATTACH=JSON]{“alt”:“Click image for larger version Name: ROS_LandscapeTimb_2.jpg Views: 1 Size: 13.6 KB ID: 10476243”,“data-align”:“none”,“data-attachmentid”:“10476243”,“data-size”:“small”}[/ATTACH]

ROS_LandscapeTimb_2.jpg

Painting tip to prevent bleeding- If the base color is white paint the whole pole white, let dry, tape, paint the edges of the tape white again, dry. Now paint the colored stripe. More time consuming but works pretty well.

OP- your jumps look great. DH and I have done a lot of jump building. It is time consuming but fun. We have done a few xc jumps too.

Wave jump is one I haven’t made yet but want to. I havent had the patience.

4 Likes

Some of the deeper ridges in the timbers wouldnt have been saved with the extra coat of white. I was too lazy to sand all of them down smooth, so the dabbing was a good middle ground to get “clean enough” lines. The first few poles were hairy, before I figured it out haha

Great job, I’m impressed! They are beautiful. :slight_smile:

1 Like