Leaky frost free spigot

My stupid barn spigot has OF COURSE chosen now to misbehave. We’re going in to a cold spell :frowning:

If I run the big hose, which does not have a sprayer at the end, it leaks when I turn off the water. A steady trickle.

If I run the little hose, which has a sprayer at the end, the spigot shuts off.

My theory is that there’s gunk (technical term) at valve at the bottom and the line pressure with the short hose/sprayer keeps it clear. The long hose doesn’t have the sprayer or the pressure and the valve gets gunked up and doesn’t shut off properly. Is that likely?

Is it best to dig up the whole thing and replace, or can I get away with a rebuild kit? I’m thinking I probably have to pull it? This is the repair kit and I guess it only has parts for the handle assembly.

If we’re replacing this, does brand matter? This is a Campbell lead free frost proof spigot. Is there something else I can buy that’s less likely to fail in this manner (or any other)?

They’re built so that anything that can be fixed is fixed without digging it up. Id buy the rebuild and try that first.

If you do decide to dig it up, make sure you wrap a silt clothe around that weep hole and zip tie it into place up prevent gunk getting in that way

1 Like

The kit looks to have the rubber plunger that attaches to the bottom of the rod assembly and stops the water, so probably worth replacing that. They can get old and fail. Our hydrant froze a couple of years ago and long story short we replaced the entire rod assembly. We found somebody locally that could cut and thread a rod for us because shipping on a rod the length we needed would be $$$$.

Just in case you pull yours out and find the rod is bent thus allowing the valve assembly to leak like we did with ours. :ambivalence:

(We didn’t install the hydrant, it was here when we moved in.)

1 Like

Not sure if I am following you. Does it leak when a hose is not attached?

As far as the “gunk” clogging up things. preventing the rubber stopper seal at the bottom from seating/sealing properly. I doubt it. Water should be flushing any sediments out as it flows through. May if it is shut off when the hose is pressurized with and shut off at the hose end. Sediments could settle to the bottom and hang up on the seal ring in the fitting. But IMO this is a stretch. If you always shut it off at the hydrant while the water is flowing this can’t happen.

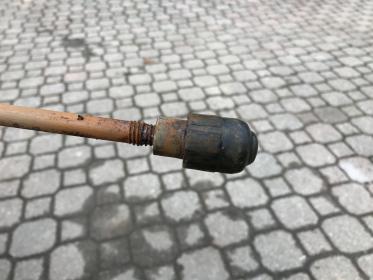
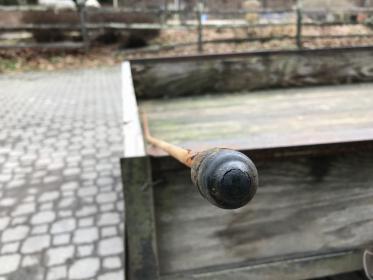
As you can see in the 2 pictures this is what the rubber stopper looks like. This part is pretty much the same used in the different brand hydrants I have installed. Looks the same as the brand you have. This is an off the shelf part the main difference between different brands is the head, handle and riser pipe rood connects.

All the hydrants I have used the riser pipe rod that the bottom seal is attached to can be adjusted. Which allows for more down pressure on the bottom stopper seal. Squeezes it tighter into the fitting.

The adjustment on this brand is easy. Loosen the set screw HP-9 on the diagram on the connector Hp-4 that the rod slides through. So as to see how much your are adjusting take a magic marker and mark the rod where it goes into the connector HP-4. With the set screw loose lift the handle a tad and look to see how much higher the connector is from your reference mark. Start with 1/8" or less. Tighten the set screw and close the handle. If you adjust too much it will be difficult to close the handle all the way. If this is the case loosen the set screw and drop the connector closer to your reference mark. Tighten and try again.

The bottom seal is just a big rubber stopper. It seats in the valve bottom HP-3. I have never had to replace this. Just the occasional adjustment. But very rarely. If the above doesn’t stop the leaking it is possible the rubber stopper is worn out, kind of hard to believe the way it is made/designed. Possible if the water has is very hard a chemical reaction has taken place and effected the rubber, hardened it. So instead of rubbery/soft it has turn very hard/solid. Never had this happen even with high iron water.

The other possibility if it still leaks, the valve bottom (HP-3) seat is defective, has developed a defect. This could happen if the hydrant is left open, pressurized, water is turned off at the end of the hose for long periods of time. Even though it is brass and shouldn’t rust a chemical reaction, calcium build up in the seat, hardened sediment etc and the rubber stopper can’t seat correctly.

If this is the case, the worst case scenario you will have to dig it up and replace that part.

Replacing the bottom seal is easy depending on on easily the head/handle comes off. This requires 2 hand tools. A big crescent wench and a big pipe wench. Can be done by one person two people makes it easier. Depends on how long, tight the head is attached to the riser pipe.

Loosen the set screw as above. The crescent wrench goes on the head, the pipe wrench on the riser pipe. This is to keep the pipe from twisting if the head is on real tight. You DON’T want to twist the riser pipe when taken the head off. This could break the supply line fitting that goes into bottom valve HP-3. Especially if a nylon/plastic elbow was used it doesn’t take much “twisting” of the riser pipe to crack this. I only use brass elbows to attach the water supply line to bottom valve.

With the head off, pull the rod out. The bottom seal is threaded and spins off the rod. Most likely you will need 2 vice grips to get this off. One to hold the rod and one on the end/head of the seal to spin it off.

Slide the rod back in and spin the head back on. Use thread tape or pipe thread putty on the rise pipe threads. Adjust the the down force as described above. Bob’s your uncle back in business. Hopefully.

The only seal I have had to replace on hydrant that have been in service for years. Is the one on the head where the rod goes through, HP-10. This seal is can and is different depending on brand. Most are just a generic O ring seal. Which can be had as most well stocked hardware stores. Esp Ag hardware stores. Just take the old one and have the match it.

The rebuilt kits have everything. But most of the stuff is unneeded, rarely needs to be replaced. But for $15 to your door can be easier than going to a hardware store. An O ring costs next to nothing. Convenience charge for the kit.

As I said the head may or may not come off easily. Murphy’s law usually kick in and it can be a PITA to spin off. Large crescent and pipe wrenches are expensive at hardware stores, home depot etc. Esp for something that is not used much by most people. This is where Harbor Freight is your friend. The pair can/should be had for under $20. IME worth the money for this job even it is only one time deal. I have found other uses for these over the years.

Good luck.

[ATTACH=JSON]{“data-align”:“none”,“data-size”:“full”,“data-attachmentid”:10285812}[/ATTACH]

[ATTACH=JSON]{“data-align”:“none”,“data-size”:“full”,“data-attachmentid”:10285813}[/ATTACH] ​​​​​​​

IMG_0552.JPG

IMG_0553.JPG

These sort of questions reminds me of this Far Side I cut out of a News Paper years ago and have kept.

[ATTACH=JSON]{“data-align”:“none”,“data-size”:“full”,“data-attachmentid”:10285827}[/ATTACH]

hardware store 4.jpg

2 Likes

@gumtree the faucet leaks when off–runs a steady trickle–if I’ve had it running the big hose that does not have a sprayer at the end.

If I run the small hose that has a sprayer, the faucet shuts off as normal.

The small hose with sprayer is providing pressure down the line until shutoff. The large hose with no sprayer is not.

Does that help?

I have the rebuild kit in hand. It sounds like it might be worth trying that first. I’m not eager to replace the while thing, particularly since access is a ~12"x12" hole in the concrete…

There is a set screw on the side of the spigot that DH kept adjusting ---- until there wasn’t anymore adjustment left; adjustments never were 100% anyway.

He finally bought two bushing repair kits at Lowes and voila! Both Spigots are now dry as a bone:)

1 Like

I put a rebuild kit in mine this summer. It was a very old hydrant - about 18 years installed, after sitting uninstalled in my father’s garage for probably 20 years. I wasn’t sure we’d be able to get the head off. I rented two big pipe wrenches from the local rental place for $5 each and my son and I were eventually able to get it to unscrew from the pipe. We replaced everything that came in the kit, hoping not to have to take it apart again.

gumtree - I’m still laughing at that cartoon. Please take into consideration, when you read the following, that I have now removed almost all of my frost free hydrants because they kept leaking after multiple repairs. I place buckets over various hose outlets that are lined with shaving bags. Works great. Winters here are usually in the 20s/night at the coldest. It has gotten a lot colder. My buckets still work

OP: Does the hydrant shut off when there is no hose attached to it - sprayer or no sprayer? I have to guess the answer is: yes and the sprayer is what is turning off the hydrant. I’d start with the adjustment/screw/thimkee (yes, that is a term) and tighten that to see if it handles the problem. Just speaking for myself: if I had to replace a frost free - I’d do what I have already done and replace it with standard hose faucets.

Is the leak coming out of the end of the hydrant, or the inner parts that move with the handle?

End of hydrant would likely be the rubber plunger, inner parts is likely the packing nut.

This video has replacement of both, which you should be able to do with the kit you bought: https://youtu.be/HllTiMvGuxI

I went over, discussed this in my detailed comment. Engineers call it a “packing nut” because they are taught to use complicated terminology. The same as vets. Your horse has a DDFT, barn term, Bowed tendon.

On a hydrant under the “nut” is a an O ring seal. This is a wear part. Take off the “nut” remove the rubber O ring and replace. The O ring can be bought at just about any hardware store. This is the only thing that I have had to replace on hydrants that have been in service for years.

I recently found a bunch of Far Sides I have cut out over the years. They all still crack me up. Esp this one.

The “thimkee” is called the rod set screw and I went into details on how the adjustment needed to be done.

We get cold spells well below freezing at times. Like -10,-20. Only had one hydrant freeze up on me and figured out why. One’s that leaked out of the O ring seal at the top. Wear part and it tends to always fail in the winter. But there is a reason why.

The only time I had to dig up a hydrant was in the freezing winter of course, Murphy’s Law.

No. If the spigot runs without a hose, water still runs when the handle is pulled down and fulled seated. Same as when the big hose with no sprayer is used.

When the spigot is running I can get it to stop by connecting the small hose with the sprayer closed, turning on the water, letting the hose pressurize, and turning off the water.

I’m not leaving anything attached here. It’s not like the spigot is running all the time and I just don’t notice it when the small hose/sprayer is attached. It’s winter and freezing. Nothing is left attached to any spigot here longer than it takes to fill whatever water tub needs filled.

This behavior of leaking if the spigot is used without pressure on the line is repeatable and predictable. Running the spigot with pressure on the line allows it to turn off.

The end. Where water normally comes out. It looks just like if you didn’t have the handle down all the way.

Thank you for the video!

Still can’t figure out why any type of hose would make it leak. I think I understand your logic but as I wrote it doesn’t really make sense.

To be clear as asked. Does it leak when turn off and on with no hose attached to it?

There are only 2 places that a hydrant can leak. The bottom seal is not closing correctly and water is seeping by that from the supply line. If the bottom seal has not warn out as explained above adjusting the down rod force as explained should fix it. If it doesn’t then the bottom seal has to be replaced. I would start with adjusting the rod as explained.

When it leaks as explained, does it leak continuously? Or eventually stop?

If it leaks for a while than stops. The only other possibility I’m guessing is the hydrant has a slow drain drain field and or the drain hole on the bottom valve is partially clogged. When turned off with the hose/sprayer attached the line has back pressure and that pressure is forcing the water in the stand pipe out quicker, clearing the back drain hole? I’ve seen hydrant that were installed without a lot of thought put into the back-drain field. By “plumbers” too. This has been discussed, talked about on various hydrant threads over the years.

Frost free hydrants are simple in design, no real changes in my lifetime. There is only 1 moving part the down rod and the only thing that can fail on that is the seal at the bottom and the O ring at the top. Would have to be very unlucky for the bottom valve to fail. Which would requiring digging it out. Never had to replace the bottom seal only the top seal. Did have a rod break/snap off where it attached to the handle.

The only other place that can leak it the supply line fitting underground. Which requires digging it up. I never cement on in. If it is in a barn I pack around it with asphalt. If the barn has a cement floor being installed I box off 18 inches around the hydrant and pack with asphalt. Asphalt is much easier to dig out then cutting through concrete to replace, dig out the hydrant if needed.

As slow draining hydrant can be very problematic in places with very cold winters. The slow draining standpipe water can and does freeze before it drains out. Ask me how I know. A hard cold lesson learned about not properly preparing the drain filed around the bottom of the hydrant when installing.

@gumtree

Yes, it leaks if it’s turned on without a hose and then turned off.

No, it doesn’t stop leaking on it’s own if left while leaking. At least not on any reasonable timeframe. Overflowed a five gallon bucket yesterday and was still going. Heavy trickle.

If leaking, attaching the hose with a sprayer turned off, turning on the spigot, pressurizing the hose, turning off the spigot, stops the leaking. Hose is removed, spigot doesn’t leak.

We’ll try rebuilding it this weekend. It’s been weepy from the packing nut for awhile and I just tighten the screw and compress the lead from time to time. Might as well fix that, too.

As gumtree mentioned (but they did not do in the video I posted) use two wrenches when loosening the hydrant head.
One on the hydrant, one on the riser pipe (that you hold in place). If you only use one, you risk starting to unscrew the riser pipe from the underground valve/supply line. No bueno.

You might need to use cheater pipes over the wrenches if they’re really stuck.

The hose “thing” has kept me wondering, thinking. I’m one of those “MacGyvering” types.

Definitely replace the bottom seal before digging it out. MUCH less work. Report back. This old dog is always wiling/hoping to be taught/learn new tricks.

Yup, I bought a giant crescent wrench and pipe wench from Harbor Freight. Well worth the $20.

In case people don’t know what a “cheater pipe” is. Pipes that will slip over the handles of the wrenches. Extent out, gives much greater leverage. The same principle that made building the pyramids possible. Well, that and a lot of slaves.

I know much less about my hydrant so I hesitate to add anything here, but in case it’s useful, here goes. My hydrant comes directly out of my well cap, and for 8 months a year I run 700’ of hoses uphill to my horse barn. The pressure is very good at the barn. This means that the pressure, when using a short hose, is strong enough to destroy the inner lining of hoses and create leaks at any weak point in the metal hose hardware. If I open the hydrant and don’t open the hose, water leaks out from the packing nut — sometimes a trickle, sometimes a 10’ geyser, depending on the length of the hose and how long since the hydrant’s been serviced. The water pressure blows out the soft bits on the hydrant head annually. I have my well company re-pack the graphite and replace the nuts and whatever else looks bad — because if it goes awry, it’ll kill my well. Good luck with your rebuild, Simkie, and please post any new info. Hydrants, so fascinating!

We recently ran into a similar problem where one of my hydrants was not draining. My plumber said I would have to dig it out and replace but I found a bunch of you tube videos and started with the easiest fix which is just an adjustment of a nut. That adjustment solved our problem so I would recommend starting with the top nut adjustment and then going from there. The rest of the replacements don’t seem too difficult. And definitely watch the you tube videos!