My solution to hanging a 150-lb steel 16ft gate on your own

Hubby’s away, and one of my main gates needed re-hung. Clamps worked loose and the gate was too out of whack to fix with subtle adjustments and re-tightening. Plus the hanger-side post isn’t completely plumb, so you have to finesse the angles of the clamps to get the gate to swing correctly. (I know, another method is to adjust the two bolts in/out, but the nuts are rusted so that wasn’t one of my available solutions today).

My go-to method is to put a car jack on each side of the gate, so you can loosen the clamps without the gate sliding through, and lift it up as needed. But normally I’d do that with a helper who can steady the top of the gate to make sure it doesn’t tip. Fussed around with my car jack method today but it was too unstable. And not producing good results, anyway-- I’d jack it up to the height I wanted, tighten the clamps, take each jack down, test the swing, and it’d still be way off. Start all over again.

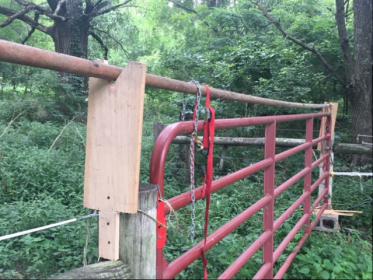
So I decided to really hang the damn gate, by suspending it from above. Cut a little cradle in two pieces of plywood and tacked that to each post, and used a 20ft well pipe to span the gate opening. And then hung the gate from that pipe with tie-down ratchet straps. Worked like a DREAM. The gate served as its own plumb bob, I could make fine height adjustments with the ratchet straps, and it was a cinch to tighten the clamps on the gate once I had it in position. Gate is perfect now, opens and closes nice and level, with fingertip pressure.

Anyway, thought I’d share this idea, because it made quick work of a task that normally needs two people and lots of patience. I know not everyone will have a 20ft long pipe lying around like I did, but it sure came in handy today.

[ATTACH=JSON]{“data-align”:“none”,“data-size”:“full”,“title”:“IMG_4063.JPG”,“data-attachmentid”:10210969}[/ATTACH]

IMG_4063.JPG

That is beautiful! I too have some 20 foot pipe that I knew I would need some day. I love us women using our brains to substitute for brawn. This is definitely going in my future problem solving file. Next, how to keep Yellow Jackets out of my pipe gates…

Thanks, great engineering

2 Likes

Love it, great MacGyver.

“I too have some 20 foot pipe that I knew I would need some day.”

Also the reason I keep a well stocked “useful” junk stash. Every time I throw something out, Murphy’s law bites me. I’ll have a need for it not long after.

5 Likes

Great, creative solution!! My DH is so NOT farm user friendly…! I generally have to come up with similar type solutions to common problems!!

Awesome idea!

That is an interesting way to hang gates.

If I don’t have the tractor handy to hold them up for me, I set the gates on blocks until level and the desired height and wire them on both ends to keep them standing in place.

The ones we weld, we use big clamps on the hinges we will be welding.

If we are hanging two gates without anything in the middle, we brace in the middle side with something on both sides, generally t-post, boards or shovels.

Love the car jack idea – it’ll save my back from lugging my favorite cinder block around as I install the next 7 gates in my never-ending pasture project. And wiring the gate in place while working on the hardware – genius. What would I do without COTH?!

I agree with @Bluey 's method if you have a helper with a level, who can hold it plumb while you tighten/weld the clamps. The bracing in the middle and wiring to the posts will give you relative stability while you work. But it doesn’t produce accurate plumb (or put it this way, I’m not good enough with a post pounder to get my t-posts perfectly plumb :lol: ) So this is just something you might try if you are stuck doing it alone.

Do be very careful though because car jacks are not built to widthstand movement of the load they’re supporting. They’re not very stable- especially when placed on dirt rather than pavement. I actually put mine on a cinderblock, to give a better base of support (and also reduce how high I have to crank the car jack).
So maybe don’t throw away those favorite cinderblocks just yet ! :lol: )

We use wood blocks out of 4" x 4", 2" x and 1" x to lift and level the gate, cheating a titch on the latching side, because hinges tend to let gates drop that little bit once off the blocks.

Using a long stiff pipe over the top to hang and level as the OP was showing would also work just fine.
Gravity should level the gate vertically then.
You would not have to be sure your hinges are vertically properly level so it doesn’t drag when you open it wide.

Just don’t try hanging gates when the wind is blowing hard.

1 Like

allons-y-If the yellow jackets get in the open bottom pipe, fill it with the orange fire-rated insulation foam. Once it dries it’s like concrete If the straw for the foam dries between uses, cut off the last inch or two of the part that’s solid, and you should be able to use the foam for more fill ups.

1 Like

Good stuff Hippo. One luxury option I would add if I may is a stout self tapping screw in the face of the hinge clamp.It will help with a couple things. First, you don’t have to clamp the hinge down so hard it crushes the pipe. Then it keeps the hinge clamp from riding up and off the hinge or twisting on the gate. I guess if its a full swing gate it could theoretically get blown back against the post, but this would just shear the screw, not hurt the gate.
It takes some force and a small impact driver, but the results are no more crushed pipes or hinge clamps twisting or working their way up off hinge.

@Buford Sounds like a great improvement but not sure I’m picturing what you mean. Is it something like this? https://kencove.com/fence/Gate+Accessories_detail_GH2.php
Does the set screw actually pierce the tube steel? Not sure I can visualize what you about how this would keep the clamp ass’y from riding up off the hinge? It’s not a full swing gate, max swing is 90deg either way due to fenceline.

I am assuming that is what he/she meant. Personally I don’t like large gates that don’t have the hinge welded. But stouter gates that are made with heavy steel that can be welded are more expensive. But IME they are well worth the additional cost.

Self tapping metal screws act just the way the name suggests. Drill a hole slightly smaller then the screw (the packaging will tell you what diameter drill bit to use) Self tapping metal screws are made with very hard metal. They “tap” cut the “treads” in to the metal they are being screwed into.

I don’t like using them in very thin metal that is used in light weight pipe gates. They “tap” fine on the hinge but not so much in the gate. Not thick enough for the screw to cut more than one thread or two. Depending on how much the gate is used, they can and do work loose from the hole in the gate. If you use them, put one on both sides of the hinge IMO. IMO and experience as soon as the gate is hung. Just drill a 1/4 or 3/8ths hole depending on the size of the hinge all the way through and “through bolt” with the same size screw and nut as the hole drilled. If the screw is a lot longer than needed cut off the excess.This is easier IME then using self tapping screws. Doing it this way as soon as the gate is hung makes for years of trouble free hinge issues. It took me a few gate to realize this, lol.