reupholstering!! (wedge seats?)

So my carriage has been in need of some new upholstery for a while and I was going to take it to a pro- but between time and money- it just wasn’t feasible so I have committed to doing it myself. The day before yesterday I tore out the old. Now I am really committed. YIKES!! Did I say YIKES!!??? will everyone please keep me in your thoughts and prayers for the next week or two? Thanks.

Anyway- Today I am cutting the wood panels that the seat bases will be built on. I’m thinking about my driver’s seat which is currently a long secure (removable) rectangle with about a 4" cushion.

I have never driven with a wedge seat and I don’t know if I would like it. I should mention that the driver’s seat has a backrest which is good in the current arrangement. I am thinking about replacing the one long rectangle with two (roughly) square pieces- and making up three padded panels- one, a wedge. So the seat could be set up either as two level cusions or one low one high. Would the backrest hit in a stupid spot with a wedge? Is it just too much? Does the wedge put a lot of stress on your feet?

I will of course update with pictures as this progresses but I’d love to hear the thoughts of those who have used a wedge seat.

The wedge should be angled to let you put feet ahead of your body, knees fairly straight, not bent like a chair seat. You need to be able to reach the floor and have SOLID footing, to press into your feet.

Adding height to the wedge can help if you can’t see ahead of a tall horse, for looking down the path, road, where you are going. But every wedge doesn’t NEED to be tall, just higher in the back than in the front of where you sit. The angle is what helps get feet and legs out ahead of you, not the height.

You really don’t get to use the backrest when you add the wedge! Sorry, but the Driver will learn to use the upper body, leaning forward and back a bit, which can pull the reins or release them, beyond what moving your hand gives the equine with movement. Does save some rein adjusting that way, on straight-a-ways.

I would go SIMPLE to start my wedge building. Start with an angled square of wood boards. Again, lower in front than back, start short, to see how you like it. So maybe a 2-3 inch front, with a 5-6 inch rear. Put in some cross pieces on the top of square to hold the flat cushion, put it on the vehicle, go for a drive. A wedge should be FIRM, almost hard, no give. Sorry again, not the most comfortable seat! Cushion should not be slippery, so the Rubbermaid shelf liner with little square holes, is a good cushion topping, to hold you in place on cloth or plastic seats.

Going for the drive, do you feel SECURE in that seat? Can you see? Feet are solid, tight to the floor so you can push on them, not move?

If the wedge frame doesn’t do what you want, make another with height changes you think would be helpful, try stuff again.

Sometimes with a wedge addition, shorter legged folks will also add a wood box for their feet to get the firm footing they need. Paint the foot box black, put carpet or rubber flooring on for grip, fasten box down Securely, box almost turns invisible to notice but you have the good footing you need.

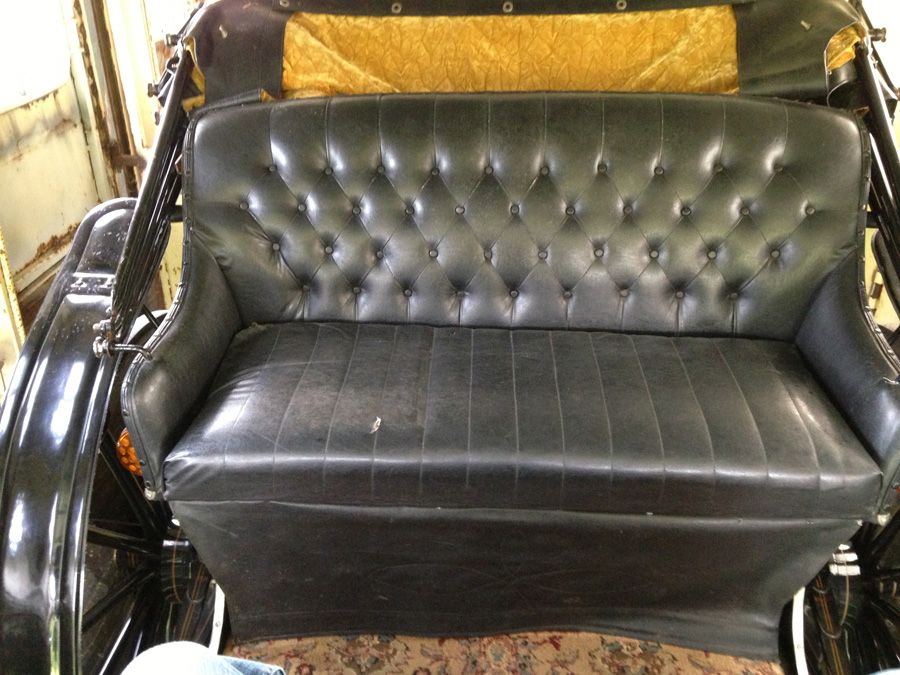
With our wedges, we have used both paint on the wood frame with cushion above, and covered frame with seat fabric, put a solid seat on the frame and covered it with matching fabric. You just want that wedge seating to be firm, not let you sink into cushion, rock around on wedge as upholstery gives under you when you move. For more Traditional type vehicles, the wedge won’t have sides, according to our antiques what came with old wedge seats. Just that square frame, upholstered to match the other seat fabrics. This is on 3 elderly carriages, with original upholstery, wedge seats.

Wedge seats with sides, higher edges, are a modern thing, evidently to hold the Competitive Driver in place on rough ground. Not a requirement, some times not even desirable. Because if you bounce UP, you MAY come down on that higher side or edge and it HURTS.

Making these seats, a wedge, you have a big advantage of being able to change things that are not working for you, not having a lot invested, should an idea not work out precisely as you planned. You might also consider putting the wedge in the seat center, with small cushions as spacers, for driving alone in the vehicle. Does give a different view than sitting on one side of the seat! Heck it is just two more little cushions!! Ha Ha

Something to consider is if or how, the cushion/s and wedge are anchored on the seat frame. Tight fit helps hold things in, but straps are an acceptable method of holding things down, especially if using rough ground to drive on or compete over. Old reins are nice brown, long, you can put a buckle in the rear to open the straps for seat removal during travel or for storage. We use footman’s loops for the strap anchor points or to hold straps straight if you run strap completely around the seat frame.

Husband the driver, uses wedge seats on everything he drives. Feels it improves his body position, secure feeling in his seated location. Depending on the vehicle, they are in different heights for the wedges, nothing firm in what works best for ALL vehicles.

We learned what worked by experimenting with OUR vehicle and horses. Our end result would not be what works on another vehicle or their horses. The wood frame wedge to learn angles that work for you, is fast, inexpensive, easy to change around as needed. So go for it, find what you like before doing the upholstery stuff.

I really think you will like having a wedge seat, after a bit of use to get familiar with using it.

Thank you so much goodhors- I knew I could depend on you to give me the low-down on the high-up!

I think I’d prefer to have the wedge in the center too- but my brake pedal is on the far right of the floorboard- I don’t think I could reach it from the center. I’ll have to do a check on that though. You have given me some things to think about.

Oh- speaking of wedge seats- I recently ran across this cool old photo- take a few deep yoga breaths all the way in- and all the way out before you click on the link- or you may feel faint-

https://www.facebook.com/photo.php?fbid=553546231358097&set=a.540253832687337.1073741824.100001081751583&type=3&theater

no kidding! wow talk about a wasp waist!

I really like my wedge seat, I find it very comfortable and easy.

Just an update on my learning curve-

My time schedule was derailed by the whole situation with Spirit the $1 pony. The deadline however, has not changed.

My fingers are raw, aching, cut from pulling strings and pierced many times with a needle. My house is covered with shreds of cut foam. My laundry is not getting folded.

The lower portions of the passenger seats are almost done except for the flap that hangs from the seat to the floor. I am working on finishing the tufting on the backs of the passenger seats today. Each seat back has 44 buttons.

If you ever want to get someone to reupholster your carriage- whatever they want to charge- it is not enough.

Ha ha, great post. I am REALLY sorry about your fingers! Thanks for the update on your progress and lack of home life. Broom might be better than vacuum for getting foam pieces, once you reach the clean up stage. Foam will clog up in the hose. I greatly admire your persistence in the face of adversity!!

Today I’m going to put the seat backs and arm rests in. I am just taking a break and wanted to share a picture of what it looks like so far. By the way- my carriage is named “The Meadowlark”.

There have been a few compromises I’ve made due to not having the prefect professional tools- #1 an industrial sewing machine- #2 a button making machine and dies #3 a foam hole punch. The one tool I do have which has been a lifesaver is my pneumatic stapler.

So I opted to do the tufting without pre-sewing the diamonds the way my old seats were. The old seats did not have such deeply inset buttons. problem is I dreaded the cleaning nightmare the folds might be- so the foam was cut and the vinyl lays in the cuts but doesn’t actually fold over itself except for the edges. Right now I have some twine wound through the creases to help the vinyl set in it’s place- which I does well once it heats up in the sun. (You can see the pleats up at the very top of the seat are not settled down yet- hopefully they will once I roll it out of the garage.)

The vinyl is very luscious to the touch and the foam is deeper and softer than the old- so not just to look- but the feel of the seats is much nicer than before.

http://i16.photobucket.com/albums/b27/frogcabinfarm/pony/null-5.jpg

Wowza! Seat does look cushy so you will just sink down into it. Does look nicer than an old seat on a vehicle, but they didn’t have foam then. Too bad for them!

Photos make me even admire you more with all that work visible. That is a LOT of buttons, fitting pieces, and getting seatback so very NICE.

Maybe some of that liquid bandage would help, to lay on your cut fingers and hands, close up the cuts for protection. Husband uses it, says it is good stuff.

Thanks for the sympathy goodhors- At one point I needed to learn how to tie this certain knot- so I youtubed it- and the person doing the demo was this ancient Italian lady with some very disfiguring arthritis in her hands- she’s probably been tying that knot since she was 10. Anyway- seeing her hands still working made me feel like a big cry baby about my own.

Here are some more pictures- Yesterday I was able to get both passenger seats installed- all except for the flap to the floorboards. I’m going to make a run for more supplies to finish those.

I am such an annoying perfectionist- there are some problems with how this came out- chalked up to inexperience and rushing- I could drive myself nuts picking it apart if I went there- but if I look at the big picture- I can cross my arms over my chest and give a satisfied sigh of approval. …and maybe next fall I can raise my hand a little more confidently when there is a beautiful old sleigh on the auction block! What’s funny is when I look back at the “before” picture- there are just as many problems with the original job as there are in mine- and I never saw them before- it’s just because I did it that it’s bugging me.

The carriage is a modern commercial vis-a-vis- so the seats were modern worn out- (not antique)- from years of use in Louisville before I bought the carriage used. The vinyl was very shiny and hard- but the surface was flaking off to grey and no scrubbing would make them look fresh. Also it was starting to crack and split at some seam lines. I do like the shine and style of tufting of the original- reminds me of a Dr.'s buggy from an old barn find… but there were actually four different kinds of upholstery finishing throughout the carriage- notice how the seat bottom does not match the back.
The old seats: http://i16.photobucket.com/albums/b27/frogcabinfarm/pony/newseatsold.jpg

The new ones: (two pictures of the same seat- different lighting)
http://i16.photobucket.com/albums/b27/frogcabinfarm/pony/newseats.jpg
http://i16.photobucket.com/albums/b27/frogcabinfarm/pony/newseats2.jpg

sources for info

Hi new member here. I found your thread in a search. I am going to reupholstery a vis a vis next month and would like to know what sources you used for directions. Your work is beautiful.:slight_smile:

Hi LaBrecque! I learned a lot from youtube, and read a few articles online. It’s a learning curve that’s for sure!! I also know that the price quoted to me for reupholstery from the Amish carriage builder here in Indiana was about half the price that I wound up spending in materials alone… so you might want to think about that. (what stopped me from going that route was just the time and hauling 2x 3+ hours… and fear that the job couldn’t get done between my bookings.)

Do you have a commercial vis a vis?

The two biggest barriers to me doing the job like a pro were
#1 no industrial sewing machine
#2 no Button making dies and press

My favorite tool I purchased for the job was a pneumatic stapler followed closely by a set of long upholstery needles.

The original seat had button backs that have a spreading clasp (like those little tacks you use to hold together a little booket of papers) That is certainly an easier way to do your buttons than by tying them the way I did… that is- if you can get the buttons made up in your uppholstery fabric. Price the custom buttons and you might choke. I was glad that I could get just random buttons that matched my black vinyl close enough to work- and that was what forced my hand to tie them.

The one tool I was never able to perfect (seen on youtube) was a way to punch perfect holes in the foam- wound up skipping that step all together and just cutting a deeper slash in the foam at the intersections of the diamonds.

You will also want some piping trim to match that will hide your staples that hold the cushions to the seats.

My seats don’t have any “sewn in diamonds” - all of the tufting comes from cuts in the foam and tension on the buttons. Most vinyl or velvet vis-a-vis seats you see have the diamond shapes sewn in and the buttons just lightly dent the cushion. The diamond sewing is just a skewed grid- it’s not piecing like a quilt- but you may need a big machine to manage the size of the seat panels or the thickness of 4 layers of the fabric.

I look forward to seeing your before and after pictures!