Robby's Braiding Clinic ...

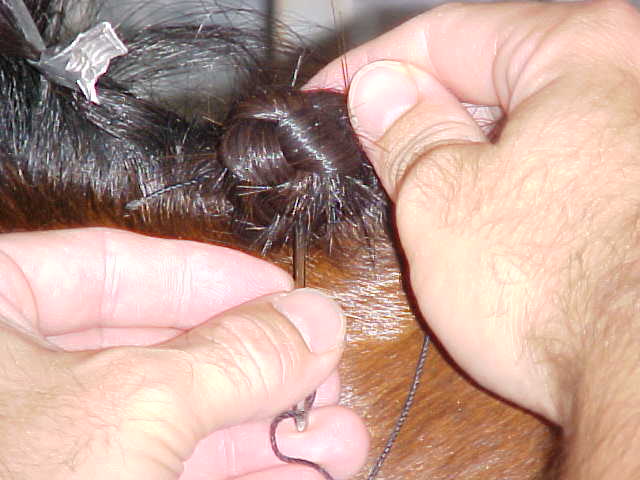
Because I am left-handed, I always bring the needle from the crest, to the left, and back down so that I can sew through both layers of the single-folded braid, at the bottom and push back through the crest, once again.

You have to use your other hand to hold the braid in the ball shape. Sew tightly.

Once I’ve gotten through both layers from the left, I come out from the crest and this time sew in through the double layers from the right side.

[This message was edited by Robby Johnson on Jun. 29, 2002 at 03:05 PM.]

Step_6,Pushed_Through_Crest_2.jpg

Robby & Dezi – thanks for the clinic!! It will be very helpful to a lot of people (including me!). You should submit it to some magazines & try to get it published.

If you lend someone $20 and you never see them again, it was probably worth it.

Thank you so much for going through the effort of making this nice presentation. I thought it really made things very clear.
However, I do have to comment on the 13 braids. I have always heard to never braid in 13 braids (unlucky) and I know a story about a Big Name Event Trainer who once took a pair of scissors and cut off the thirteenth braid when one of his students had braided a horse with 13.

Who does BEAUTIFUL Baby Kate belong to? And does she have her own pony yet?

The “fringe” is the perfect descriptive term!!

And yes, I fold it over at the very end, sew through it, and then wrap the thread around, binding it tight, and then pull it up for the first sew through. It seems to contain the fringy bits pretty well.

Thank you, thank you, thank you, for the forelock instructions. Poor Ben is going to get practiced on

So far, my forelock procedure has been:

  1. braid mane

  2. say, “hey, Kelley, you gotta minute? He’s ready for his forelock!”

  3. stand attentively and try to see what she is doing so that I can do it by myself at some point.

  4. fail miserably on every try.

This system doesn’t work if I’m showing/braiding by myself, so I fake it ok, and with enough sewing to tuck in stray pieces, and a be-yoo-ti-ful browband for distraction, we get by But, like most grooming things, I wanna know how to do it right, darnit.

Libby (who once, along with a cooler of beer, provided an evening’s entertainment as she wrapped and re-wrapped her horse until all four legs were perfect and then, they finally gave me a beer too . . .)

this is me pushing through from the right.

Step_7,_Sewn_in_From_the_Right..jpg

Thanks for the pix.
Where do you get your waxed brading thread?

I believe that geldings are supposed to be braided with odd numbers, aren’t they? (Hunting lore.)

Regardless, I would’ve put 14 in had the bridle path been grown out and braidable. And I also will pull his mane a little more before we start showing. With a neck that long, however, I don’t want it too short! I could be braiding for hours!

Interesting, also, is that in the Kaballah, 13 is a very lucky number (hence 13 tracks on Madonna’s “Ray of Light” album, back during her Kaballah phase … that album was VERY successful, so maybe it has merit?!).

Robby

You may be only one person in the world, but you may also be the world to one person.

<BLOCKQUOTE class=“ip-ubbcode-quote”><font size="-1">quote:</font><HR> Who does BEAUTIFUL Baby Kate belong to? And does she have her own pony yet? <HR></BLOCKQUOTE>

She (along with twin brother Corbin - asleep for the braiding clinic) is mine, and although there is no pony yet, Dezi at 15.2 and completely bomb proof will do for the time being.

(until the “free” pony comes along that is!)

Sue

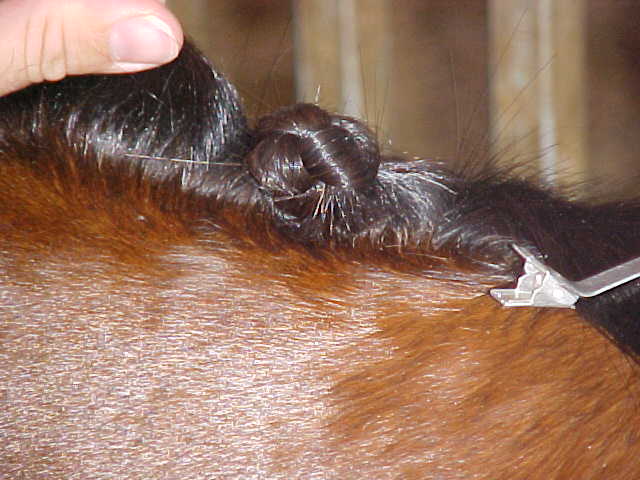
You can continue to sew under/in from either side, until the braid is as tight as you want it. I always find once each way to be sufficient. Again, sew in a 1/2 stitch at the top on your last pass, at the top of the crest. Then snip off with scissors.

This finished braid isn’t my best in the world. At the bottom, I could’ve threaded better to make it a little more of a ball.

Try to sew in as close to the bottom of those double folds as you can. This will make your braid really round.

[This message was edited by Robby Johnson on Jun. 29, 2002 at 07:39 PM.]

Step_8,_Finished_Braid.JPG

thanks robby! Very helpful. I need to learn how to braid nicely before this weekend’s big dressage show. I might just try your technique.

~Lindsay~
A proud co-owner of CorLin PROductions, specializing in dressage, eventing, and hunter/jumper digital photography.

~Co-founder of the COTH Photographer’s clique~

Robby,

Thanks so much. I never could figure out whether the forlock was counted when you were figuring that you needed an odd number of braids for a gelding and even for a mare.

Lany

Robby, between the cookbook and an online guide, you’ll HAVE to quit your real job Gee, I’ve heard that the DC/VA area is a great location to run such ventures from…

I don’t know if we’ll have horses at Radnor; we will have a couple at Fair Hill. We’ll have to talk! --Jess

she is just as sweet and happy as the day is long!

After we finished the “model braid,” I proceeded to braid Rhodey all the way down, and Dezi and Kate sat on my tack trunk. (Corbin was too busy cutting logs.) Rhodey was VERY fascinated with Baby Kate. So much so that I thought he was going to attempt to nibble little toes. I gave Dezi full-permission to bitchslap him, but it never got to that.

Kate and Corbin have a really cute older brother, Justin, who is now 2. Yes, Dezi went full-on with baby-making! Once that woman decides she’s doing something, nothing can distract her! LOL!

Robby

You may be only one person in the world, but you may also be the world to one person.

[Originally posted in the Eventing forum]

OK, Dezi and I did the braiding clinic today. She took the photos, and most of them are pretty good quality.

If you’re reading this as I’m posting, please don’t comment until I finish the process, as I’ve numbered the photos in steps, and want future readers to be able to see them in a simple step-by-step process.

I know this isn’t nearly as comprehensive as it could be. If you still don’t get it, please email me and we can chat about it on the phone, or perhaps I can attempt to do a few more photographs.

Rhodey is our model in the photo. He got a bath before Dezi got to the barn, and I did bathe his mane well.

The first photo is my braiding box. I keep all of my braiding equipment in it, as well as my small clippers. It’s very handy as it also serves as a stool. I think I bought the step at KMart several years ago for around $30. It was pricey, but it’s good quality.

I use the grandma-style hair clips, black waxed thread cut into strips about 18" - 24" long. Note: I can usually sew in three braids with one strip of thread.

I use a large metal craft needle which, as you can see, has a scrap piece of waxed thread threaded through the eye and tied in a knot. This prevents me from losing it, though I’ve lost it twice in two years - braiding the same horse at different times, if you can believe it! Talk about the proverbial needle in the haystack. Thankfully I’m really neurotic and found it both times.

I use the bigger gold pull through for doing the forelocks.

You can use any kind of comb you like. I don’t know where I came up on the red comb, but I really like it as that hook at the end makes it easy to evenly part the mane.

Also, I use a LONG piece of yarn around one of the handles of my (very sharp) scissors. I then just loop this around my waist. Sometimes I wear my Olive Garden apron, especially if I don’t have a handy place to store my Quick Braid.

For the sewn in button braids, I like the mane to be about 6 inches long, and pulled decently thin. Regardless of mane length, I use the 1/3 rule when parting the mane. If the mane is 6 inches long when pulled down taut, I part the mane at 2" increments.

How you braid is important, too. I find that for braids I’m wanting to make “round,” that braiding a little bit “out,” instead of “down” is easier.

Ok, here’s my toolbox …

[This message was edited by Robby Johnson on Jun. 29, 2002 at 03:03 PM.]

[This message was edited by Erin on Oct. 10, 2002 at 02:28 PM.]
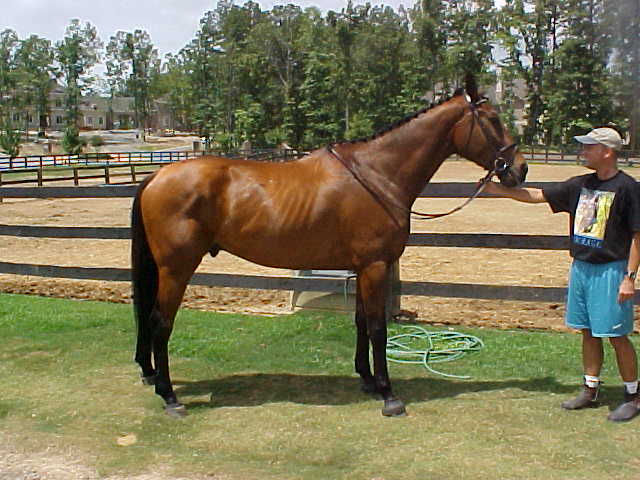
in this photo, Rhodey is wearing 13 braids, but could wear 14 if/when his longer bridle path grows out.

If I were braiding a horse for a three-day, I’d pull the mane to more like 4 inches, and I’d try to put about 20 ball braids in.

For the forelock, I (french) braid like a hunter. I prefer to keep the forelock pulled well enough that you don’t have to sew in a ball on the end but, if yours is too long, you can certainly do just that, following the steps I outline above. You can do this with a french braid that is too long to slide under the ridge (like a hunter) or, if your horse doesn’t have much forelock, you can skip the french braiding all together and treat it as if it’s just another section of mane.

Feed your pony lots of carrots and tell him how good he is! Like my Rhodes Point is, here!

Robby

Rhodey_Braided,_Cute_Boy!.JPG

Weezie – you can get it from Bitofbritian

~Cass

“Dont let your schooling interfere with your education” – Mark Twain

Thanks!

Good pics and directions. I hate braiding manes, I’ve been known to take 2 HOURS for a 14 braid job for dressage. Good thing Kalinka doesn’t mind them in, just cover with a neck stretchy to keep the shavings out and they last for 2-3 days!

–Therese


“Going through hyperspace is unpleasantly like being drunk.”

“What’s so unpleasant about being drunk?”

“…Ask a glass of water.”

-Douglas Adams The Hitchhiker’s Guide to the Galaxy

THANKS, that was very helpful. I only knew how to do the hunter style braids, you know, with yarn and a “pull-through”. I love those round braids; very cute.

Can you give tips on doing the pulled tail?

BTW, that is a very pretty baby!!

I tried to follow the instructions in the Grooming Handbook, but ended up making a mess. I’m good at the yarn braids but wanted to learn the sewn-in ones. This is very helpful and now I know where I went wrong the first time I tried this.

Another way of doing the forelock is when you bring in the side hairs, go UNDER the braid on either side. This makes a raised braid called a Dutch braid (I know the name from years with long hair). It’s the same concept as the french braid, but you cross the sections under, not over.