Unlimited access >

Robby's Braiding Clinic ...

[Originally posted in the Eventing forum]

OK, Dezi and I did the braiding clinic today. She took the photos, and most of them are pretty good quality.

If you’re reading this as I’m posting, please don’t comment until I finish the process, as I’ve numbered the photos in steps, and want future readers to be able to see them in a simple step-by-step process.

I know this isn’t nearly as comprehensive as it could be. If you still don’t get it, please email me and we can chat about it on the phone, or perhaps I can attempt to do a few more photographs.

Rhodey is our model in the photo. He got a bath before Dezi got to the barn, and I did bathe his mane well.

The first photo is my braiding box. I keep all of my braiding equipment in it, as well as my small clippers. It’s very handy as it also serves as a stool. I think I bought the step at KMart several years ago for around $30. It was pricey, but it’s good quality.

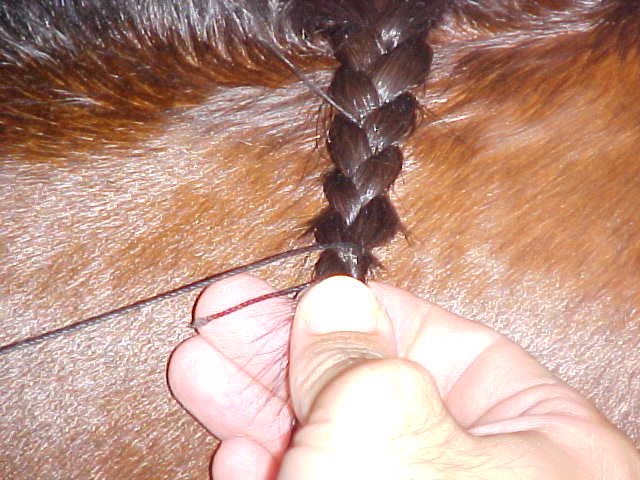
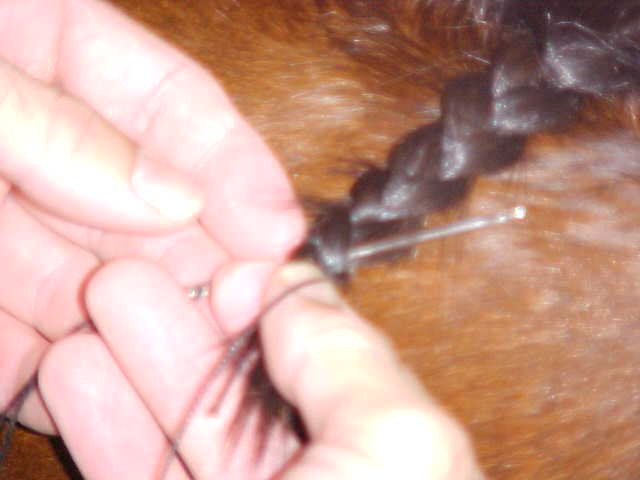
I use the grandma-style hair clips, black waxed thread cut into strips about 18" - 24" long. Note: I can usually sew in three braids with one strip of thread.

I use a large metal craft needle which, as you can see, has a scrap piece of waxed thread threaded through the eye and tied in a knot. This prevents me from losing it, though I’ve lost it twice in two years - braiding the same horse at different times, if you can believe it! Talk about the proverbial needle in the haystack. Thankfully I’m really neurotic and found it both times.

I use the bigger gold pull through for doing the forelocks.

You can use any kind of comb you like. I don’t know where I came up on the red comb, but I really like it as that hook at the end makes it easy to evenly part the mane.

Also, I use a LONG piece of yarn around one of the handles of my (very sharp) scissors. I then just loop this around my waist. Sometimes I wear my Olive Garden apron, especially if I don’t have a handy place to store my Quick Braid.

For the sewn in button braids, I like the mane to be about 6 inches long, and pulled decently thin. Regardless of mane length, I use the 1/3 rule when parting the mane. If the mane is 6 inches long when pulled down taut, I part the mane at 2" increments.

How you braid is important, too. I find that for braids I’m wanting to make “round,” that braiding a little bit “out,” instead of “down” is easier.

Ok, here’s my toolbox …

[This message was edited by Robby Johnson on Jun. 29, 2002 at 03:03 PM.]

[This message was edited by Erin on Oct. 10, 2002 at 02:28 PM.]

Tricks_of_the_Trade.JPG

Robby, this is fantastic. Are you wedded to reporting, or shall we tag-team at the next three-day we both go to?

Also, what do you think of developing an online, interactive, how to groom/prepare for a show guide? I, of course, never have anything to say on that subject --Jess

Do I understand correctly that you do not braid your thread into the braid, just attach it with your sewing and wrapping at the bottom?

Does this work with yarn? I’ve always braided mine in and tied a half-hitch at the bottom.

Also, what’s the quick trick for getting them OUT after dressage (or whatever)??

MANY THANKS for doing this!!

<BLOCKQUOTE class=“ip-ubbcode-quote”><font size="-1">quote:</font><HR>Originally posted by suzy:
All I could think of when I saw the second photo was “Basic Instinct.”

Well, Robby, what DID you expect from me?

P.S. Good thread and nice pictures. Thanks!<HR></BLOCKQUOTE>

I go with the flow!"

(Funny you bring that up. For a long time it was my favorite movie, so we watched it on DVD just a week ago!)

“Somebody has to die. Someone always does.”

Robby

You may be only one person in the world, but you may also be the world to one person.

When you’ve braided down, take your threaded needle (I always keep it in my mouth, with about 4" of bight) and sew through the bottom of the braid, leaving about 1/2 inch of thread on the back side.

Step_3,_Sew_in_Thread.JPG

One dumb question… What is a slip knot?

Thanks for your clinic…helps a lot!

Andrea and Dreamer
“Why does it take a lifetime to learn to live a lifetime?”- Ray Hunt
"I’ve spent most of my life riding horses. The rest I’ve just wasted. - Unknown

Including chit-chat and a pretty good boy it took about 25 minutes to do the braiding, including a beautiful forelock! I have seen Robby do them in less time when pushed though!

It does help alot to have all of your tools in easy reach, thus the Olive Garden apron or similar type is really helpful. Also a spray of the Quick Braid is good if you have alot of fly-away strands or a mane that is alot of different lengths!

I’m not always wedded to reporting! I would love to tag-team with you at your next three-day. What are you going to do? I was hoping to groom for a friend at Morven CCI*, but that’s probably not going to work with my work schedule. Maybe Radnor, though.

I love the interactive idea! Let’s see, if I could just charge for these things, between this idea and the cookbook, I could maybe quit this 8-5 mill that gets in my way!

Robby

You may be only one person in the world, but you may also be the world to one person.

This is a very well done explanation, of course, and exactly the way I do it Except, I usually don’t usually pre-cut my thread, but boy, that would make life easier. Once you get the hang of it, this is not only pretty fast (I did Ben in about 30 mins the last time I braided him – I’d have been even faster if I pre-cut my thread.)

What I can’t do, however, is the forelock braid. Are you guys up for a step by step on that?

And, I adore Bit of Britain, but I don’t care for their waxed thread. Way too goopy. I like what they have at Harmony Farms (www.bigbluetrailer.com) and I think Robby said he found some a local tack shop that carried leather working materials for less than Randy’s price, yes?

Libby (who really likes to braid and is dying to groom at a 3-day, but who needs to learn more first)

<BLOCKQUOTE class=“ip-ubbcode-quote”><font size="-1">quote:</font><HR>Originally posted by Robby Johnson:
I gave Dezi full-permission to bitchslap him, but it never got to that.
<HR></BLOCKQUOTE>

I love that phrase…so demeaning.

Superheroes of the universe, unite! http://www.allmightysenators.com/super.html

http://hometown.aol.com/bgoosewood/index.html

I then wrap the thread around the bottom of the braid, push back through once from underneath to the top side, and sew in a 1/2 stitch. At this point, your braid is secure and ready to sew up.

[This message was edited by Robby Johnson on Jun. 29, 2002 at 07:38 PM.]

Step_4,_Sew_in_a_Slip_Knot.JPG

<BLOCKQUOTE class=“ip-ubbcode-quote”><font size="-1">quote:</font><HR>Originally posted by In Your Dreams:
One dumb question… What is a slip knot?

Thanks for your clinic…helps a lot!

Andrea and Dreamer
“Why does it take a lifetime to learn to live a lifetime?”- Ray Hunt
"I’ve spent most of my life riding horses. The rest I’ve just wasted. - Unknown<HR></BLOCKQUOTE>

A tailor I’m not! Where I said “slip knot” I meant to say “1/2 stitch.” I’ll go back and edit those! A slip knot is one that comes lose when you pull it. We don’t want that with our braids, now do we?

Thanks for catching that!

Robby

You may be only one person in the world, but you may also be the world to one person.

Robby/Dezi:

Thanks for the refresher course. I learned to do this last year at a clinic with Nicole Beauchene – wow is it easy and fast. I need to do some practicing, so this was great for me to review.

Becky

Don’t say you’re not coming to Virginia!

Friendship is Love without his wings
-Lord Byron

hmm – I do do one thing a bit differently than Robby, upon reflection. I tie a knot in the end of my thread, fold over the end of the finished braid, pull the thread through to the knot, and then wrap the thread around the folded bottom about three or four times, hiding the sticky out ends before it is pulled up.

The fast way to take them out is with a good seam ripper. Actually, two good seam rippers and a careful friend Last time we started one on each end of the neck and met in the middle and were done lickity split. Ben looooooves this part, making terrific camel faces as you do the portion near his withers. I don’t run xc anymore with the frizzies not wet down though – the one pic we have of this look was just not acceptable

Using the needle, push through under the braid, at the crest, once. Pull it up, and you’ll have a single-folded braid that looks like this.

Step_5,Pushed_Through_Crest_1.jpg

nice to have Close UP photos to really SEE what the brider is doing!!!

Robby did forget the most important picture - his supervisor for the braiding session, and Rhodey’s entertainment - Baby Kate!!

We’ll be there September 21-29!

Robby

You may be only one person in the world, but you may also be the world to one person.

I did find it locally, but that shop has gone out of business, which means I’ll be paying $18 again!

Are you talking, Libby, about sewing around the “fringe” at the bottom of the braid? So that it’s not in the way when you pull/sew through?

My method for removing braids:

Hose horse down. Wet the braids well!

Take a seam ripper (rip away from you). I rip the left side of the braid (usually both pieces of thread that will be there), then pull it down with my finger so just the long, pre-pulled-up, braid is there.

Then I use my seam ripper, remove the 1/2 stitch, pull it out, then use my big wide comb and fingers to get the braids out. Then, with mane still wet, I comb out entirely.

You avoid afro-poof if you wet the braid first.

I don’t braid into the braid with yarn or thread. I just sew it in. I used to, but discovered you don’t really need to.

To do a forelock:

1.) Spray with QuickBraid.
2.) Comb through thoroughly.
3.) Take the top inch of forelock (starting between his ears) and separate into three pieces. Cross over like a regular braid but, when you cross the second time, add more hair from the sides , and so on so forth. This is french braiding.
4.) French braid the forelock, then 1/2 way down the switch (the long piece of braid), braid in your 12" piece of waxed thread.
5.) Use your gold pull through, pushing from the top of the french braid down through the braid (under the ridge) and thread strings through the loop.
6.) Pull all the way up. If your forelock is pulled correctly, you’ll watch the whole braid disappear under the french braid.

Then, the final step is simple. The two pieces of thread will be sticking out of the top of the braid. Using your pull through, push it under the ridge from the side and catch the opposite piece of thread in it and pull through. Do the other side the same way. Then tie the pieces of thread in a knot at the forelock, then snip off.

If your forelock is too long, do the step as above, then actually come in with more waxed thread and do the remaining single-folded piece of forelock exactly as you would do a braid on the mane, which makes a nice button.

Robby

You may be only one person in the world, but you may also be the world to one person.