A few pertinent facts I’ve mentioned in a smattering of posts:
First, drove my horse MD -> FL on a Saturday in January, slept in the largely-unimproved DR of my trailer overnight, and drove myself back Sunday. I did this only because I was having surgery the next week; love the cold and winter training, loathe Florida.
Second, scheduled a week off and planned for a generally more leisurely return trip for the collection in hopes that I could battle the surgeon into letting me ride again in time, but decisively lost that fight! So now instead I’ll be spending that week watching my coach ride my horse, packing things, doing what working out I’m allowed to do, day-drinking, and finish(ish)ing my DR. As inspired by @endlessclimb (but likely considerably less productively and skillfully), I thought some folks might find the chronicles of my misadventures interesting.
Goals for this trip:
Remove 100% of large spiders that have taken up residence in my absence
Finish floor
Stud walls/ceilings
Install hardware (tie rings, door holdbacks, etc) before insulation goes up
Remove welded steel hooks/blanket bar (replacing with a different solution)
Insulate everything except the windows
Future goals:
Add finishes over insulation
Add custom storage solution on bulkhead wall
Add electrical panel and marine battery setup (for lights, USB charging for electronics, maybe fans or a camp freezer)
My trailer is a 2003 Adam 2H GN, all-steel; dimensions are 7’x4’ for the usable DR and about 7’x7’ for the gooseneck itself. My tow vehicle is a diesel F-250, so I’m not really concerned about weight. By the time I got done unpacking Mare in her southern digs, it was too dark to take reference photos, so this (snipped from the original sales ad) is what I’ve been working from:
The stuff in it was the previous owner’s, and the carpet (and the carpet glue…) was already been removed prior to the FL trip, because twenty-year-old carpet in a trailer that once had roof leaks smells great. The process of removal was in and of itself quite an odyssey, since it took me a while to light upon the Magical Angle Grinder (my new favorite thing), but that’s a story for another day.
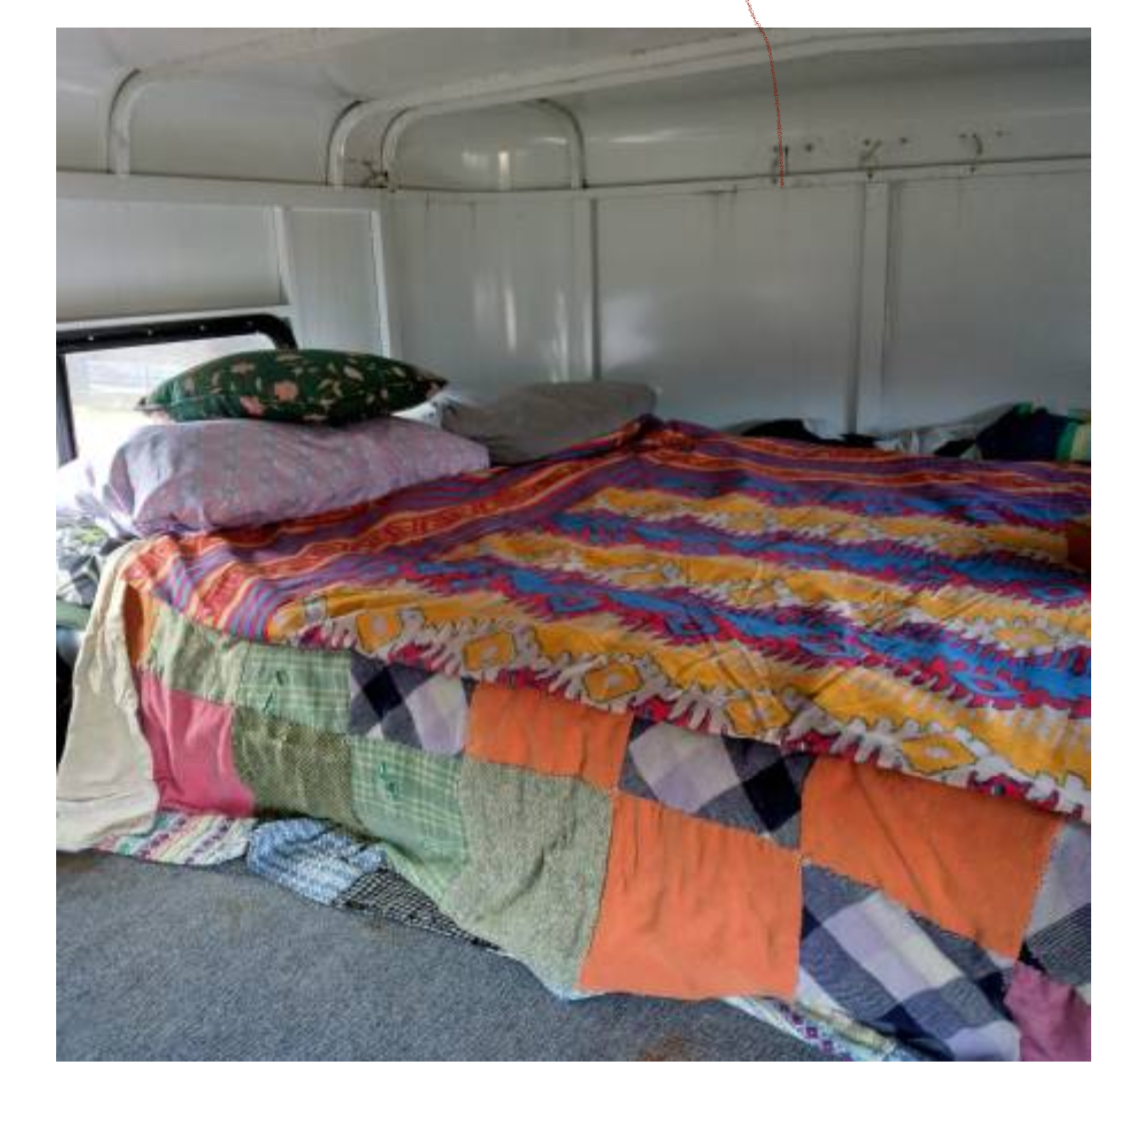
I’ll be heading down this weekend, probably Sunday, and am preloading a lot of my supplies. Yes, I will be sleeping in it that week again while I’m building it out, which should be motivational. Let the games begin!
What I did for the bus windows in my GN was get ready made valances that fit the windows.
Attached Velcro to the window frame & fabric - the sticky kind, not the stuff you have to sew on (I do not sew. Ever.).
Made great curtains, so I could sleep w/o sun waking me or worrying about people peeking in (yeah, I know: unlikely, but…).
Could also leave windows open for fresh air.
I got a clip-on battery lamp, so I could read in bed.
I had room in the DR for a folding chair if I didn’t feel like being in bed.
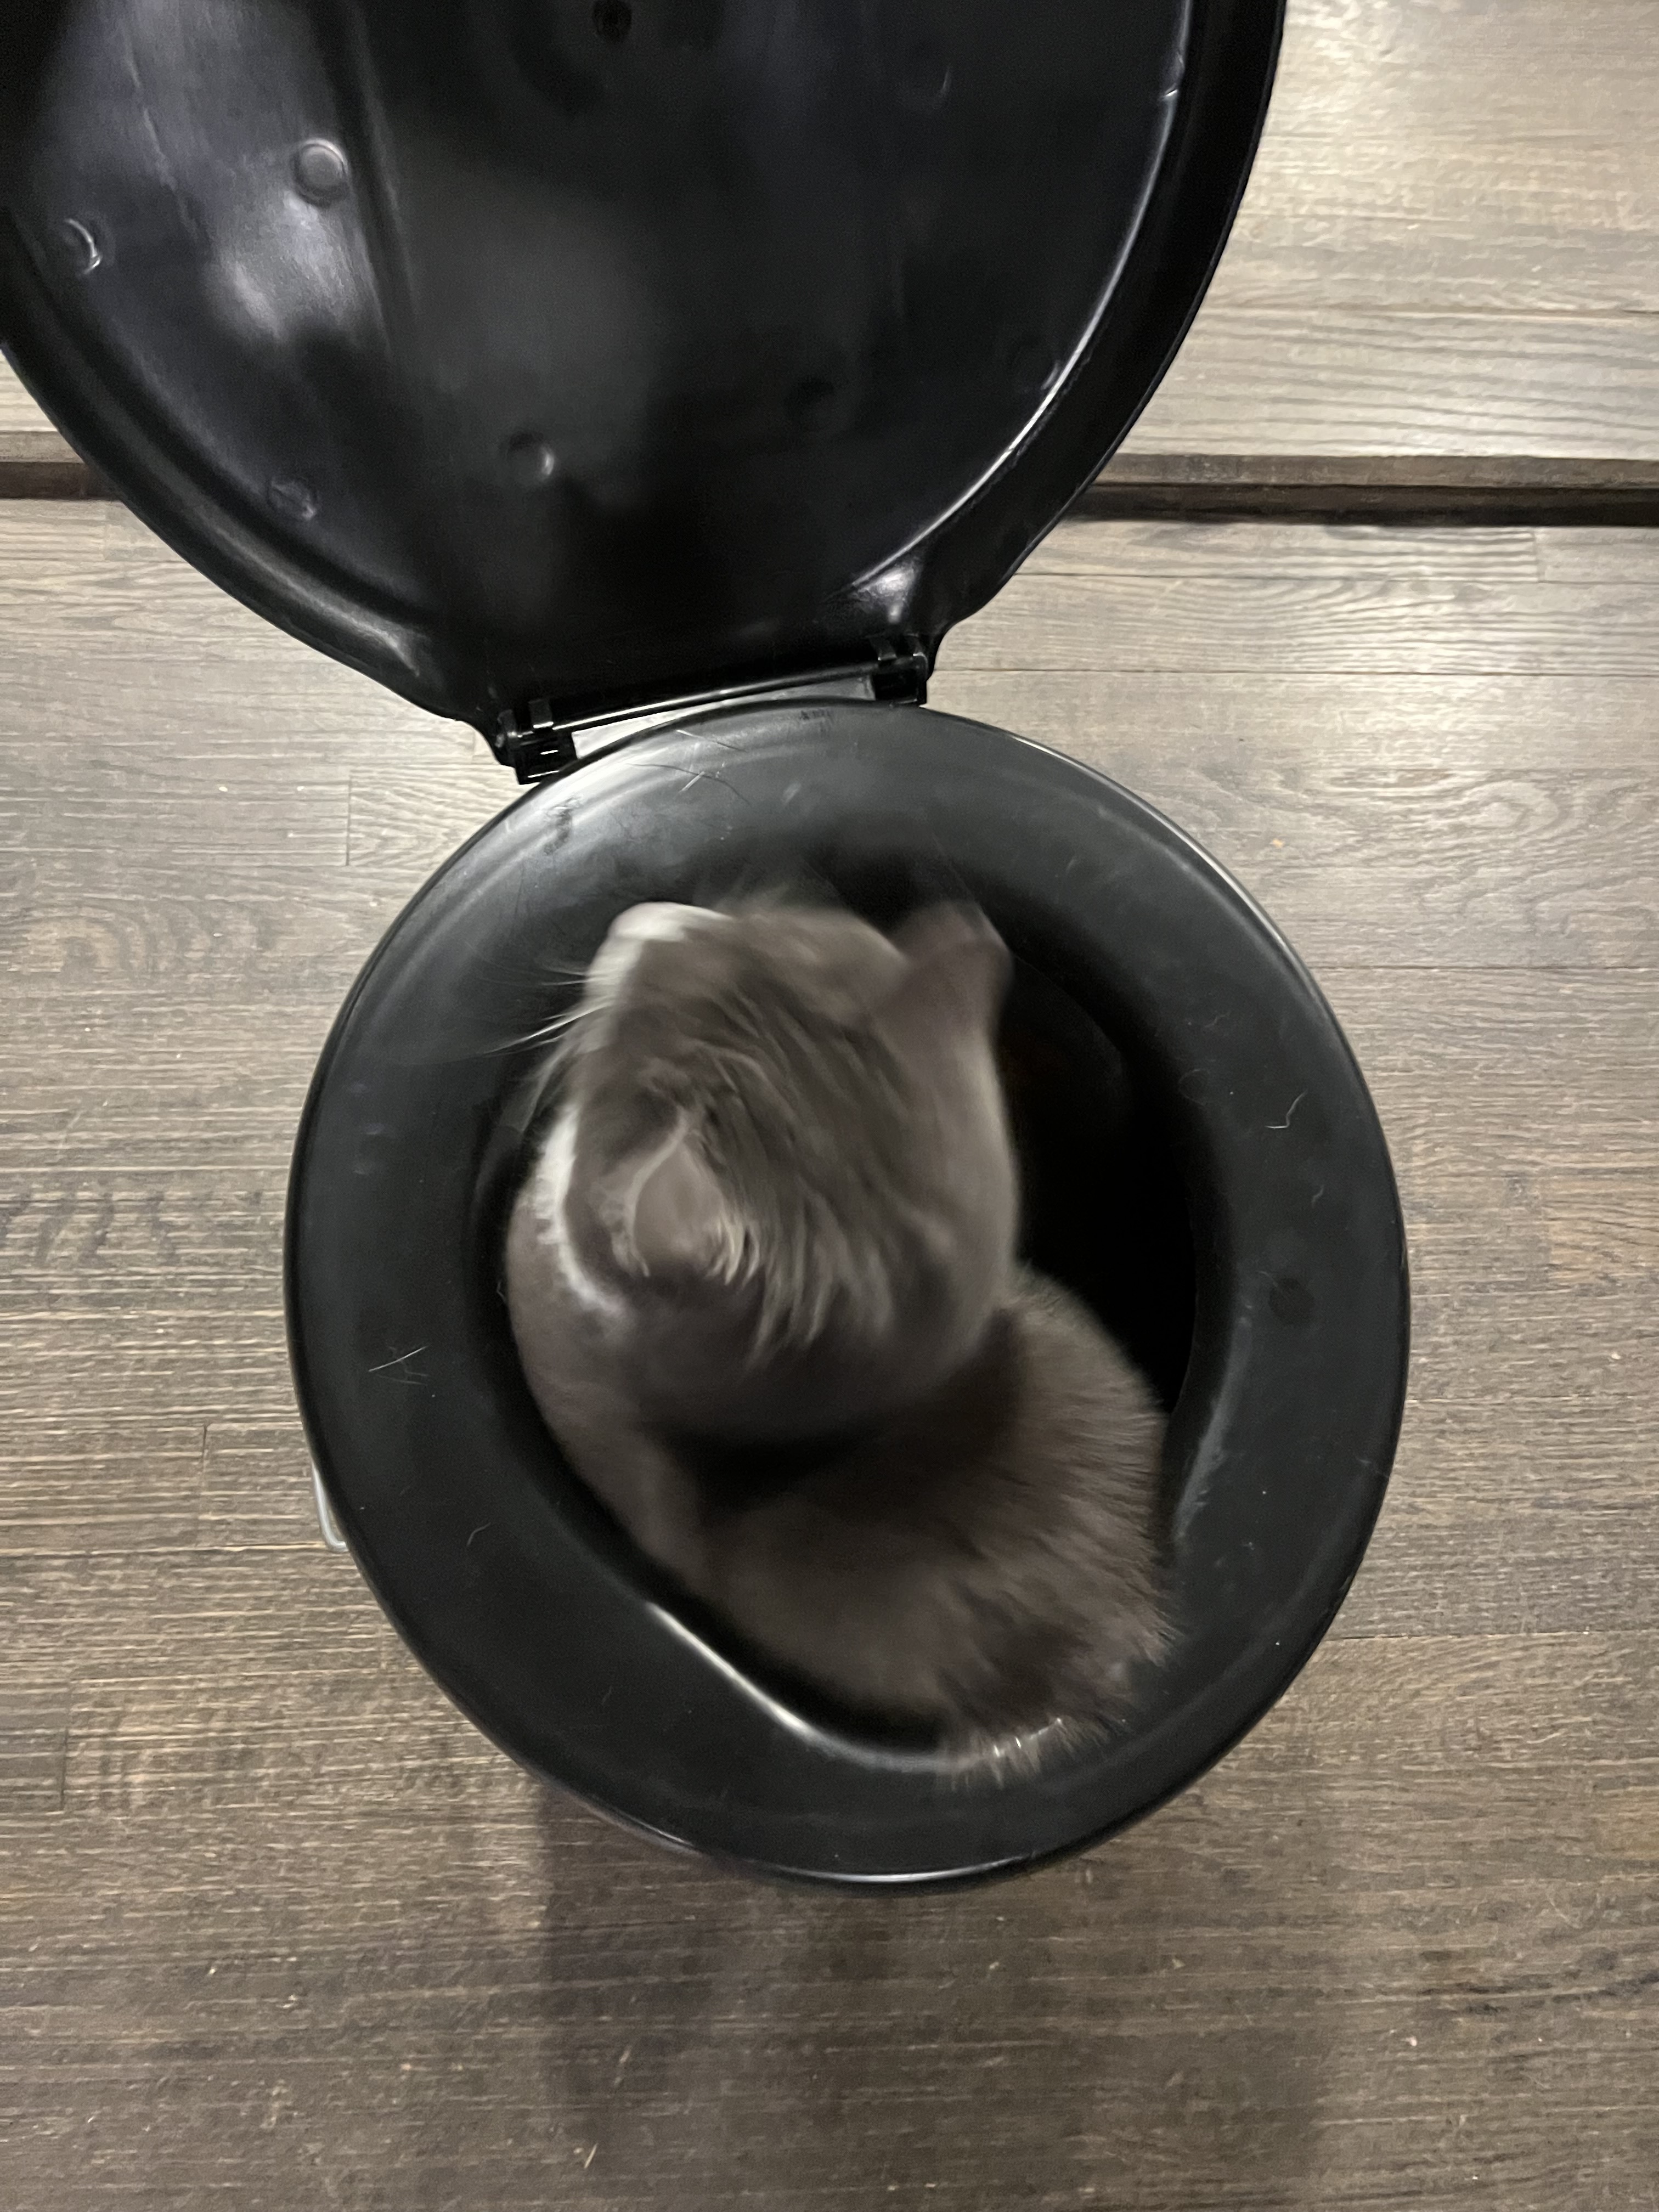
And (TMI?) a 5gal bucket with a lid that I lined with a HD garbage bag filled with clumping litter & Voila! Camping Toilet. No trekking in the dark to pee
If you haven’t already I highly recommend checking out the horse trailer conversion FB group. Lots of great tips, especially for insulating and finishing the walls and floor, and tons of design ideas. https://www.facebook.com/groups/912876135499961
A few tips I’ve picked up from that group regarding insulation:
Foil backed insulation, Styrofoam, spray foam or even bubble wrap do not work as insulation in a metal horse trailer because the walls do not breathe like they might in a sticks and brick built building. In fact the wrong insulation actually attracts moisture and encourages mold to grow.
Specifically use Extruded Polystyrene (XPS) foam board for insulation (blue, pink or green), non-faced/no foil.
Use aluminum tape. Duct tape is not appropriate in this case.
A lot of people question the furring strips step. It is absolutely necessary because it creates the dead air space and this eliminates condensation. Dead air space is in effect another layer of Insulation.
The last couple days have been Amazon Christmas. I’m doing rigid foam insulation on all the flat parts, but using neoprene foam for the curved parts of the ceiling/nose and to provide a thermal barrier over the metal ceiling studs (I’ll be sistering the wood 2x2s along the side of the roof studs, rather than on top of them, in order to provide maximum headroom; the R-value of the wood will be less, of course, but it should suffice for my purposes) and so I ordered a bunch of it off Amazon, plus some smaller parts (certain pieces of stainless steel hardware, tie rings, door holdbacks, etc.)
Naturally, because it wouldn’t be Amazon Christmas without things that were supposed to arrive in two days randomly getting delayed, I got a notice on Tuesday that only two of my three rolls of neoprene weatherstripping would arrive before I leave Sunday. So I did the Amazon Trick and ordered more (hypothetically arriving Thursday) with the plan of returning whatever I don’t need that shows up.
This has resulted, of course, in me now having two extra rolls of the neoprene weatherstripping, but being down a roll of the larger neoprene padding, which is now scheduled to arrive “by Sunday.” I’m leaving around 4-5am Sunday so THE RACE IS ON. Additional result: I’ve been giving my saddle racks, which I pulled before taking the trailer down, a glow-up (more on that when I finish them) and had planned to neoprene those as well, but am now holding off until I see if I have enough extra to do that; I can always do the saddle racks when I get back.
In happier news: found some of the 2.25" wood-to-metal specially-coated fasteners I need on eBay for 1/5th retail. And they showed up in a timely fashion. And they were actually as advertised (and also parceled out into grocery store deli meat bags, which made me laugh harder than it probably ought to have.) Score!
Other bits and bobs:
Got my friend who’s down there to take video of my DR so I could count the roof studs. I was very close to the correct number and also there were no spiders big enough that I could see them on the video. Another win!
Had thought that I’d left The Magical Angle Grinder down there because I couldn’t find it. She checked and couldn’t find it either. Which made me remember that I actually put it away, in a cabinet… so obviously I couldn’t find it.
Did actually remember exactly where my saddle rack affixment bolts were. To wit: in my grooming kit in my cubby at the barn where my horse isn’t right now. Retrieved them.
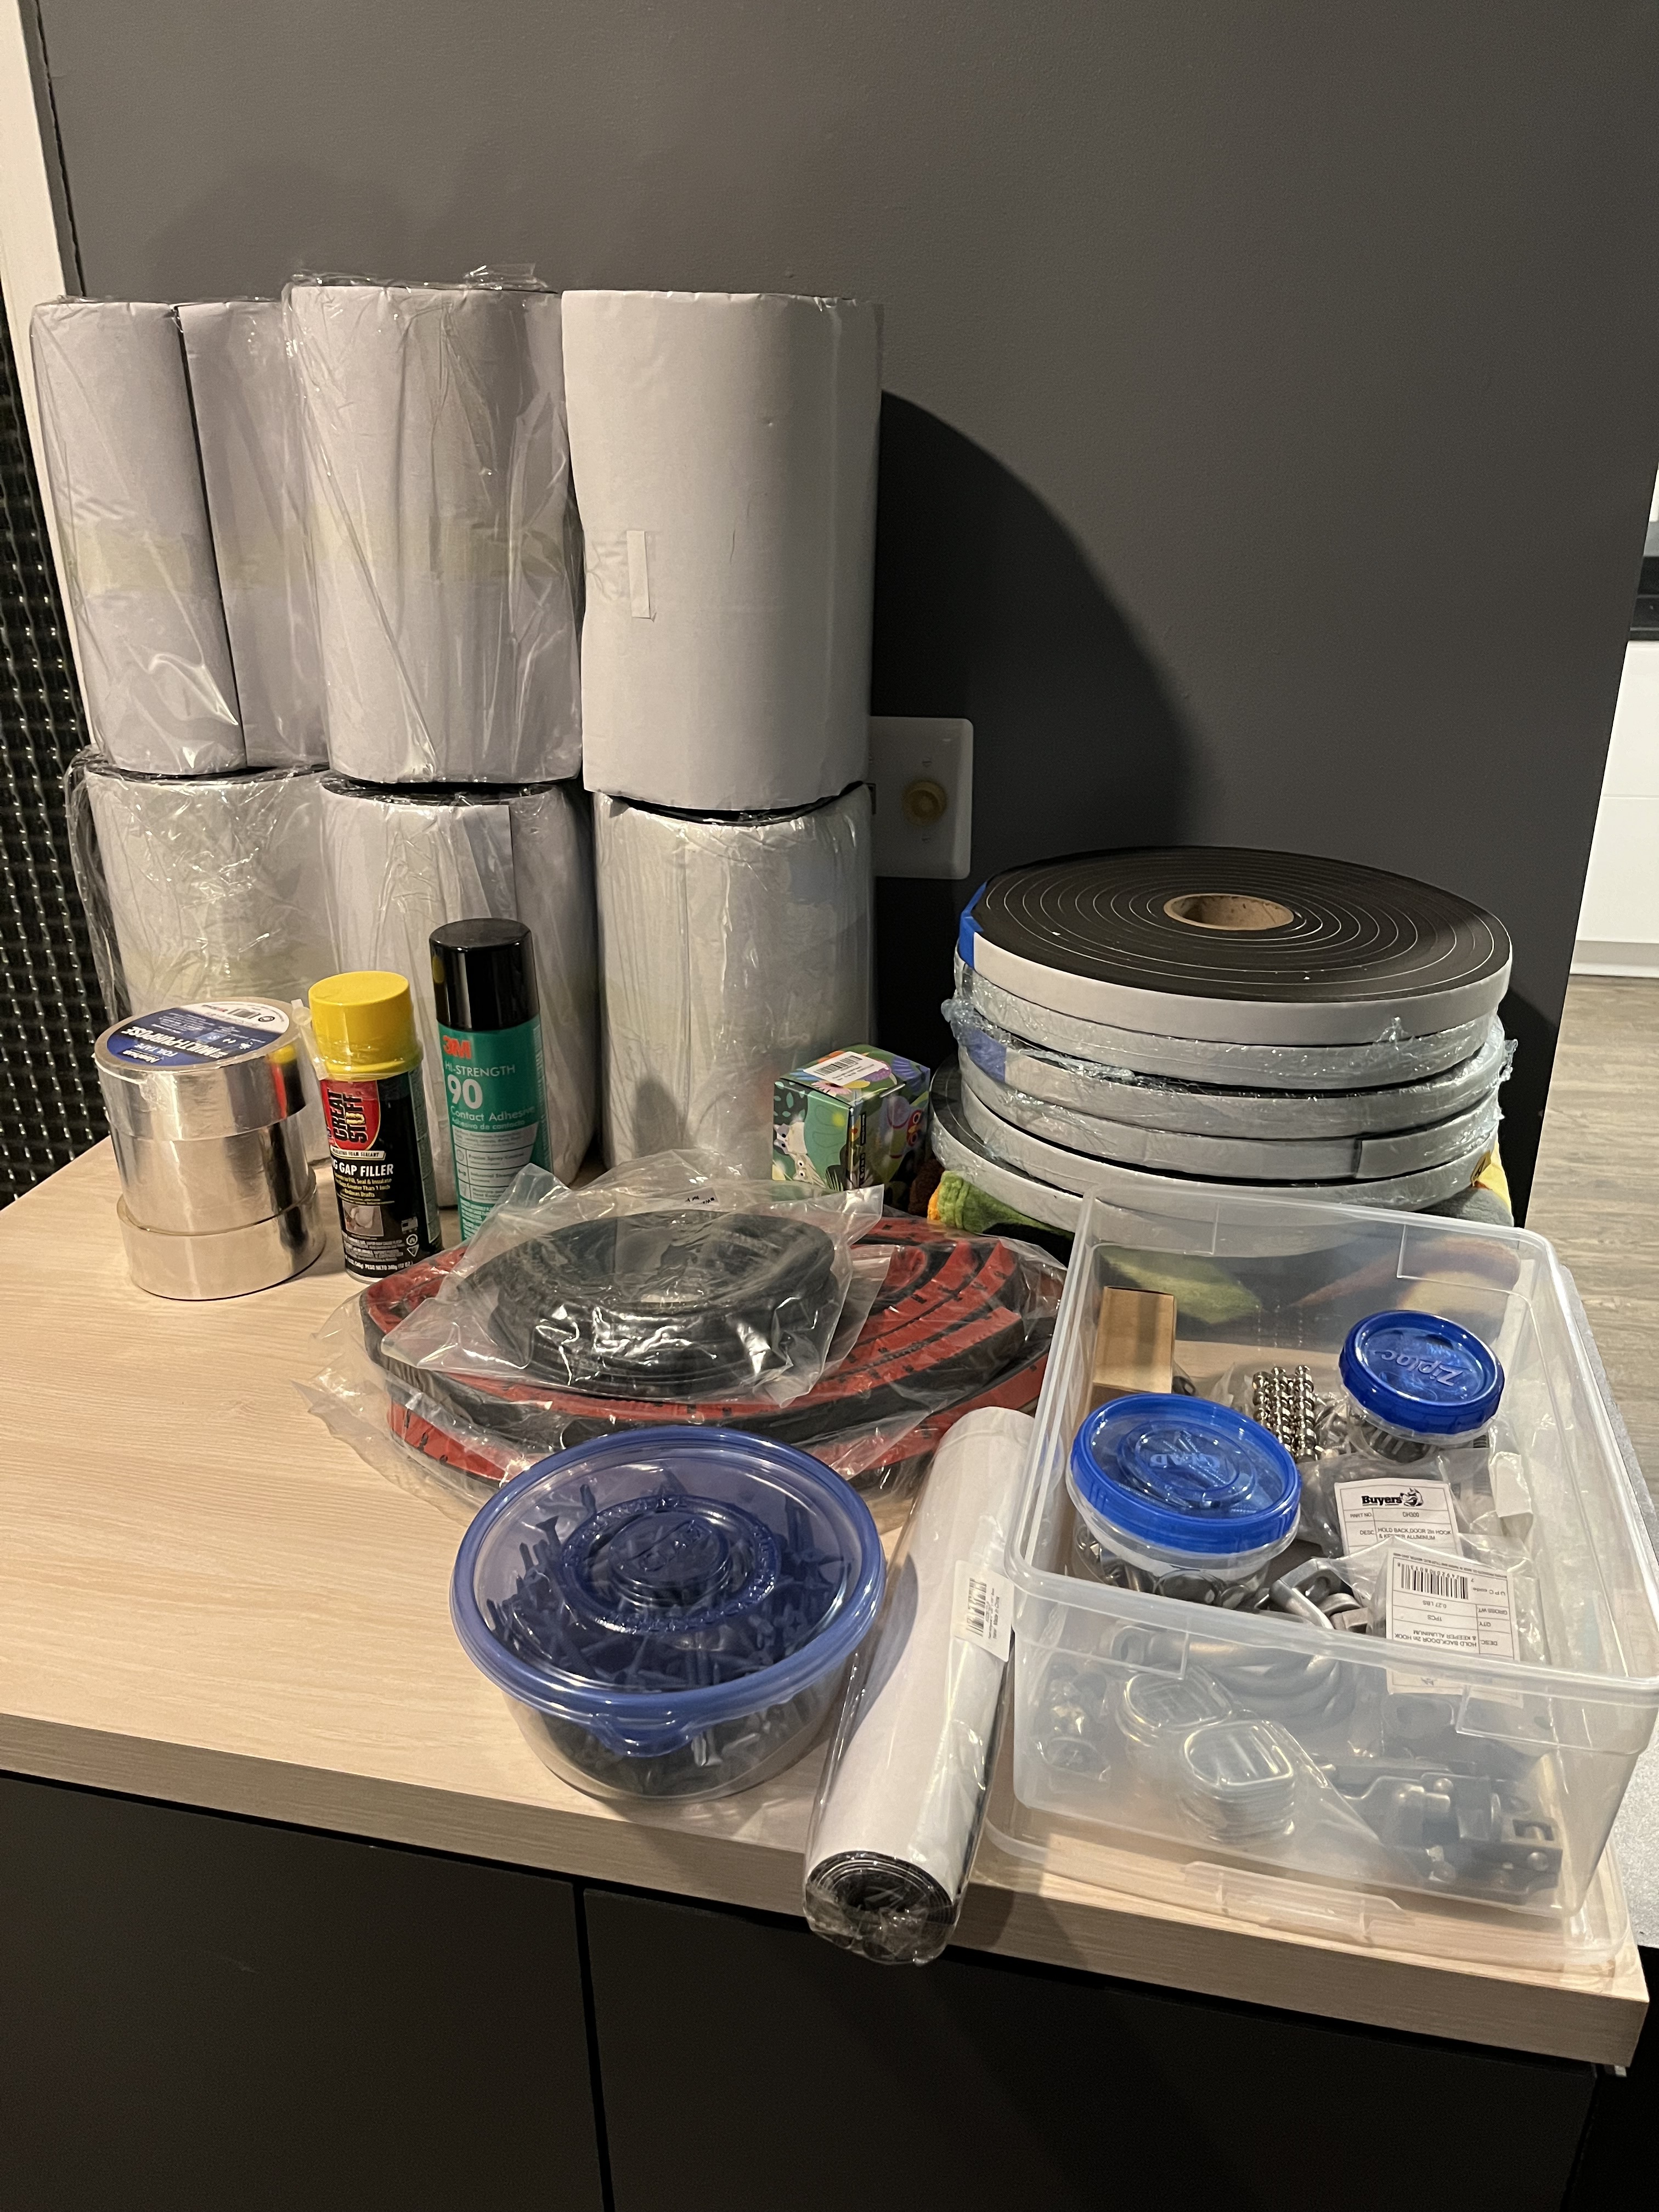
Amazon Christmas Spoils, plus things I already had but am staging, minus the can of rust converter that the cat decided to murder:
I am between the two of you: I sew a mean whipstitch and nothing but, which I use for attaching sarcastic patches to things and reviving dog toys. Eventually I plan to do nicer curtains, but I want them to coordinate with the final finishes, so waiting on those.
For this trip, though, I present to you: Nightmare Fuel. To wit:
This is the package insert card for a blanket I received from a well-meaning relative for Christmas. It’s even more terrifying in blanket form. I plan to chop it up into curtain-sized pieces and attach them with the tiny magnets in the small-parts box above (see: Amazon Christmas.)
I splurged on the Luggable Loo because I thought a seat would be nice and also because I wanted to horrify my spouse. There’s a bathroom with an actual toilet in the barn, but the barn is quite a hike in the middle of the night.
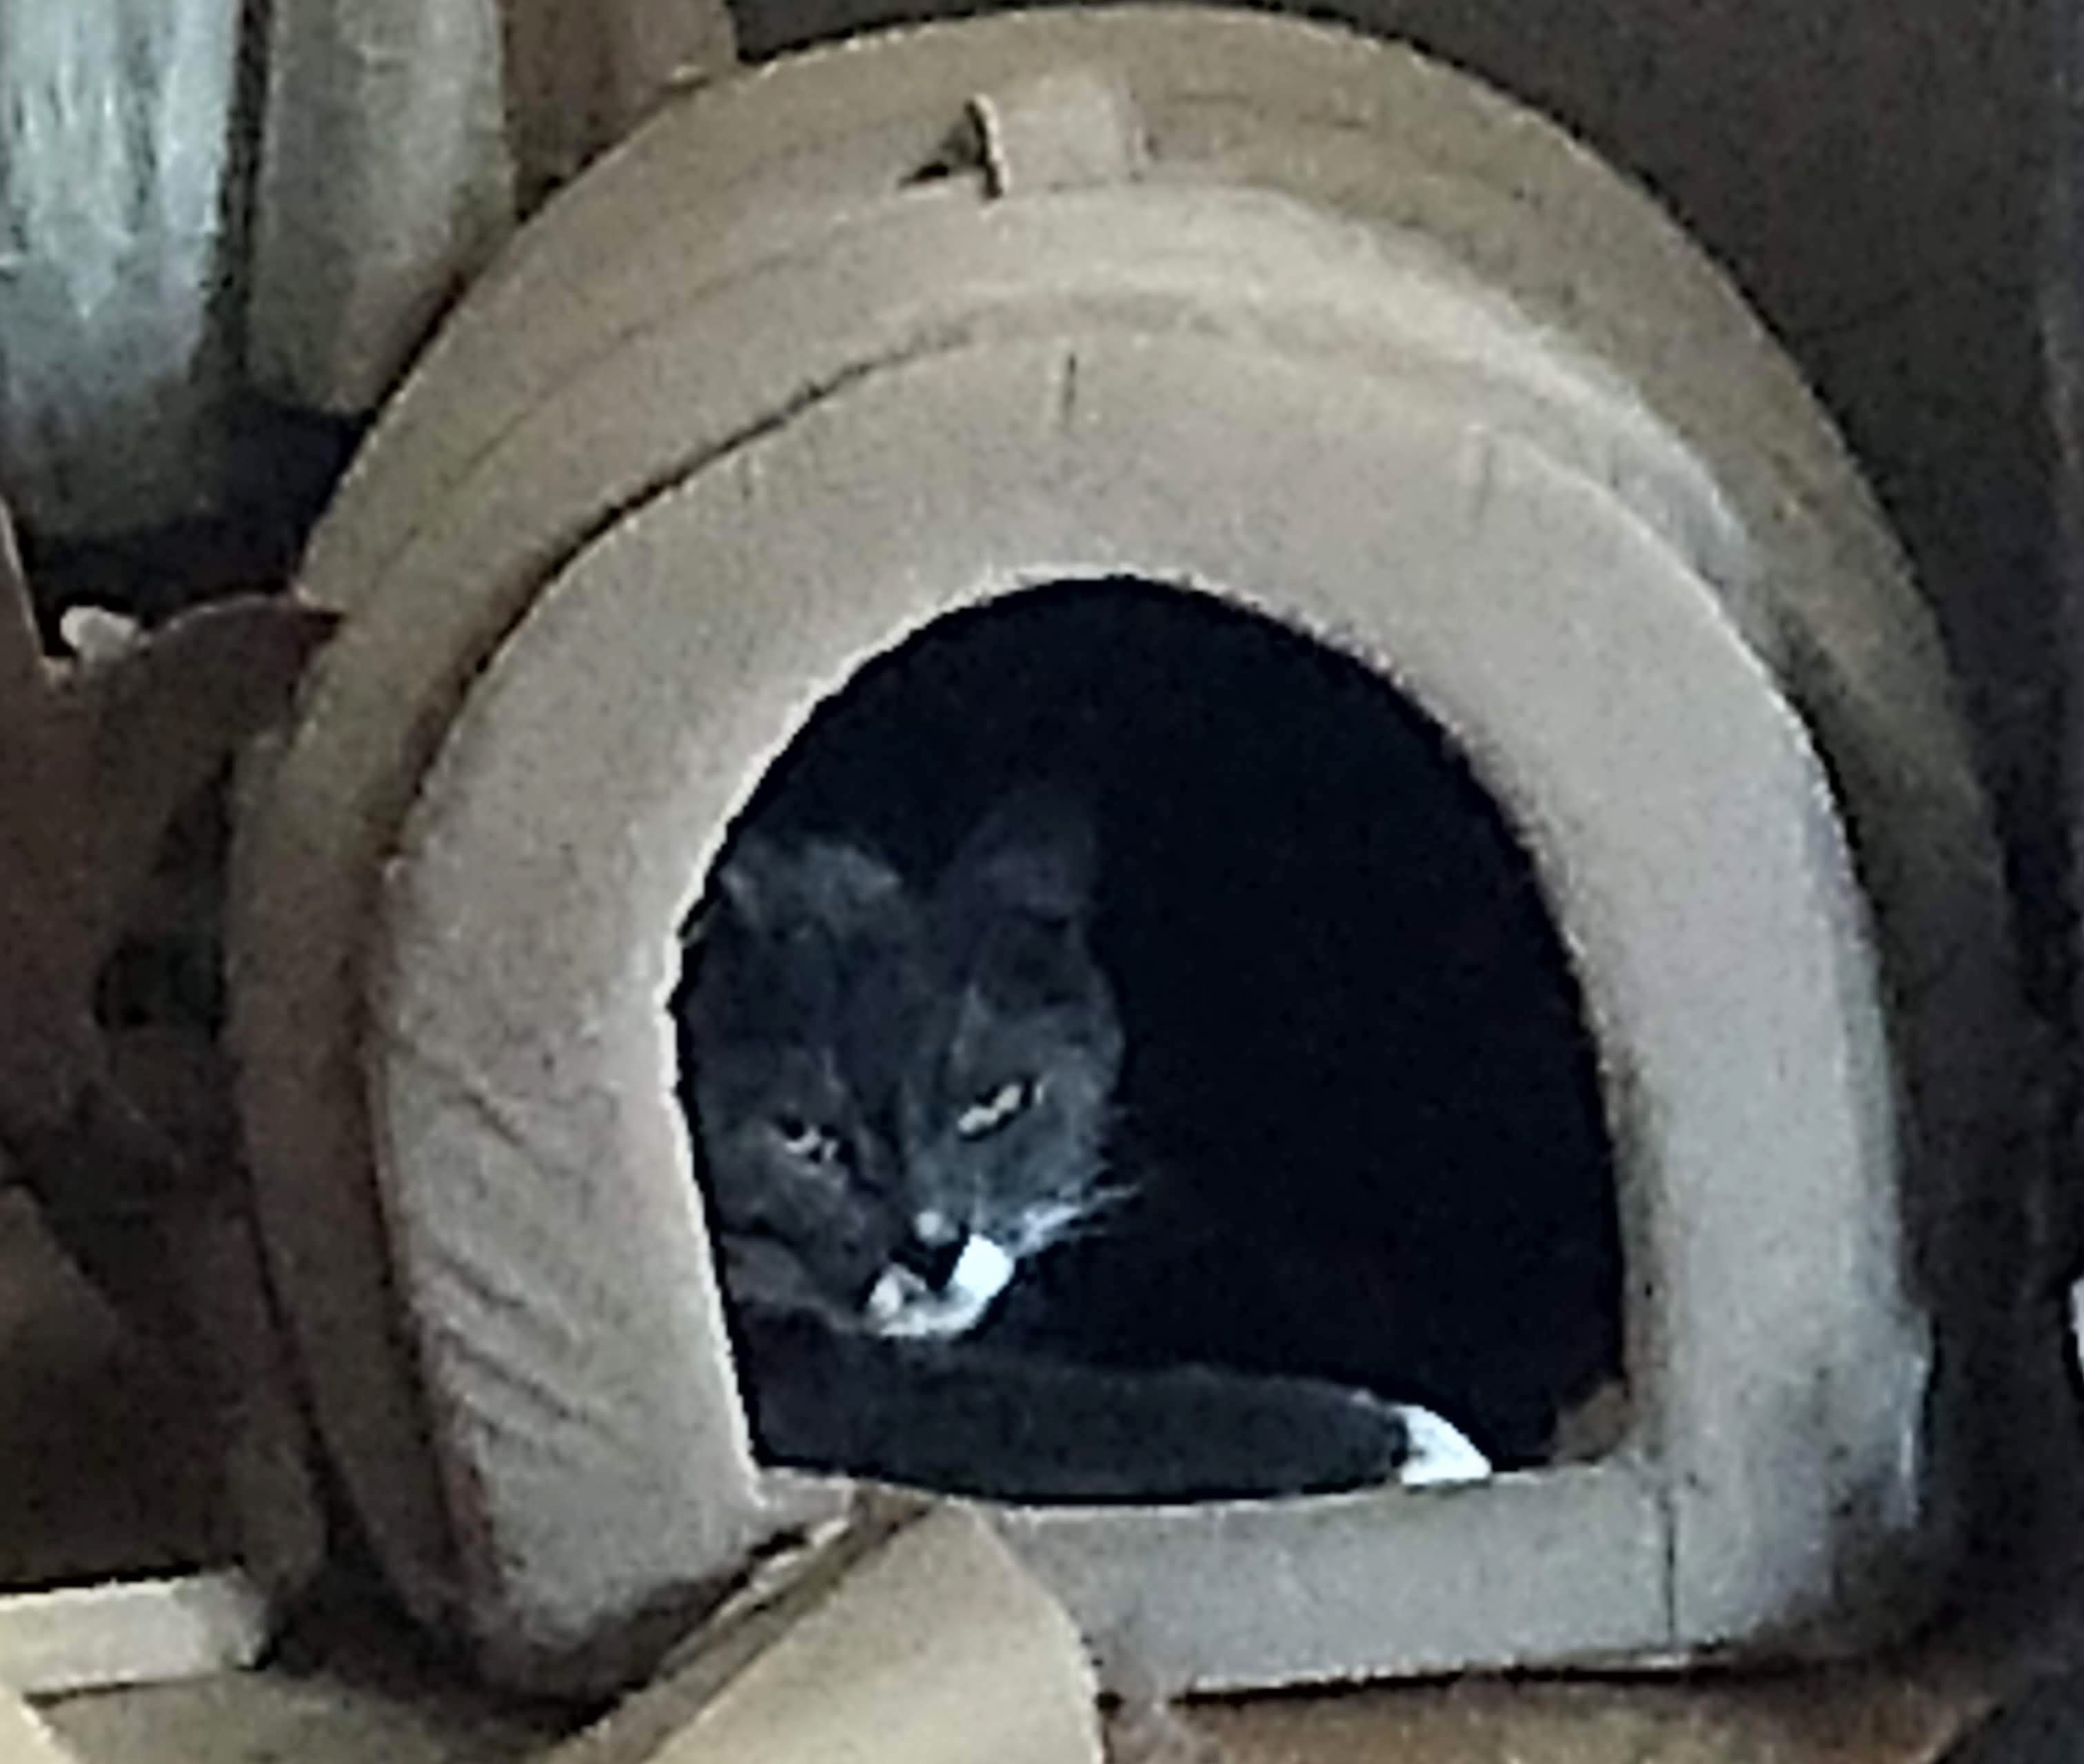
I am unduly entertained by teaching the smaller animals to fit themselves into spaces, and when we got this cat he hid behind the toilet for three days, so it seemed only fitting that he return to his Toilet Cat roots.
I’d thought about doing the electrical setup this time, but turns out that insulation is actually pretty expensive! Oh well. There’s always real Christmas, for a LiFePO4 battery and panel. In the meantime, I’m digging up all the various rechargeable light sources I have about and packing those, requisitioning Spouse’s powerbank for the trip, and leveraging the truck and barn electricity.
I read about that previously and would love to, because it sounds like a great resource, but sadly I’m deathly allergic to Facebook. In lieu, reading previous threads here, as well as on the HorseTrailerWorld forums and various van conversion sites, has been really helpful! I’m sure my plan won’t survive contact with the enemy (the enemy is the trailer), but that’s part of the fun.
These are definitely good and workable/functional tips that folks would do well to use–thank you for sharing!
That said, I may live to regret my choices, but I’m doing things a bit differently!
I am planning to use foil-faced polyiso, for a variety of reasons. It’s more environmentally friendly, it has a built-in vapor barrier bilaterally (which can be a good or bad thing but in my application should be a good thing), it’s more temp-stable, and the R-value is higher except in extremely low temperature situations I don’t expect. To mitigate the concerns they’re expressing about the vapor barrier, I plan to seal the edges of all foam installs thoroughly to avoid moisture-laden air hitting the metal skin in the gaps between the foam panel itself and the edges of the studs. 1.5" polyiso should give me sufficient R-value for my needs even without it.
It’s true that some building types breathe more, but contemporary building envelopes are, to my understanding, much tighter than historical instances, and some codes do require a vapor barrier as well. Additionally there is some full-metal construction out there these days too for houses. That said, my primary source here is the van conversion people, who have a very similar use case to ours. This is an interesting thread on the subject; though he didn’t specifically test XPS, it comes up in the comments.
While I will also be doing furring strips as studs, I’ll be doing it because I want to be able to hang finishing material without creating additional holes in the studs; there won’t be any air space created by them, mostly because I don’t want to lose the additional space and I also don’t want to create critter runways if there does wind up being a spot I miss. Either dead air space or no air space should eliminate the condensation, which is my primary objective.
I do definitely agree on the aluminum tape front, though, since duct tape is vapor permeable!
I’m imagining waking up to be greeted by that army of sneering equines
I have a more peaceful piece of felt serving as a curtain for a window in my barn.
It features horses in various types of tack, mainly headshots.
At ToiletCat!
Mostly because he looks like my Bounce:
You’ve definitely researched this and have a great plan!
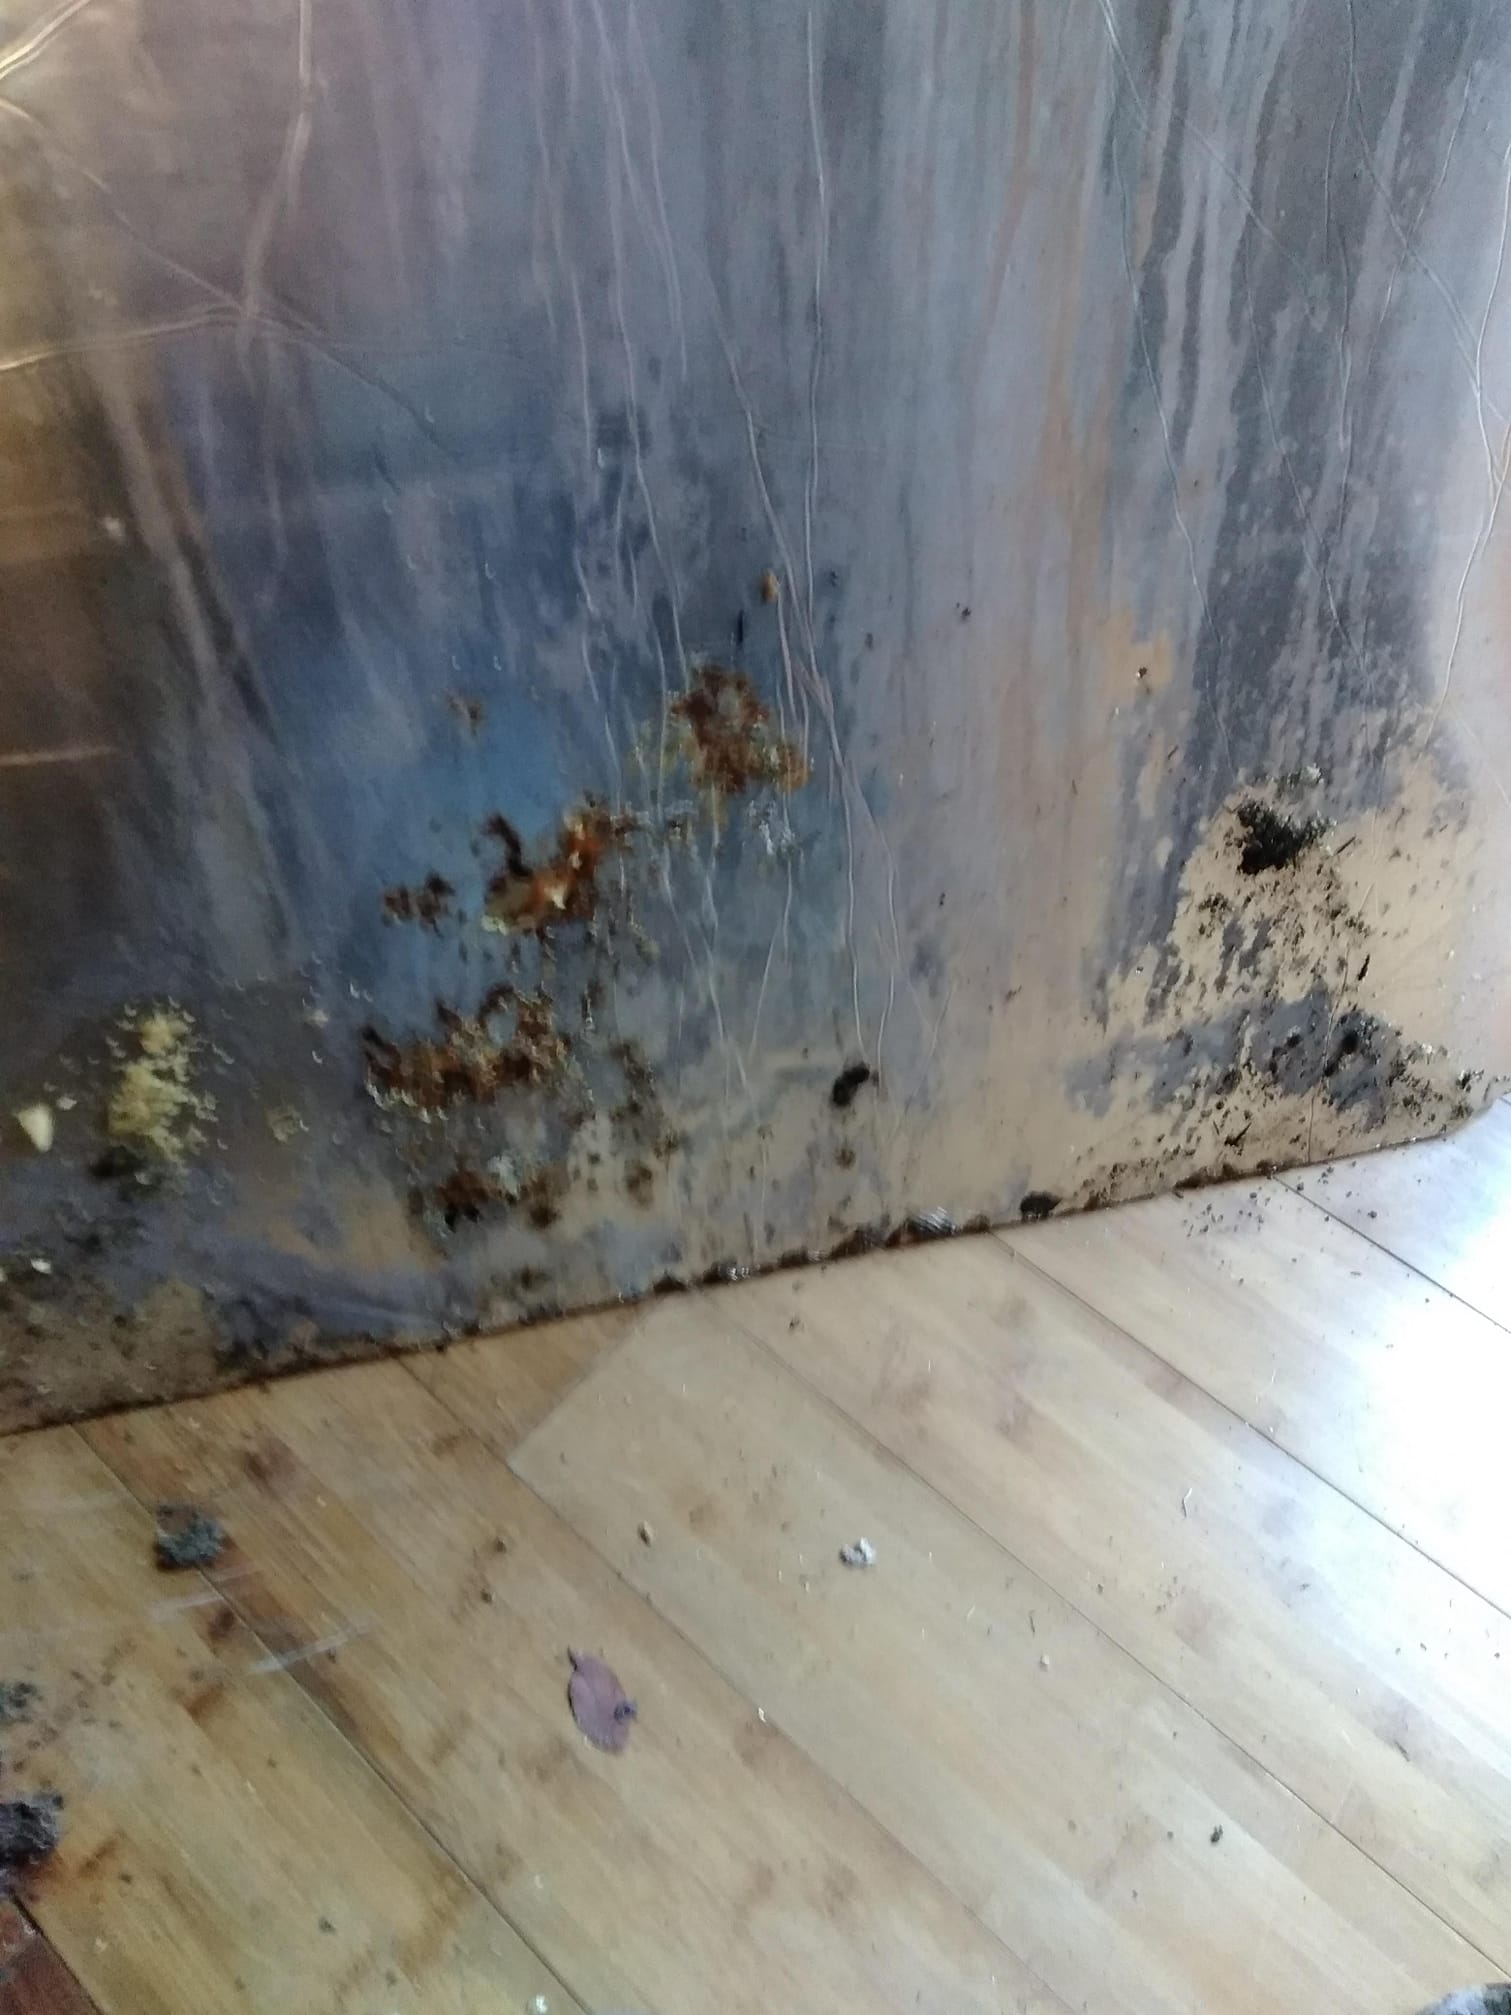
I think another concern with the foil-backed insulation is rusting/corrosion with the wall of the horse trailer - one of the pros (does conversions/restorations for a living) posts this picture a lot of a client’s trailer he had to gut because it was eating through the trailer walls. Not sure how commonly this happens though.
For those of you who were wondering, I didn’t accidentally kill myself with the angle grinder and/or drive off the road on the way home.
This wound up being an overly ambitious set of goals, given the following factors:
It was raining for two of the five full days I was there
Driving 30 minutes each way to do a 90-minute workout and shower plus AM/PM chores takes up a lot of time
The angle grinder is amazing but perhaps not as good as the many actual tools I needed
… and, the main one:
… I had a lot more fun than I was planning (kayaking, nature walks, so many breweries, board games, etc.) and prioritized fun vs. progress during the trip itself.
This ultimately resulted in me finishing the following items while in FL:
Spider removal (nothing huge, yay!)
Insulating and installing the subfloor (with the asterisk that I had to pull it back up again when I was home; more details to follow)
Unwelded the blanket bar/hooks, with my unwelder, which is actually an angle grinder with a cutoff wheel
Insulating around the windows
Mitigating rust and repainting the bare steel gooseneck itself to avoid future problems on that front
Items that have been completed since I came home:
Roof, bulkhead, and gooseneck wall studs
Full ceiling insulation (taping, two kinds of foam, etc.)
Installing tie rings and holdbacks everywhere
Flooring install (including subfloor tweak)
Additional insulation (three kinds!)
Fixed a couple exterior lights
Fender glow-ups (paint/edge guard)
Some horse area seal improvements (more needed)
Items that still need to be finished for which I have all the materials:
Finish cutting/installing/taping rigid insulation on walls
Finish the flexible insulation
Studs for bed/jack wall and dressing room wall
At some future point:
Insulation for gooseneck/jack wall
Plywood for the bulkhead/gooseneck/jack wall
Storage setup for bulkhead wall
[maybe, as money/desire allows] Finishes over the insulation for ceiling/walls
[maybe, as money allows] Electrical (fans, lights, switch panel, etc.)
Planning to document all of these past and future as I have time! Did a slightly better job than I usually would of taking pictures, but still not good. That said, really happy with how it’s going so far even though some things have been a bit more painful than I thought.
Huh, that’s interesting! That looks more like corroded aluminum to me than anything I’d expect from steel, but I could be totally wrong. Do you happen to know if it was aluminum or steel in that photo?
I did ultimately decide to go with the polyiso regardless, but I also took steps to avoid that specific issue (sealing the bare steel with paint before insulating.) As always I may live to regret my mistakes!
I looked back and he didn’t specify aluminum or steel, just says metal.
I had to completely gut customer Lq because of foil back insulation. The pic is of insulation against the metal wall side. It had started to eat through the metal walls. Plus all of the mold and mildew against the inside wall because of no dead air space. So Do NOT EVER USE FOIL BACKED INSULATION. Green, Pink, Blue unfaced or peel the outside plastic off insulation.


 I’m imagining waking up to be greeted by that army of sneering equines
 At ToiletCat!