
The response of the thieves might be that in the current booming real estate market, the property value rose so much during the extended “escrow” that the cost of all the stolen items is more than covered. 
1 Like
I so hope they at least left the house in more easily quickly occupied good condition.

No. This is why it took a month to get around to dealing with horse facilities. I was cleaning actual  out of the house, too. Think “stuff of nightmares.”
3 Likes
It was not that scientific, but the hot market was to blame. Basically, they knew they could get away with anything and still sell the property to someone else if we walked away. We have some legal actions pending still. That is why I have not posted many pictures of the house.
4 Likes
Omg ! That’s so wrong but not a surprise I guess. I promise you. In the end this will all be a weird story you tell people and make your end result so very sweet.
If you are planning on getting rid of that shedrow anyways, I would level out the dried up shit as much as possible, throw some mats on it, and put real bedding/shavings on top. Particularly if it floods- digging out all the poo is going to leave a lower ground level. Unless you plan on filling it in with stone dust, which would be better, but if you have plans to build new barns/sheds, why spend the money?
4 Likes
@Texarkana
Wow, fabulous paddocks! The wood on the stall looks very sturdy and like it’s in good condition. If the structure is poorly made, at least you could recycle the wood.
That fencing looks great on the ready to go paddock!
I will commiserate with you - when we moved in I was out in the barn using a hatchet/ ax to break up the that had hardened into an almost concrete like mixture. We also had a full stall of hay that was several years old and moldy.
It gets better! Our barn is still a WIP but the horses are home, happy, and safe in it despite it not being the fanciest.
2 Likes
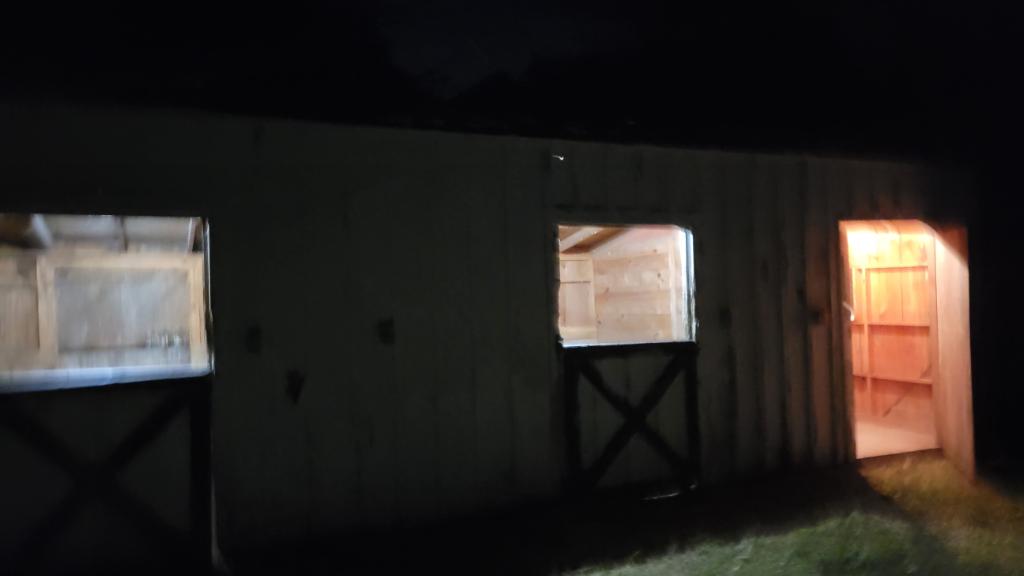
This was a pleasant surprise tonight! Mr. Texarkana is the BEST. Barn was wired but I don’t know if the electricity had ever been hooked up. Let there be light!
It doesn’t look so bad in the dark. Unfortunately the back of the roof and back wall are in bad states of rot/decomposition (like, I’m worried my horses will rub their butts on the back wall and go through it). But I’m surprised we got it this functional so quickly.
The stalls only took me about 90 min each. I just mucked it all straight into the bed of the pickup. I filled our entire 8ft bed about 1.5 times per stall!!!
Oh, and my carport arrived! Now we just need to assemble it. The review say it takes ~4hrs.
16 Likes
You’re doing an amazing job sorting it all out - what a huge effort!
Report back on how long the carport actually takes to assemble  my experience with both the Black Hole of Farm Time and assembling things is estimating that it will take most of a day and possibly some of the next
5 Likes
Great job.
Somewhere on the board is a thread from my farm purchase 7 years ago. I had the adventure of
buying at a county tax foreclosure auction. The singlewide trailer was structurally good, but disgusting
inside, it was completely overgrown, and there was no functional barn but there was the remains of an old dairy barn. It took an entire summer, but I got the trailer habitable, the old barn demolished, a new barn built on the old foundation by an Amish builder (most economical way) and some fencing up so I could get the horses home Halloween night. Electric and water weren’t installed in the barn until late November or early December.
7 years later there is still work to be done, but I sometimes remind myself how far it’s come.
9 Likes
@Feliz Right?!? Four hours was what people were saying it took them in their reviews of the product (not what the manufacturer says or anything). We’ll see how long it actually takes. I was hoping to maybe start assembly tonight, but I’m not sure that will happen. We’ll probably be doing it with equine supervisors. It’s supposed to rain Monday so I would like it up, especially since I still haven’t bought mats for the stalls.
Side bar: how do you put down 4x6 mats in 14x14 stalls to get max coverage without having to cut narrow strips of mat?!? I don’t know if there is a way or if my geometry is just failing me.
@Christa_P I remember your story! What did you do for months without water?
I thought I had a normally installed frost free hydrant in the barn area. What I’m learning is that the sellers half-assed everything. What looked like a normally installed frost free hydrant is actually a frost free hydrant somehow hooked to a shallowly buried pipe attached to a second hydrant by the back door of the house. There is a spigot next to the hydrant at the house. You hook a hose from the spigot to the house hydrant and turn them both on, and that’s how you get water at the barn. What on earth?!? Why???  So I guess properly plumbing and installing a frost free hydrant is on the list of things to do. I just hope we have a mild winter so the entire contraption doesn’t freeze solid before we can get around to replacing it.
Make a 12’x12’ mat space with a 1’ gap on all edges?
So three rows of two mats, centered in the stall.
If you want 100% coverage then you put the three rows of two mats starting in one corner and then you need to cut to fill the 2’ gap on the two sides.
Edit to add graphic.
Cyan is full mats, red in first image is stall. shows gap between full mats and edges.
In second image the yellow is cut mat pieces if you want full coverage.

4 Likes
That was one more reason we made our stalls 12’ x 16’.
There are companies that will sell you cut to order mats at no extra cost.
You probably will have to order where transportation costs would make them more expensive than just cutting some down.
How many stalls are you talking about?
If we were installing your mats we’d probably put the 2’ strips down the center so that there’s not so much pressure against the edges that would push the smaller mats up. Another way is to put the full mats, 2 of them, down each side and then the full mats crossways between the 2. Again, put a 2x6 strip in the middle as well a 2x4 strip in between the full mats on the edges. That way, there are fewer seams meeting. Of course it’s real easy if you have access to 4x7 or 4x8 mats.
2 Likes
Thank you for taking that time! I had done the same thing on paper and came up with 3 solutions: the 2 you posted, plus a 3rd with a 2x2 square in the center.
Like @tobruk pointed out, 2’ strips are likely to get pushed or shifted. In my experience, being in the center is just as bad as being against the wall, maybe even worse. So I don’t want to mess with strips.
I think the best plan for the time being is to lay them as one would for a 12x12 stall and just deal with the gap.
@Bluey I’m just buying them locally because it’s only 3 stalls.
I hope this works for the layout. There is a third way where you only need to cut 2 mats.
Set 3 with the short side along one wall, then set 4 in front of them turned 90 degrees. This gives you a 12x14 area and you could either leave the 2’ strip or cut mats to fit.
Stall mat layout.pdf (80.6 KB)
2 Likes
For water, I had an outside spigot at the house so I ran hoses to the barn as long as possible, then hauled water from the house until I got water in the barn - it was only around 6 weeks I from when I brought the horses home until I had a sort of functioning hydrant.
My issue was similar to yours, I had to run water in the house so the hydrant would work. The problem turned out to be a check valve by the pressure tank and pump switch under the trailer. I T-ed the line for the hydrant off the water line close to the well which was before the check valve so when I turned the hydrant on there was no drop in pressure so the pump wouldn’t come on. I finally had that fixed along with burying the part of the water line to the house** correctly the next fall.
** Example of doing things half a$$ed - at some point, probably the late 90s they replaced an old mobile home with a new one and water line attached in a different location. Instead of digging a trench and properly burying the extra water line, they put it on top of the ground under the trailer and wrapped it in heat tape. In Western NY. My electric bill was rather high keeping that thawed the first winter.
If you do this–and it would be my preference, too–you need a hard edge around your mats, or they’ll travel away from each other & allow bedding underneath.
Either use stall mat klips to secure the outside edge, or use a straight pressure treated board buried in the stall floor & secured with angle brackets to the walls to create a short wall and hold your mats in.
1 Like