
Newbie farm owner here… When doing fence repair, we’d been using 3.5" screws. However, we’re putting up about 1000’ feet of new board fencing using fresh sawn rough cut oak boards. I’ve been told 3.5" 16D spiral nails are the way to go. Is there any way to put these in short of hammering them? I can’t seem to find a nail gun to shoot them or a source of strips for a gun. That’s a whole lot of hammering otherwise…
16D aluminum ring shank are what you should use. Unless your are REALLY good with a 28 oz framing hammer. You don’t want to hammer/drive them in oak boards. If you have to use manual labor go with plan 16D steel nails. Otherwise you will bend FAR more then you will drive clean. Unless you pre-drill each hole.
That being said, rent a “gas” powered framing nail driver. “Gas” meaning nail guns that use a “gas” cartridge to power it. Other wise you will need a compressor, generator and pneumatic nail gun. The learning curve to use a nail gun is not very steep.
Do the math for nails, 3 per end of each board. Nail in a "v’ pattern if you have enough “face” on the board end and the post. Buy an extra box of nails from the rental yard. Most will take back, refund unopened boxes. And the gas cartridges.
This is the only one I have used. It’s a lot lighter than it looks.
YES to the Paslode nailer. Our framing contractor used one and DH promptly bought his own. Ka-thwak, ka-thwak, ka-thwak, done!
Ideally though, I’d use star drive screws and an impact driver. We don’t seem to have @Tom King posting anymore, he knew all the things about fence building, (and frost free faucets, and everything else on the farm…)
Here is his advice on fencing:
https://www.chronofhorse.com/forum/forum/discussion-forums/around-the-farm/139986-advice-on-diy-high-quality-4-board-fence-installation?p=4404342#post4404342
Whatever you decide, don’t try to nail large jobs with a hammer.
Especially on oak, if you don’t want a whole bunch of bent nails.
Also may get elbow bursitis, very painful.
I also just noticed…
> we’re putting up about 1000’ feet of new board fencing using fresh sawn rough cut oak boards
It will shrink as it dries. Are you doing the vertical front board over each post? That will help it all stay straight (and look nicer as the boards try to pull away from the posts.)
I have one inch thick oak kick boards in my stalls.
The old time way to nail oak is to:
-
Drill a slightly smaller hole than the nail.
-
Buy a cheap quart of motor oil at WalMart.
-
Put nail in oil, THEN hammer away but you still better have a good arm and a healthy pair of leather gloves to do the job.
I was raised on a dairy farm and have never in my life used board fencing for any type of livestock. We use woven wire and thankfully clipping woven wire to T-Posts is a lot less grief than nails when a couple miles of fencing is involved:(
Best of luck with your fence project — I Hate stringing fence almost as much as running the vacuum, lol
Using screws certainly will keep the boards tight for long time. But it is very time consuming. 1000 feet, 125, 8 foot sections of 2-4 board fencing is roughly enough to enclose 1 acre. So it is not a lot in the grand scheme of fencing. But still requires around 1.700 nails/screws. 9 screws/nails per 16 ft board. There are 62.5 16 ft boards per 1000 feet, X 3 boards = 188 X 9 nails/screws. That is a LOT of screws to drive. Very time consuming compared to a matter of seconds to drill 3 nails and move on.
Even though the batteries for power tool have come a long way in recent years. It takes a lot of power drive 3" screws through oak. So if the builder wants to keep moving along they will need to have 3 batteries the largest size 18 volt, and two chargers. Rapid chargers work well but IME they do not charge quick enough in time to replaced a fully discharged battery. When needed for quick “turn-around”. I forget exactly how long my impact driver will run on a big battery driving 3 inch nails into oak, 15-20 minutes+±. The Milwaukee extended batteries take about an hour to charge. So without the extra batteries and chargers there is a lot of wasted time waiting around for a battery to charge.
When using screws do not use Deck Mate. These work great for a lot of projects. But they are designed for holding deck boards. Which are laid flat and walked on. Deck Mate screws do not have near the “shear” strength of framing nails. In other words to withstand large down forces that a horse will put on vertical fence boards. I have used them when replacing the odd boards. Horses have broken the broken screws. Granted this only happens with the odd sections. With a cost of about $60 per 5 lb box that has around 75 screws. 23 boxes @ $60 per $1,380. Verses around $70 for 2500 Paslode nails. The extra time and serious cost of screwing IMO does not justify using them. To each their own on this.
When using screws for anything that will be subjected to heavy forces, esp “live” forces. Use the brass colored star drive construction screws. Unlike deckmate screws they are designed/engineered for general construction. IMO for the majority of “screw” jobs pay the extra money for star drives. FAR superior to philip (+) drive.
Tom gave good advise but I did not always agree with how he went about things. One thing he used is 4X4 post in a thread I read after the one your linked to. IME 4X4 post are easily broken by horses. They also have much less of a nailing face/area. The standard 16’ oak rough sawn fence board I have used my entire life are always cut a an 1-2" longer by the mill. Laying out, spacing posts is tricky even for the very experienced fence builder. Even with 4X6 the standard size used for board fencing. They give 5 1/2 inches of nailing face. Sound like a lot but if the posts start to drift apart by just a little that adds up 40 posts down the line. Unless you can find a board stretcher there will be sections that you will come up short. IME if using 4X4 posts which only give 3.5 inch of nail face. 1 3/4 inches for each board end. The lay out of the posts has to be much more exact. IME the difference in the costs of the posts, 4x4 verses 4x6 is being penny wise, pound foolish. To each their own on this.
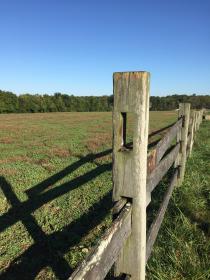
Tom suggested/advised in a post to cut the tops of the posts off at an angle. This allows water to run off and keep the tops from rotting.This was the standard practice back in the day. Before pressure treated posts were widely available. It is not needed on pressure treated posts. When I was building fences as a kid in the 60s they also cut and nailed “caps” to the posts. Time consuming, but looks pretty. I have post that are 15-20 years old. The vast majority showed little to no deterioration on the tops. I pulled the post out of an 5 acre paddock for reuse.Every single one was in great shape. The majority of the oak boards were reusable also.
“Face boards” to cover the nailed ends as suggested. Doesn’t bring a lot to the table as far as keeping the boards tighter to the posts. IME the odd boards will still “pop” from the post over time. The face boards just make it more difficult to see/find them and more difficult to hammer back tight to the post. They also trap moisture behind them and promote the rotting of the board ends. I have taken down enough old school fencing to see the difference.
But caps and face board do to make for a very good looking finish touch. But IME it does not justify the added time, expense and maintenance issues.
When laying out the post. Use a 300-400 foot reel tape. Not that expensive, $20-$40. Plenty of other uses for around a farm, big or small. Set the first post attach the tape, extend out and pull tight. attaching to a stake. Walk down the line and mark the 8’ spacing with a dot of survey marking florescent colored spay paint. Not big deal if you spray the tape also. All corners should be rounded, don’t have the time to explain the process. Full 16 ft boards should be used on the rounded corners. Tricky to pull tight to the posts. I use my tractor. But worth the effort. People, even fencing contractors “cheat” the bend by only using 8 ft boards. Must easier to install but they have ALWAYS become a maintenance issue with fences built this way.
A straight and true fence line that will stand the test of time comes down to installation expertise, effort and quality of materials used. Post set in holes have to be tamped tight. This is VERY labor intensive. Some people like to pour cement in each hole. Which adds a lot of expense and time, even when only fencing in a couple of acres. If you do use cement and live in an area that gets rain. Just pour the bag in and let nature do the rest.
By far the best way to have post installed and stand the test of time . Is to have them pounded. Adds expense but IMO and experience worth every penny. But not always an option depending on location and budget. IME the next best method if one has a decent size tractor with a bucket/FEL. Use a 6 inch auger to install 4x6 posts. The 6 inch auger leaves a hole that is a bit smaller than the posts. The post usually will not “drop” into the hole. One person can get it started a few inches, hold a post level to it that checks for “plumb” on both sides. The person in the tractor takes the bucket and pushed/drives the posts into the hole. The posts end up pretty darn tight with just enough wiggle room to adjust for plumb. With very little back fill and tamping required.
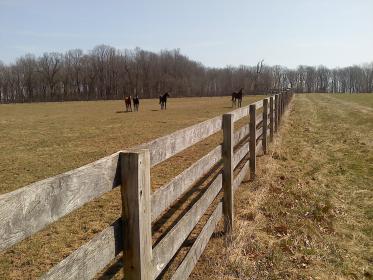
This is a picture I have posted from time to time of a 15+ year old 4 board oak on 4x6 pressure treated posts that were pounded. Speaks for itself.
[ATTACH=JSON]{“data-align”:“none”,“data-size”:“full”,“data-attachmentid”:10252691}[/ATTACH]
4 Likes
Even though I recommended the Paslode gas nailer. I have not used it to put up a lot of fencing, like mile or two. The framing nails it uses are building code approved. For house framing purposes. But they are lighter gauge and have smaller heads than the standard ring shank 16 penny nails that can be used in my pneumatic nailer. Which for fencing requires a trailer, a big enough generator to power a decent size compressor. I have a 25 gallon compressor on wheels with high output, good size air reserve and quick refill. But it my 8000 watt generator struggles at times to power it. Both are over 15 years old so newer ones maybe more efficient.
I have used to the Paslode to fix the odd fence boards. Don’t know how well the nails it uses will stand the test of time on an entire fence line. Maybe others that have done their fence with it will chime in and give a review.
A pneumatic set up can be rented also.
1 Like
Good to know about the Deckmate screws - I’ve used both types you mentioned but didn’t appreciate the difference.
When did the formula for PT lumber change? We have pole-construction run-in sheds built in the mid- to late '80s with PT 4x4s as the poles and after a good 30 years of northern New England weather all the PT wood is still holding up. But that’s the old CCA formula - I’ve heard that the new stuff isn’t as long-lived. What is the experience of people here?
The newer pressure treated stuff is not as good / doesn’t last as long. (Part of me wonders though, if part of the problem isn’t the trees… different kind specialized to grow faster to be harvested younger, and the wood is just softer? I don’t know.)
I have a quote for a pressure treated split rail fence across the front of my property. The posts have a “lifetime guarantee”. The guy explained that this means when they rot, the company will replace them (but I still have to pay for the labor to install them.)
One option, for corner posts at least, is to find out where your local phone or power company buys their poles. Contact that place and ask to buy the tops that they cut off. (The ones we got are 10’ long.) Since those aren’t for residential construction, they still get to use CCA. If you’re in the southeast, there is Ace Pole Company http://acepole.com/aboutus/ .
1 Like
I had my fencing guys put in 2 nails and one screw for each board on each post. This allowed them to move along quickly nailing. I’m hoping this will keep the boards tight to the post.
I also used treated poplar boards. I’m hoping they were a good choice. Quality oak boards are becoming harder to find. Lots of folks around me have been using treated rough cut pine boards. The poplar boards are harder than pine, but can be treated, so hopefully last longer than oak. Fingers crossed.
In 2003 “the U.S. wood treatment industry stopped treating residential lumber with arsenic and chromium (chromated copper arsenate, or CCA)”
“Industrial wood” was still allowed to use CCA but with a lot of restrictions. These restrictions from I understand vary by state. From what I was told used phone/power poles in some, a lot of states are not allowed to be sold/given to the general public.
Creosote was widely used for decades esp for fencing. But like CCA only worst because it leached easily,quickly and deeply in to the ground, contaminating ground water. It has been banded in just about every state in the country. About 10+ years ago my brother in-law got a good deal on creosoted fence post and boards in I think South Carolina, someplace in the south. Having a CDL license and a “tractor-trailer” rig to haul his show horses south for the winter. He rented a flat bed and hauled back a huge amount of fencing. He soon found out the savings he got on the fence material. Was lost when he tried to find a contractor to install it. Most said no. The one he did find charged a bundle. Because it easily rubs off and burns your skin. I know I was a kid when it was being used, lol.
Not long after after all the fencing was installed he got a knock at his door by someone from the Maryland EPA. Telling him he had to remove all of it by a certain date. If it wasn’t removed he would be fined X amount per day until it was.
So not only did he have to pay to have it removed he also had to pay to have it disposed of. He learned a big expensive lesson. I bring it up from time to time just to annoy him, lol. Cheap, sob.
I don’t like using round post for board fencing. The nailing “face” in VERY limited. Because there is limited to no flat surface to nail to which holds the board securely. IME boards nailed to a round post tend to warp easily and in numbers. I would only use half rounds. Plus half rounds, faced round posts have a lot more more “wiggle room” as explained my previous post when laying out/spacing. Board fencing doesn’t need “reinforced” corners like stretched wire and stretched “plastic” rails need. Over kill using big corner posts IMO and experience.Nice to use for heavy gates. .
I have used and worked with split rail. Very popular in the mid-Atlantic since I was a kid. Good looking and does the job for older well mannered horses. Wouldn’t use it for young horses. In fields, paddocks that hold a lot of horses without a hot wire, top and maybe middle depending on things. The “weak ling” is the ends what slip into posts. They are thin and easily broken. The ends of untreated rails rot MUCH quicker than oak boards. Anyone that has hopped over an old split rail fence knows what I am talking about. But the rails are generally a lot easier to replace then broken board fencing. But there is a trick to it and can require a heavy mallet, “mini mall”.
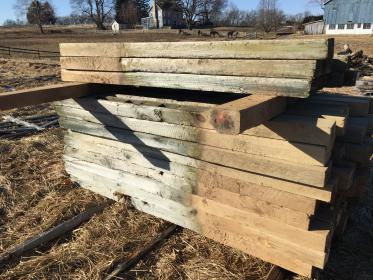
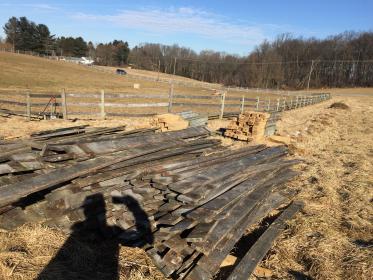
As to the longevity of the new pressure treating process. I suppose it comes down the processor. Just about all pine used for post comes from the fast growth pine forest of the coastal south. This is a picture of 15+ year old posts that I pulled from a fence line to reuse.These were installed in 2005, 2 years after the “new” process was made into law. Everyone is is perfectly good shape to reused. The majority of the oak boards pictured also. The best posts if they can be had are made of locust. They get stronger and harder with age and there is no preservative needed. Honey locust not black locust.
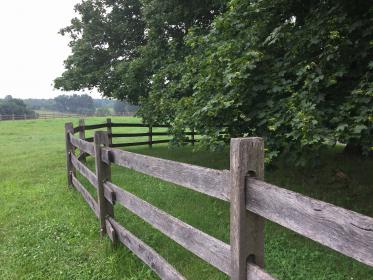
My favorite fence ( second and third from the bottom picture) is called slip board oak. Same design/installation as split rail but far better/stronger and easier to install and or replace a broken rail/board. Plus the boards will flex and “slip” in the notched posts. If leaned on and or run into. Because they boards are free to move, expand and contract due to weather conditions. It is rare to have a board warp. [ATTACH=JSON]{“alt”:“Click image for larger version Name: IMG_1849.JPG Views: 2 Size: 28.3 KB ID: 10252917”,“data-align”:“none”,“data-attachmentid”:“10252917”,“data-size”:“full”}[/ATTACH]
[ATTACH=JSON]{“alt”:“Click image for larger version Name: IMG_1848.JPG Views: 2 Size: 27.0 KB ID: 10252918”,“data-align”:“none”,“data-attachmentid”:“10252918”,“data-size”:“full”}[/ATTACH]
Slip board oak fence [ATTACH=JSON]{“alt”:“Click image for larger version Name: IMG_0364.JPG Views: 2 Size: 25.2 KB ID: 10252919”,“data-align”:“none”,“data-attachmentid”:“10252919”,“data-size”:“full”}[/ATTACH]
[ATTACH=JSON]{“alt”:“Click image for larger version Name: IMG_1014.JPG Views: 2 Size: 13.0 KB ID: 10252920”,“data-align”:“none”,“data-attachmentid”:“10252920”,“data-size”:“full”}[/ATTACH]
This is why I don’t use Hemlock boards, Besides having a high splinter in the hands factor, It’s candy to most horses. These boards are only a few months old. Compared to the oak boards that are going on 15 years. I was forced to use hemlock when replacing a short section and my supplier ran out of 10 ft oak slip boards for the season. Thank god it was only a short section. I ended up replacing the two top rails by the end of the year. Used the chewed up ones for firewood.
[ATTACH=JSON]{“alt”:“Click image for larger version Name: April 2014 038.JPG Views: 1 Size: 16.1 KB ID: 10252921”,“data-align”:“none”,“data-attachmentid”:“10252921”,“data-size”:“full”}[/ATTACH]
Whoa. Thanks, all, for the wonderful advice and thoughtful comments here! I appreciate everything, though now I’m processing in information-overload-mode!
@gumtree for the slip-rail fence, if the holes are pre-drilled, how do you get the posts installed to the correct height, especially if the ground isn’t flat, so that it looks nice? You don’t want to follow every bump and hollow on the ground, you want the top rail to have smooth curves.
The way I do it and is pretty much the same way done by everyone that puts up horse fencing. You follow the contour of the land/grade. As you can see on the posts I removed the dirt line is the same on every one. About 36" in the ground. The machine that pounds them has a depth stop that can be set to what the installer wants.
When drilling holes. I mark the auger with at 36+ inches with the bright survey paint I mentioned. I can see the depth gauge from the tractor. So all the holes are pretty uniform. I have a marking stick for 36 inches. After I lay out the posts by each hole I walk down the line and quickly strike a line on each post from the bottom. So when we drop the post in the holes we can eyeball that line with the top of the hole. Kick some dirt in or remove some to get it spot on or close enough. If you get too anal about this it will take twice as long. Close enough is good enough. As the saying goes, we’re not make furniture. The posts are spaced far enough away from each other, 9-10 ft for slip board, 8 ft for nailed, that most people’s eyes aren’t going to be annoyed, pick up on if the post is in inch high or low.
So when looked at from a distance the top rails/boards all the boards “float” with the grade. When encountering an abnormality in the grade, like a harrow depression, drainage, run off area. And unlucky because a post hole falls in the middle. We “cheat” it, instead of the posts being 36" deep it maybe only 24 or even 12-18". So the top board doesn’t take a big dip up and down between a section or two. Play with the depth, step back with a board tacked on and adjust up or down. Post that have to go shallow because of this or because a hole has to be drilled shallow due to rocks. I cement. For slip board posts that have to go shallow on a “normal” grade due to rocks. I cut the bottoms off.
If the gap between the grade and bottom board is too wide/open in that section for the odd problematic horse/s. I will MacGyver a board to spit the difference. If usually looks fine and hopefully it is not in a place that is seen all the time, lol.
I always drill my holes a bit deeper than needed. Dirt always falls back into the hole when pulling the auger out. Easier to kick some dirt back in than to take some out. By hand or with a post hole digger. After kicking loose dirt back in I take the post and tamp it tight so the post won’t sink with time.
To save time and effort is really important not to drill the holes too deep and esp not any wider then needed for the size of the posts. I drill narrow holes so it is important to make sure they are drilled as close to plumb as possible without having to get off the tractor to check. You can MacGyver a plumb gauge on top of the digger. Or have you partner eye ball it once set on the marked hole. Narrow tight holes don’t leave a lot of leeway to adjust for plumb. Using a post level makes short work of things. Post that end up way out of plumb to either side I adjust, pull/push with my tractor bucket.
Like everything, the more you have done the better you become at it, and the tricks that make the job faster and easier. The good horse fencing contractors do it all by eye/feel, Other than the spacing layout.
For nailed board fencing. I have a marking stick for the board spacing. Walk down the line of posts, set it on grade and quickly mark each post where the boards will be nailed. I use a small 12" chain saw for making all cuts. All my top boards are nailed flush with the top of the posts. If a posts is set high, I cut the top flush with the board.
The above is how I and probably how most who do a lot of fencing go about it. Always open to better suggestions.
I have a Stanley Bostitch stick framing nailer. I’ve used it for the spiral nails numerous times. The key to making it work is to boost the air pressure to 100 PSI at the gun. The other thing is to make sure you hold the gun tight against the wood. If it moves up off the board you’ll lose the driving force and in all likelihood shoot a second nail. Having been shot by a nail gun numerous times I can tell you, I definitely don’t recommend it LOL It’s not the one holding the gun that gets shot usually. But I digress, the air nailers will shoot the spiral nails just fine.
1 Like
Exactly, lol
I have a Porter-Cable air framing gun that I have used for years. Kept adjusted and lubed and it never gives me jamming hassles.
I called it the bounce effect. You can end up with nails sitting proud or 1 mostly driven and the other half way. Or one is an possibly painful place. Pulling out a half driven nail is a PITA in oak, painful in flesh. Aluminum nails sitting proud 1++ inches in oak tend to bend when finished off with a hammer.
Years ago a put up a lot of fencing oak boards on oak posts. Using a 28 oz framing hammer and large steel ring shanked. I bowed the tendon in my elbow, “tennis elbow”. Took forever to heal. Not like you can’t use your arm for months. Has been a bit chronic ever since. Thank god for power tools!
When you get your quotes on the cost of the boards, also ask about buying 14’ instead of 16’. 16s carry a huge premium. Using 14’ you will use a few more posts, but often the total cost will be less and your fence will be on 7’ centers rather than 8’ which will make it stronger.
1 Like
Wow! Following for later in life when we’ll need to redo our fencing.
Should’ve seen this before we pounded our posts! Maybe for the next line of fence.