Tips for DIY jumps

Tried to search before posting but I suck at searching, please point me to another thread if you know of one!

For those of you who DIY jumps/filler I have a few questions

  • I am going to make some green turf covered rails. What type of wood protectant or sealer should I put down before I staple the turf on? Any tips for making them long lasting and weather resistant.

  • Any tips for using those fun flower walls (bought on Amazon) and stapling them to wood…. I am on a making some natural jumps craze right now :sweat_smile:

Many thanks for all your tips and tricks!

2 Likes

When I made turf rails for our barn, I painted them with the same primer I used on the regular rails, then stapled the astroturf on top.

We also had some gnarly old pieces of jump standards that I turned into “flower boxes” that got primered and covered in astroturf as well. Works great as groundline/filler that’s a little different.

Please provide a link, I am very curious what fun flower walls from Amazon are.

They sound very fun.

I would paint or stain it with whatever you are using on anything else. Like was mentioned above, primer or such.
If you use pressure treated wood you probably do not have to do anything to it.

1 Like

@trubandloki here is the Amazon link! I have a skinny panel about 6’ wide x 18” high I am going to cover with this! I plan to paint green behind it.

https://a.co/d/5fSNiiL

2 Likes

@JenEM Iove the idea of using old standards or other discards for “flower boxes”!

Oh wow, that is so neat. Please share photos of the finished product.

1 Like

For a floral groundline, (not really a true box, but serves the same look) take treated landscape timbers, the ones that have 2 sides sawn slightly flat. Screw a short 2x4 perpendicular to the timber, near each end to act as “feet.” Drill holes into timber at regular intervals. Insert a “dollar store” flower bouquet into each hole. These are super versatile. You can vary how full or sparce you want the flowers to be or vary the colors to match a theme (such as all one color, red white and blue or fall colors).

The DIY jumps we made when the kids (now grown) were in 4-H are probably 15 years old. It was a really fun project and they are still in good usable shape. Keep you eye open for wood and other material you can repurposed. We got a lot of free decking when a neighbor was replacing their deck with a brick patio. Advantage to that was the wood was all weather resistant so didn’t need a lot of treatment. Checkout Freecycle or Craig’s list in your area.

Seasonal clearance of flowers, garlands, decorative pumpkins, mini Christmas trees, etc at Dollar Store, Michaels, or JoAnns are great sources for cheap, easy, colorful decorations. You can give your horse lots of new “scary” things to look at so that by the time you get to a show they’ve pretty much seen it all and don’t bat an eye.

One very versatile jump we made was a set of 6 stackable boxes. Each box was half the width of a jump. Four of them had wavy red and white line painted on them. The other 2 where blue with white stars. Depending on how you stacked them, the could look like a flag, just a row of blue w/ stars, or red waves. The other side of the boxes were also painted so that you could mix and match stacks to make various designs. Depending on how many boxes you stacked, you could of course also vary the height of the jump.

Planks (2x6s) also offer a lot of variations if you are imaginative. Cut them so that the ends can sit right in your jump cups. Then paint a different design on each side. Voila, 2 jumps for the price of one. We painted everything from seahorses, to piano keys (ya, that varying black and white can get quite a few looks at first) to plain white.

Since most lumber comes in 8 ft lengths we went with that. It’s not the standard show jump width, but it has several advantages:

  1. It’s lighter to move around so you will actually move your course more often
  2. You have to ride more accurately when you school, but at a show the wider jumps will seem so much easier.
  3. Longer poles are a LOT more expensive

Be imaginative, have fun, and good luck

3 Likes

I made a full set a few years back. Here’s my thread:

2 Likes

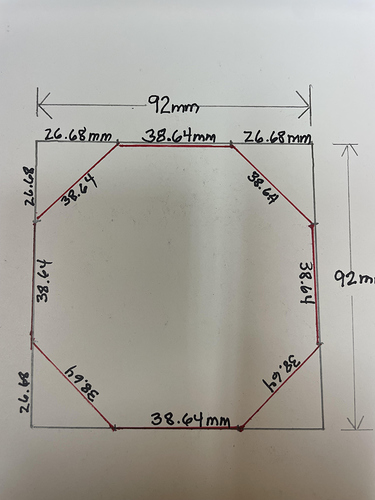
Here is how to make an octagonal rail from a square 4x4. I use pressure treated 4x4x10’s to start. Remember that a 4x4 is not really 4 inches on a side, they are typically 3-1/2 inches. I learned that it is better for me to measure and do my calculations in metric units, instead of trying to use all the 1/16 and 1/32 fractions in the USA measuring system.

So in my drawing below, the lumber I start with is 92mm per side, The idea is to use a circular saw with a blade for cutting wet pressure treated lumber, the cutting angle set at 45 degrees, and to remove four identical isosceles right triangular strips from the corners of the 4x4 (see, that 8th grade geometry class was useful after all).

Tuck away somewhere the constant 0.42. To make an octagon from a square, multiply the side of the square times 0.42. When you are done cutting, each side of the octagon will be that length. In the drawing the rail is 92mm square. So 92mm x 0.42 = 38.64mm, You can then do the math to take equal amounts from each side of the four square rail faces, leaving a 38.64 mm faced octagon. In the 92mm square rail example this number is 26.68mm.

A 45 degree cut down each side of the square rail along a line measured in 26.68mm from each edge will leave you with an octagon-shaped jumping rail. I just set the fence on the circular saw to run down each side of the square rail. and make four long cuts. Once the saw is set up correctly you can zip through the task pretty quickly. In my case, because I make a lot of rails from 4x4 lumber, I have a dedicated circular saw just for that jump rail production part of my jump building. I just leave it always set up with the 45 degree angle and the 26.68mm width, ready to go.


Imagine the saw’s fence following the top left side of the illustrated 4x4 and the saw moving towards you out of your computer screen, The triangle being cut off is the upper right corner of the 4x4. Then roll the 4.4 over 90 degrees and make the next cut, etc.

And if you have a few extra people just standing around watching, you could get them organized into something like this.
peoplejump

1 Like